<?xml version="1.0" encoding="utf-8"?><feed xmlns="http://www.w3.org/2005/Atom" ><generator uri="https://jekyllrb.com/" version="4.3.4">Jekyll</generator><link href="/biz/marketing/website/feed.xml" rel="self" type="application/atom+xml" /><link href="/" rel="alternate" type="text/html" /><updated>2025-06-19T02:10:28+02:00</updated><id>/biz/marketing/website/feed.xml</id><title type="html">cprima.net</title><subtitle>A sysadmin&apos;s notepad, a publishing hub and more.</subtitle><author><name>Christian Prior-Mamulyan</name></author><entry><title type="html">Diagnosing Dual Monitor Display Issues: EDID, Bandwidth, and the Hidden Bottlenecks</title><link href="/tec/log/homeoffice/2025/04/18/fixing-4k-display-kvm-issues.html" rel="alternate" type="text/html" title="Diagnosing Dual Monitor Display Issues: EDID, Bandwidth, and the Hidden Bottlenecks" /><published>2025-04-18T00:00:00+02:00</published><updated>2025-04-18T00:00:00+02:00</updated><id>/tec/log/homeoffice/2025/04/18/fixing-4k-display-kvm-issues</id><content type="html" xml:base="/tec/log/homeoffice/2025/04/18/fixing-4k-display-kvm-issues.html"><![CDATA[<h1 id="what-a-kvm-taught-me-about-monitor-wake-up-timing-edid-delays-and-hdmi-source-detection">What a KVM Taught Me About Monitor Wake-Up Timing, EDID Delays, and HDMI Source Detection</h1>

<h2 id="0-tldr">0. TL;DR</h2>

<p>In my TESmart HKS402 KVM-based home setup, a newly added 4K monitor began falling back to 1080p @ 60 Hz after a few days, giving me headaches on my daily driver: an Intel NUC with a relatively modest internal GPU.</p>

<p>The most surprising discovery was how critical timing becomes in what appears to be a straightforward dual-monitor setup. The interaction between KVM behavior, monitor firmware, GPU detection logic, and OS configuration created a fragile system that only behaved consistently when precisely tuned.</p>

<p>It turns out that signal order, wake-up timing, and handshake behavior matter just as much as raw hardware capabilities. When both monitors are connected through the KVM, the secondary FullHD monitor often responds faster to HDMI probes, causing the system to prioritize it at boot.</p>

<p>This timing discrepancy explains the observed fallback behavior: the GPU allocates bandwidth for the first detected display, potentially leaving insufficient headroom for the main 4k monitor to initialize at its native 4K resolution.</p>

<p>Here the key steps I took to resolve the issue:</p>

<ul>
  <li>Set the main 4k monitor (a PA279CRV) to a fixed HDMI input (e.g. HDMI2)</li>
  <li>Set the secondary FullHD monitor (a PA248CRV) in source auto-select mode: This introduced a natural delay in EDID response, helping prioritize the primary display during the handshake process.</li>
  <li>Apply the desired refresh rate manually in Windows settings. Took me some attempts to reset the settings, e.g. deleting the EDID with CRU.exe, and powercycling every device and making direct cable connections with the NUC to get a “fresh” EDID readout, only to indroduce the KVM back into the setup later.</li>
</ul>

<h2 id="1-intro--the-setup-that-should-have-worked">1. Intro – The Setup That Should Have Worked</h2>

<!-- - NUC system with dual HDMI outputs
- Two ASUS monitors: PA279CRV (4K) and PA248CRV (FHD, portrait)
- KVM switch (HKS402) for HDMI and USB sharing
- Goal: Consistent dual-monitor boot with primary display at 4K 30Hz to conserve bandwidth -->

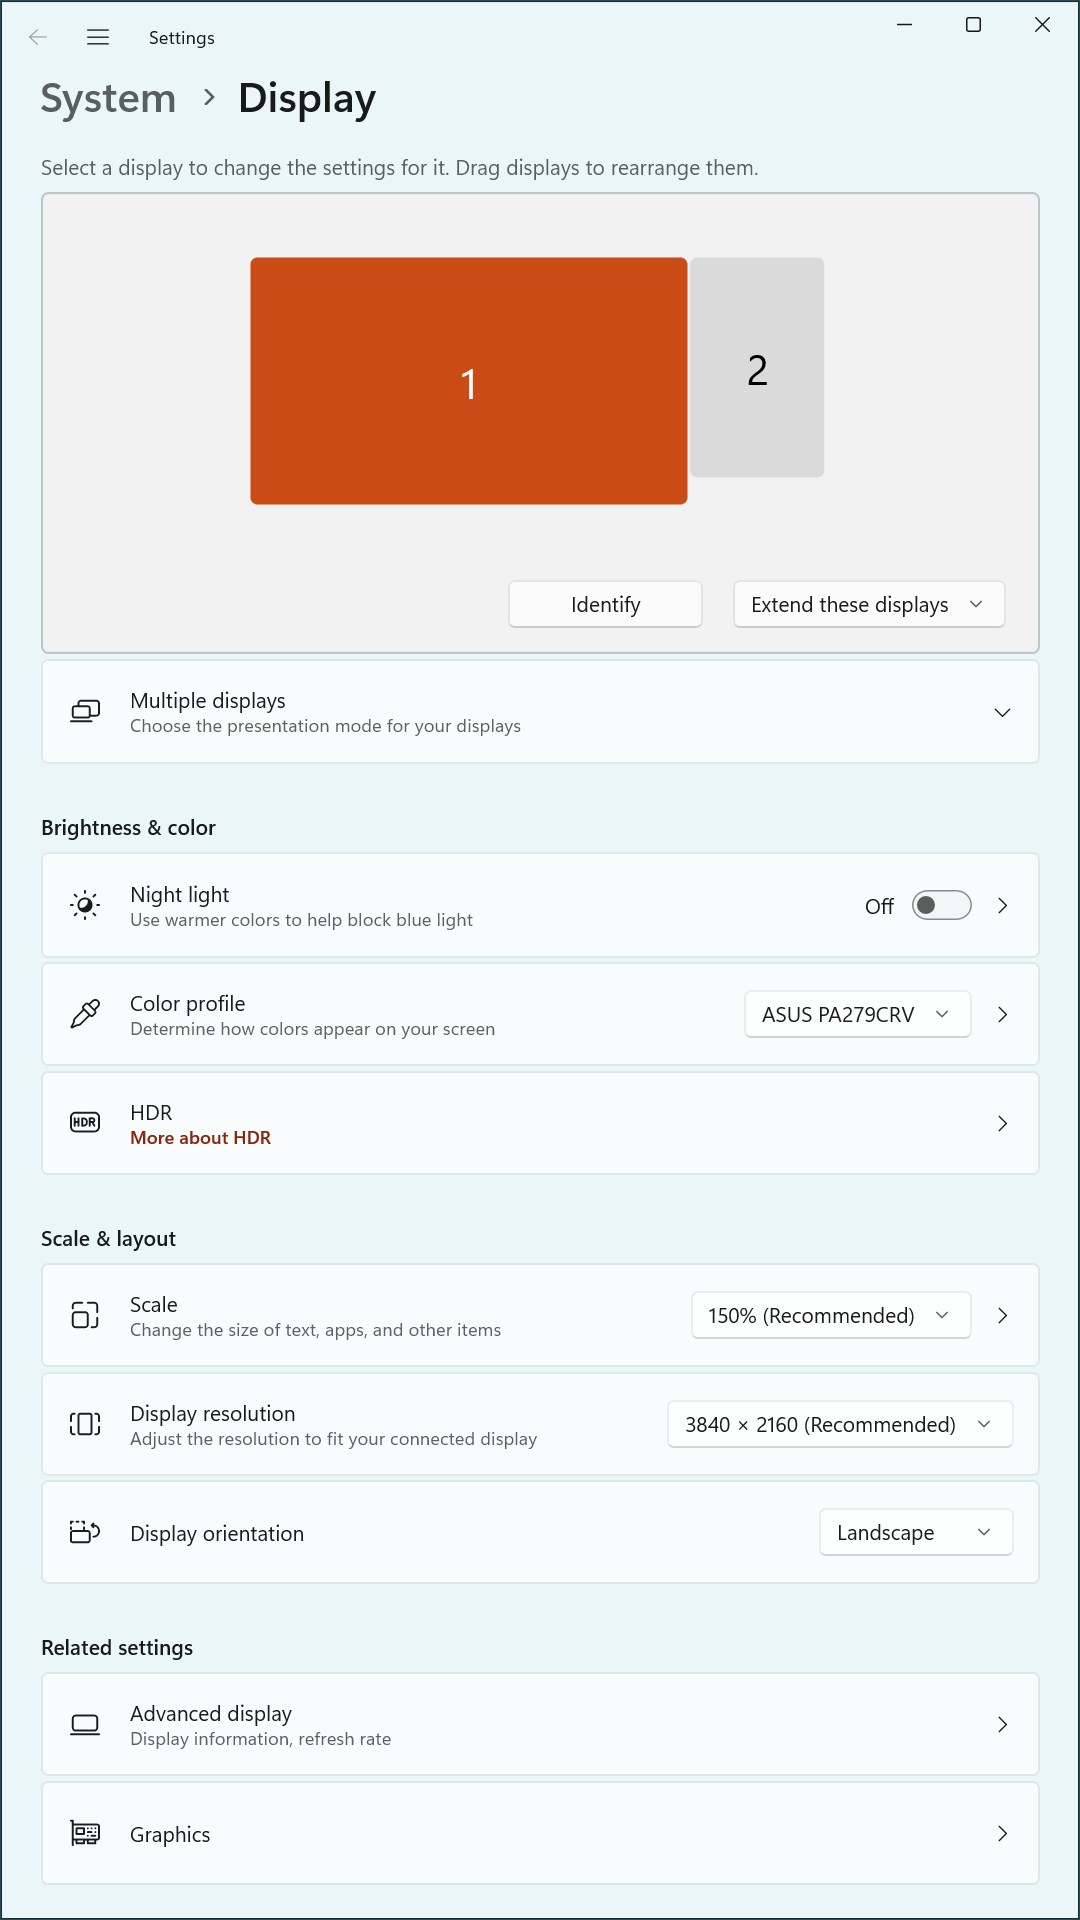
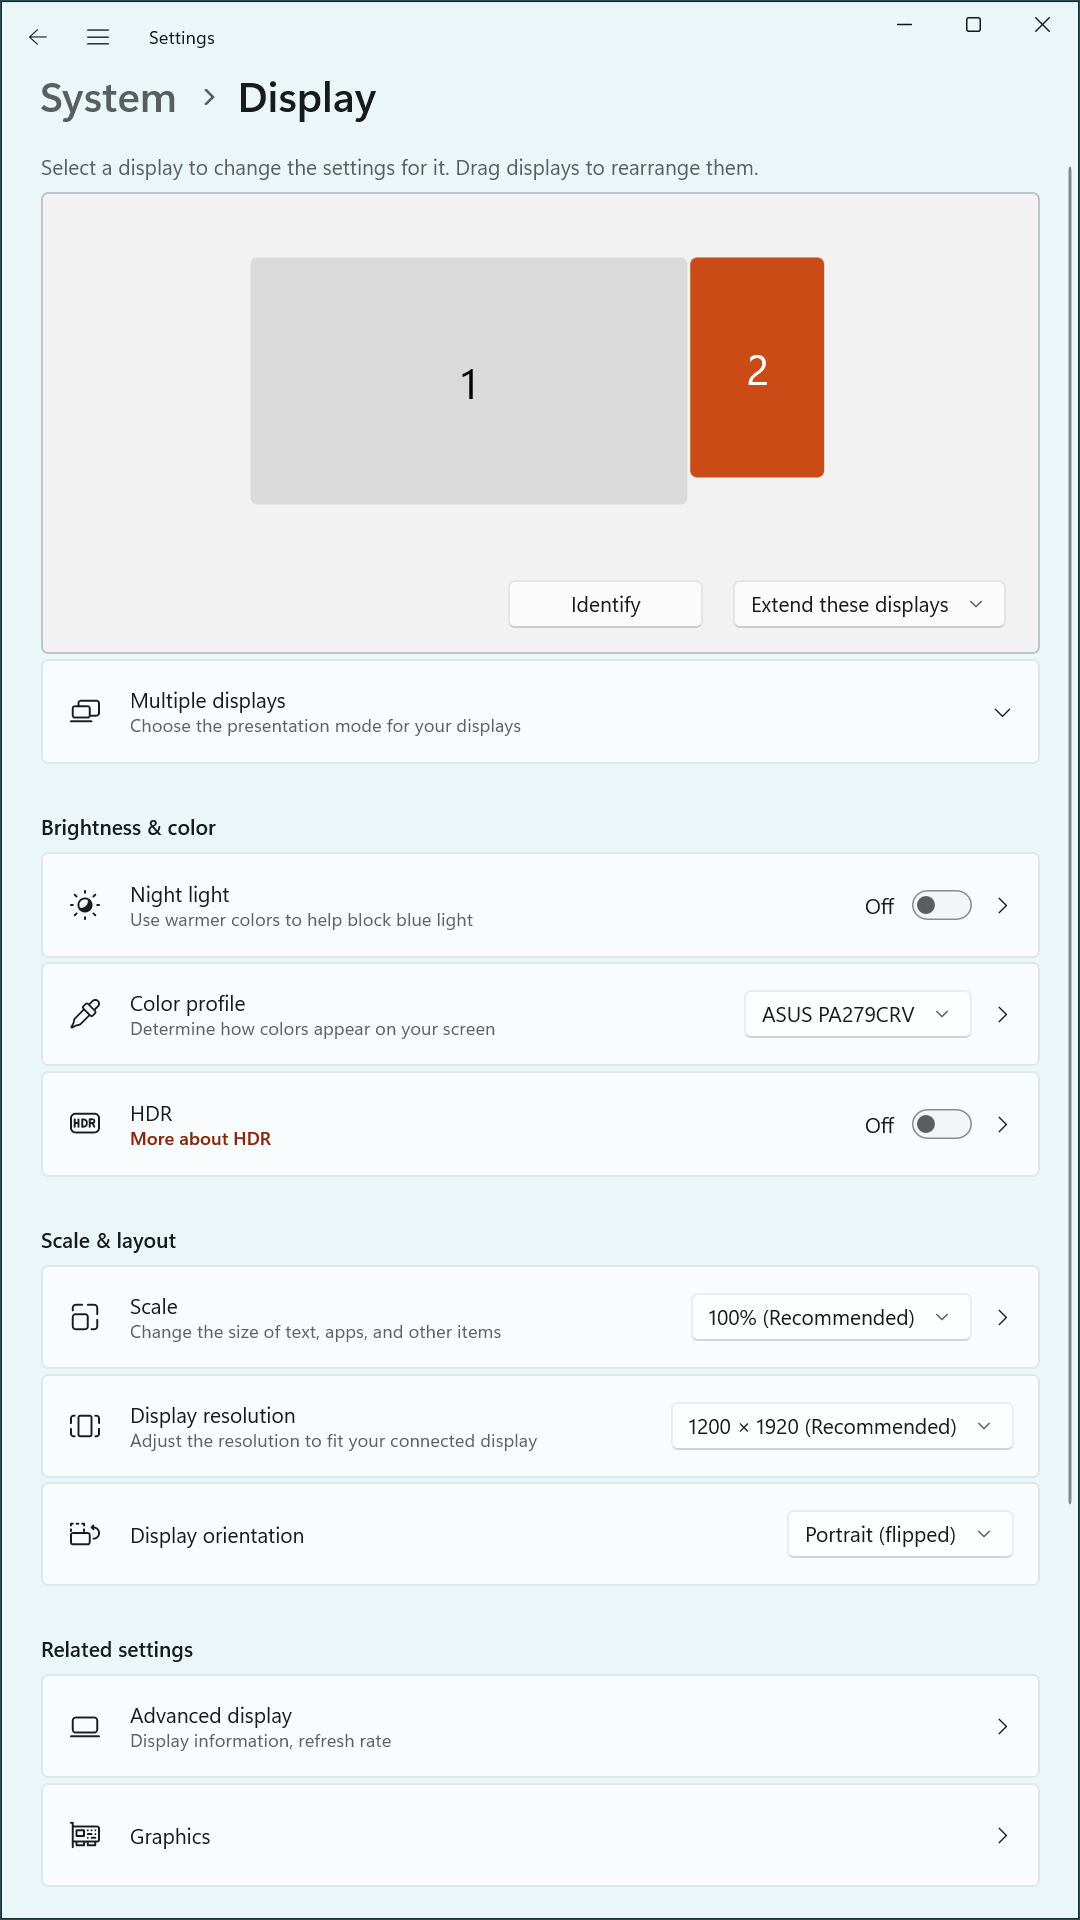
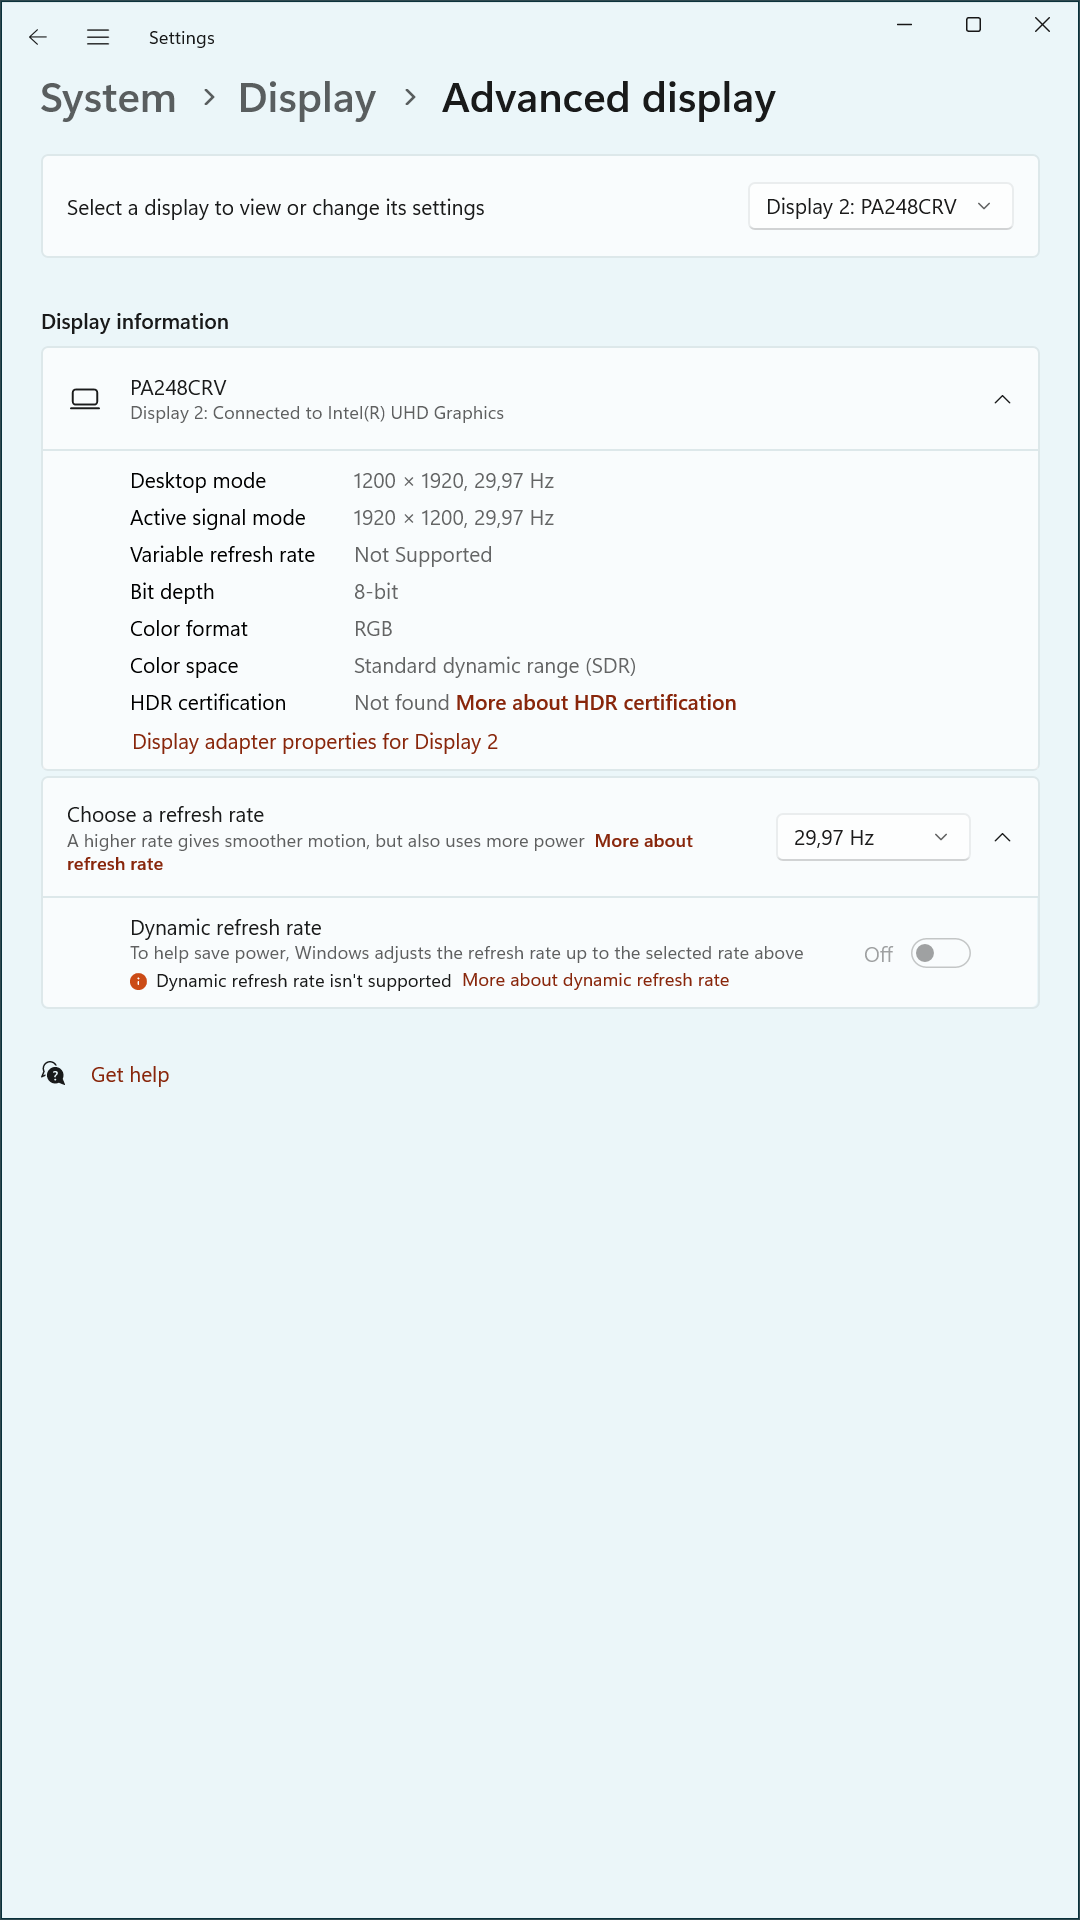
<p>The test environment consisted of an Intel NUC system equipped with dual HDMI outputs, connected to two ASUS monitors via an HKS402 HDMI/USB KVM switch. The primary monitor, an ASUS PA279CRV, supports 4K resolution and was intended to operate in landscape mode. The secondary monitor, an ASUS PA248CRV, supports a native resolution of 1920×1200 and was configured in portrait orientation.</p>

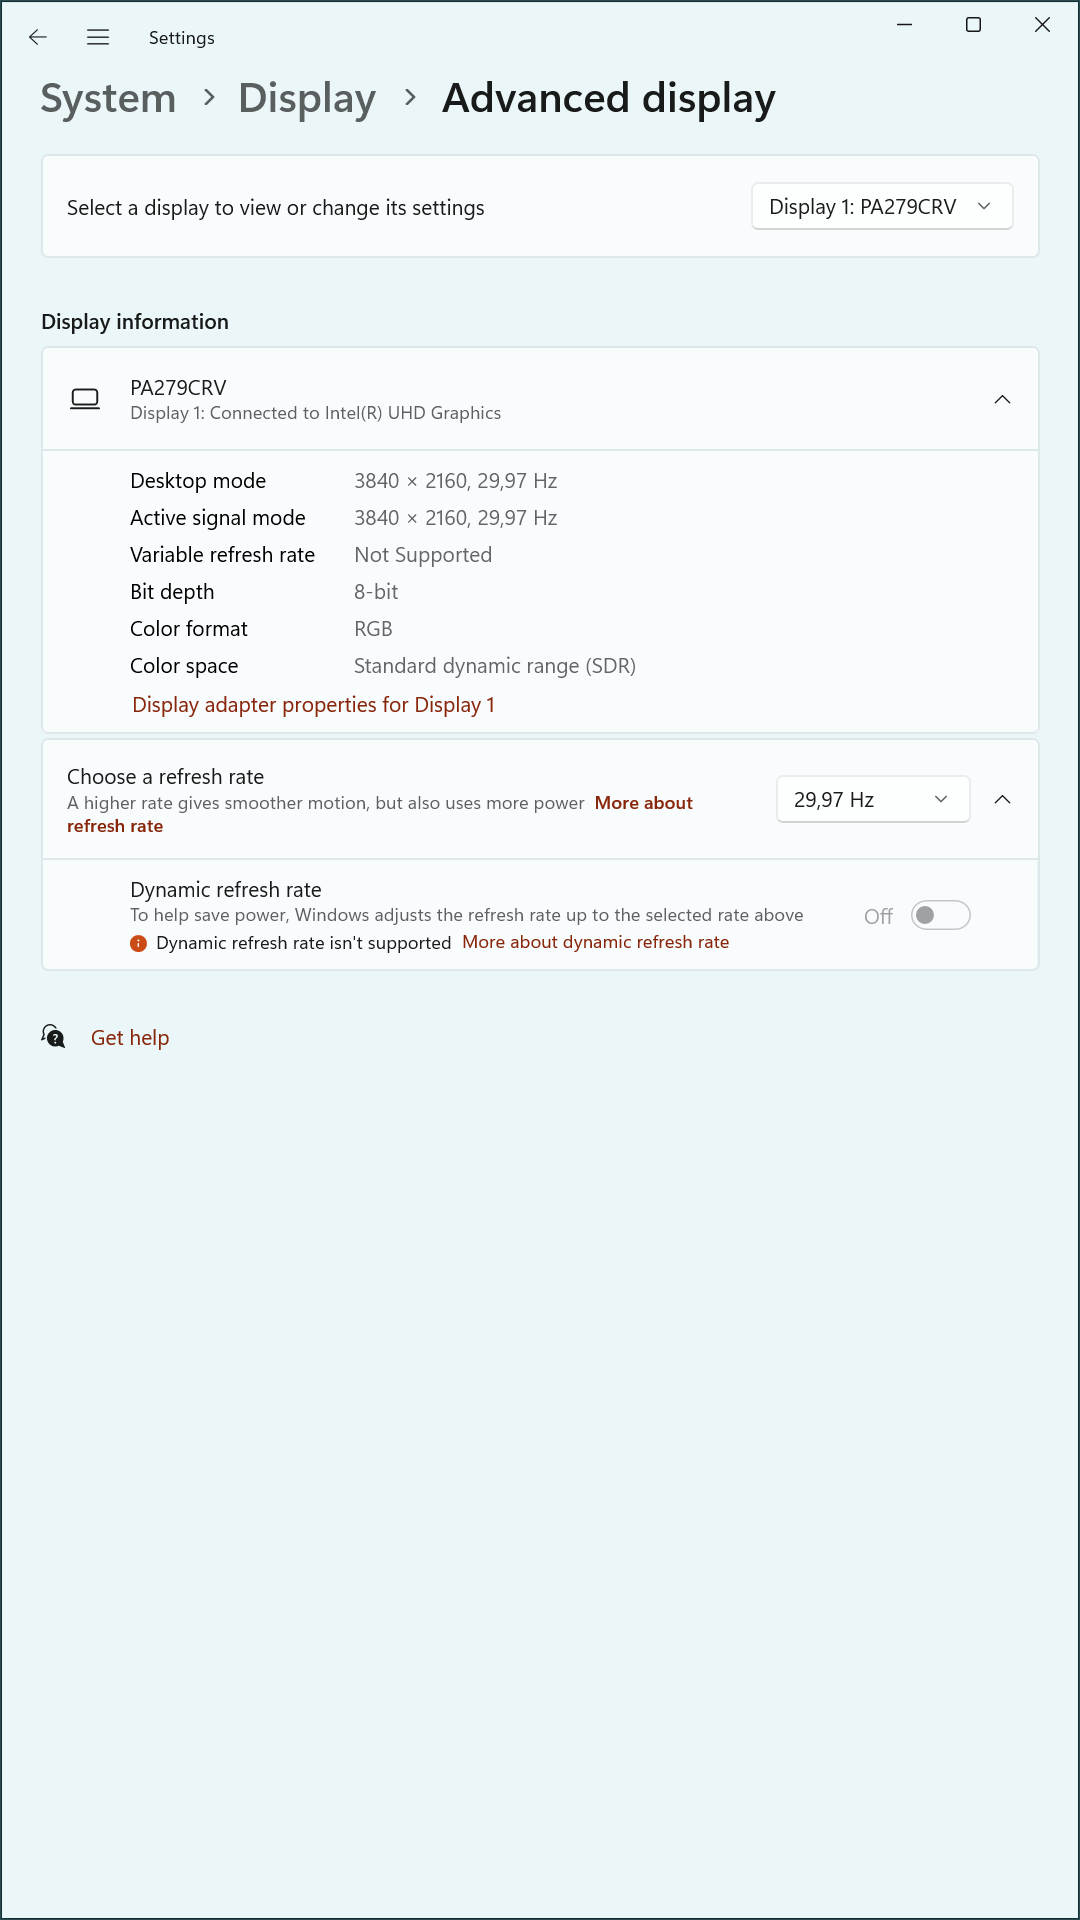
<p>The objective was to establish a stable dual-monitor configuration where the PA279CRV consistently initialized as the primary display at 3840×2160 resolution, preferably running at 29.97 Hz to remain within the HDMI 2.0 bandwidth constraints imposed by the NUC’s integrated graphics. The KVM was used to facilitate seamless input and peripheral sharing between systems, without sacrificing display quality or configuration stability.</p>

<!-- ![Initial display layout showing PA279CRV as primary monitor in landscape orientation.](../../../../tec/phy/ASUS/resources/images/display-settings__windows__001__layout-dual-monitors-first__en__900x1600.png) -->

<p><img src="/tec/phy/ASUS/resources/images/display-settings__windows__001__layout-dual-monitors-first__en__900x1600.png" alt="Initial display layout showing PA279CRV as primary monitor in landscape orientation." class="resize" /></p>

<!-- ![Advanced display settings for PA279CRV set to 3840×2160 @ 29.97 Hz.](../../../../tec/phy/ASUS/resources/images/display-settings__windows__002__layout-dual-monitors-first-Advanced-Settings-Refresh-Rate__en__900x1600.png) -->

<p><img src="/tec/phy/ASUS/resources/images/display-settings__windows__002__layout-dual-monitors-first-Advanced-Settings-Refresh-Rate__en__900x1600.png" alt="Advanced display settings for PA279CRV set to 3840×2160 @ 29.97 Hz." class="resize" /></p>

<!-- ![Windows display layout showing PA248CRV (secondary monitor) in portrait orientation.](../../../../tec/phy/ASUS/resources/images/display-settings__windows__003__layout-dual-monitors-second__en__900x1600.png)-->

<p><img src="/tec/phy/ASUS/resources/images/display-settings__windows__003__layout-dual-monitors-second__en__900x1600.png" alt="Windows display layout showing PA248CRV (secondary monitor) in portrait orientation." class="resize" /></p>

<h2 id="2-the-mystery--wake-up-timing-and-display-downgrades">2. The Mystery – Wake-Up Timing and Display Downgrades</h2>

<!-- - Inconsistent results across reboots
- Sometimes PA279CRV (main) booted at 1920x1080 @ 60Hz
- CRU rules were ignored
- Display order swapped unexpectedly -->

<p>During initial testing, the dual-monitor setup produced inconsistent results across system reboots. In several cases, the primary monitor, PA279CRV, failed to initialize at the expected 3840×2160 resolution and instead defaulted to 1920×1080 at 60 Hz. These incidents occurred despite Custom Resolution Utility (CRU) being configured to prioritize a 29.97 Hz refresh rate for bandwidth conservation.</p>

<p>In addition to resolution downgrades, the display ordering within Windows occasionally shifted, with the secondary monitor PA248CRV appearing as the primary display. These irregularities suggested that either the operating system or the integrated GPU was responding to timing variations in monitor availability or EDID detection, rather than honoring CRU-defined preferences.</p>

<p>Attempts to resolve the issue through static configuration alone proved unreliable, prompting a more detailed investigation into timing, cabling, and monitor response behavior.</p>

<!-- ![Advanced display settings for PA248CRV confirming 29.97 Hz refresh rate and 1920×1200 signal resolution.](../../../../tec/phy/ASUS/resources/images/display-settings__windows__004__layout-dual-monitors-second-Advanced-Settings-Refresh-Rate__en__900x1600.png) -->

<p><img src="/tec/phy/ASUS/resources/images/display-settings__windows__004__layout-dual-monitors-second-Advanced-Settings-Refresh-Rate__en__900x1600.png" alt="Advanced display settings for PA248CRV confirming 29.97 Hz refresh rate and 1920×1200 signal resolution." class="resize" /></p>

<!-- ![CRU configuration for the PA279CRV monitor showing two detailed resolutions: 3840×2160 at 29.97 Hz and 60 Hz. These were prioritized to manage HDMI 2.0 bandwidth constraints.](../../../../tec/phy/ASUS/resources/images/cru-main__cru__005__pa279crv-detailed-res__en__774x815.png) -->

<p><img src="/tec/phy/ASUS/resources/images/display-settings__windows__003__layout-dual-monitors-second__en__900x1600.png" alt="CRU configuration for the PA279CRV monitor showing two detailed resolutions: 3840×2160 at 29.97 Hz and 60 Hz. These were prioritized to manage HDMI 2.0 bandwidth constraints." class="resize" /></p>

<h2 id="3-the-investigation--reproducing-ruling-out-rewiring">3. The Investigation – Reproducing, Ruling Out, Rewiring</h2>

<!-- - Used Custom Resolution Utility (CRU) to enforce 29.97 Hz on 4K
- Verified EDID extension blocks and detailed resolutions
- Removed secondary display from setup to simplify
- Booted with direct HDMI cables, then through KVM
- Adjusted BIOS video port priority, verified fast boot settings
- Explored monitor OSD settings: fixed HDMI source vs. auto-detect -->

<p>The troubleshooting process involved a systematic series of tests to isolate variables influencing the inconsistent display behavior. A number of assumptions were evaluated, and multiple configurations were trialed to pinpoint the source of the issue.</p>

<p>Initial steps included enforcing a 29.97 Hz refresh rate at 3840×2160 using Custom Resolution Utility (CRU) and validating that only the desired detailed resolutions and extension blocks were defined. Despite these measures, the system occasionally reverted to a lower resolution during boot.</p>

<p>A simplified test setup was created by removing the secondary display and observing behavior with only the PA279CRV connected directly via HDMI. In this state, the expected resolution and refresh rate consistently applied, suggesting interference only occurred in the dual-monitor configuration or through the KVM.</p>

<p>Several key paths were explored:</p>

<ul>
  <li>Rebooting with direct cables versus routing through the KVM</li>
  <li>Testing multiple HDMI cables and ports to eliminate signal quality issues</li>
  <li>Power-cycling the KVM and displays to reset potential EDID memory states</li>
  <li>Switching BIOS primary display from DisplayPort to HDMI</li>
  <li>Verifying that fast boot was disabled to allow proper EDID negotiation during POST</li>
  <li>Locking the input on PA279CRV to HDMI2 while allowing PA248CRV to remain in source auto-select mode</li>
</ul>

<p>Some approaches proved ineffective. For example:</p>

<ul>
  <li>CRU sort order did not influence the default resolution selected by Windows</li>
  <li>Deleting all 60 Hz entries in CRU did not reliably force 29.97 Hz unless selected manually in the Windows GUI</li>
  <li>BIOS display port priority changes did not prevent fallback behavior when both displays were active</li>
</ul>

<p>Collectively, these steps clarified that resolution fallback and display reordering were linked more to EDID availability timing than to configuration alone, setting the stage for deeper insights into the role of hardware timing and KVM behavior.</p>

<!-- ![CTA-861 extension block for the PA279CRV. Includes the same 29.97 Hz 4K detailed resolution, plus additional HDMI 2.1 capability and video feature metadata.](../../../../tec/phy/ASUS/resources/images/cru-extension__cru__006__pa279crv-cta861-block__en__540x701.png) -->

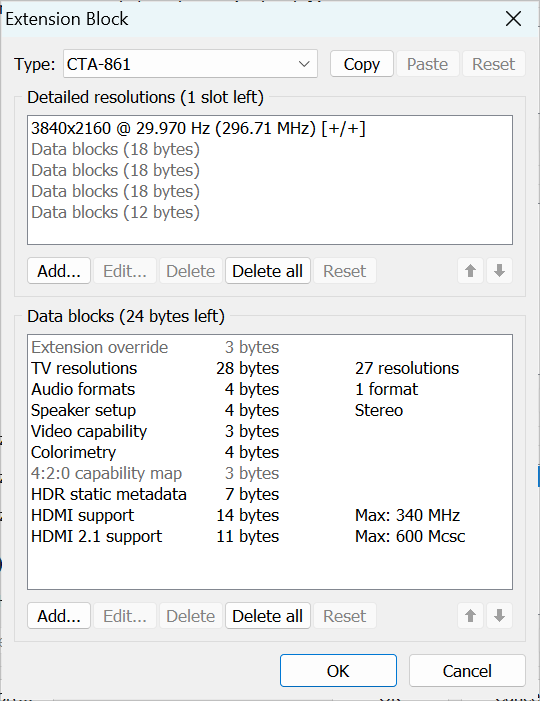
<p><img src="/tec/phy/ASUS/resources/images/cru-extension__cru__006__pa279crv-cta861-block__en__540x701.png" alt="CTA-861 extension block for the PA279CRV. Includes the same 29.97 Hz 4K detailed resolution, plus additional HDMI 2.1 capability and video feature metadata." class="resize" /></p>

<!-- ![CRU configuration for the secondary PA248CRV monitor, with a single detailed resolution of 1920×1200 at 29.97 Hz. No standard resolutions are defined to prevent fallback behavior.](../../../../tec/phy/ASUS/resources/images/cru-main__cru__007__pa248crv-detailed-res__en__871x977.png) -->

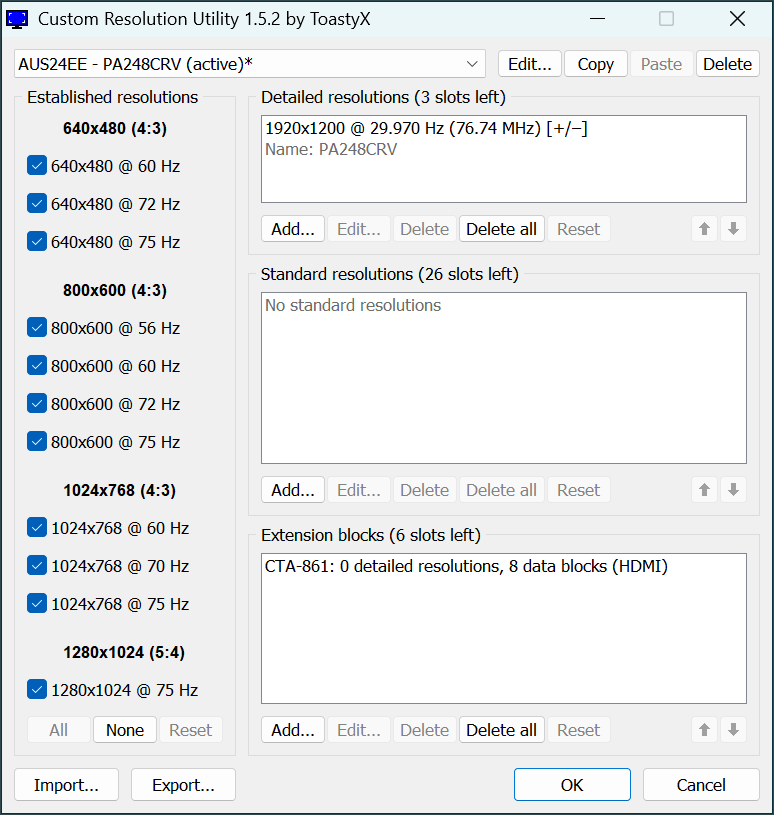
<p><img src="/tec/phy/ASUS/resources/images/cru-main__cru__007__pa248crv-detailed-res__en__871x977.png" alt="CRU configuration for the secondary PA248CRV monitor, with a single detailed resolution of 1920×1200 at 29.97 Hz. No standard resolutions are defined to prevent fallback behavior." class="resize" /></p>

<h2 id="4-findings--what-actually-happens">4. Findings – What Actually Happens</h2>

<!-- - KVM adds delay to EDID handoff
- PA248CRV responds faster to HDMI probe
- Windows occasionally prioritizes faster display during boot
- If display is downgraded at boot, CRU entries might be ignored until manually set
- Once CRU-enforced settings are confirmed in Windows, they persist reliably across reboots -->

<p>Analysis of the testing revealed that the KVM switch introduces a non-negligible delay in EDID signaling, which can interfere with the GPU’s display initialization sequence. When both monitors are connected through the KVM, the PA248CRV often responds faster to HDMI probes, causing the system to prioritize it during boot.</p>

<p>This timing discrepancy explains the observed fallback behavior: the GPU allocates bandwidth for the first detected display, potentially leaving insufficient headroom for the PA279CRV to initialize at its native 4K resolution. As a result, the main display is occasionally downgraded to 1920×1080 at 60 Hz.</p>

<p>Other key findings include:</p>

<ul>
  <li>Windows defaults to the fastest responding monitor if no explicit primary display is remembered.</li>
  <li>CRU-defined modes are only applied if the associated resolution is already selected or confirmed via the Windows display settings GUI.</li>
  <li>Once a custom refresh rate (e.g., 29.97 Hz) is manually applied through the GUI, Windows tends to retain it across reboots—unless EDID detection order shifts again.</li>
  <li>The physical state of the monitors (e.g., powered off, source cycling) significantly impacts which EDIDs are processed first.</li>
  <li>Fixing the PA279CRV input to HDMI2 and allowing PA248CRV to scan inputs helped preserve correct initialization order.</li>
</ul>

<!-- ![Intel Graphics Command Center – General display settings for dual-monitor setup. Primary (PA279CRV) and secondary (PA248CRV) displays shown with flipped orientation applied.](../../../../tec/phy/ASUS/resources/images/graphics-settings__intel__008__pa279crv-Display-General__en__2800x1575.png) -->

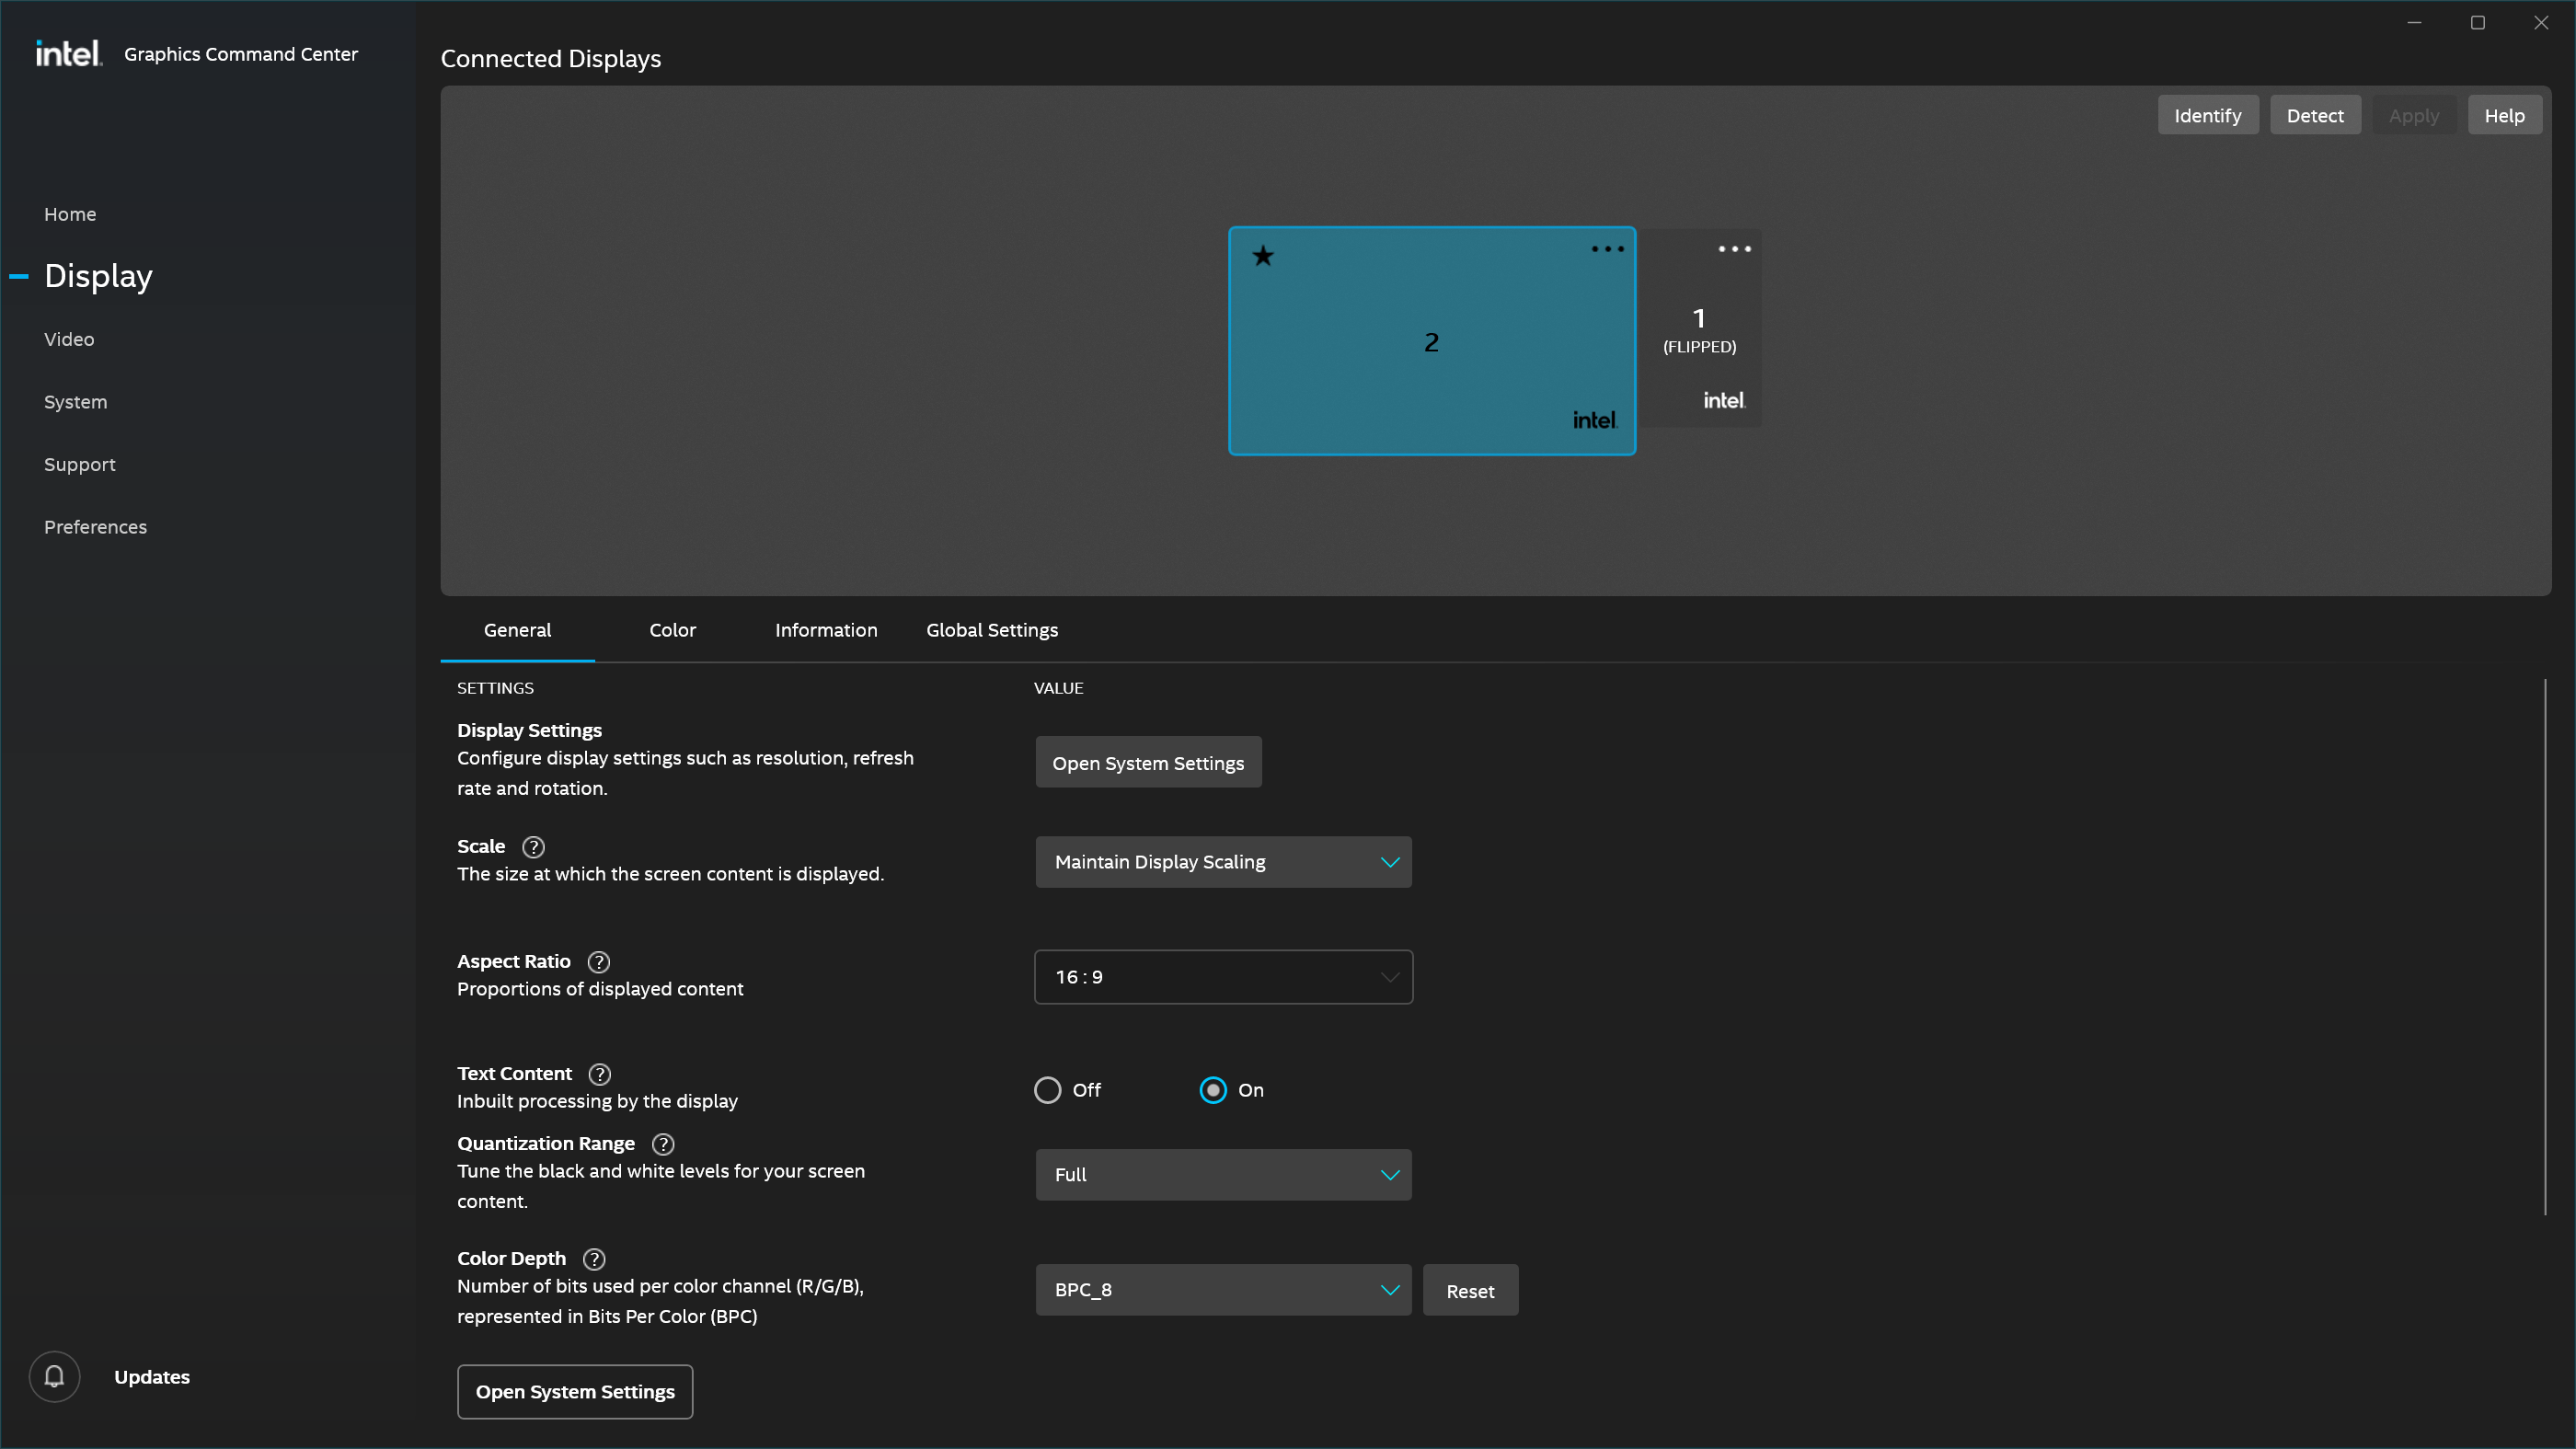
<p><img src="/tec/phy/ASUS/resources/images/graphics-settings__intel__008__pa279crv-Display-General__en__2800x1575.png" alt="Intel Graphics Command Center – General display settings for dual-monitor setup. Primary (PA279CRV) and secondary (PA248CRV) displays shown with flipped orientation applied." class="resize" /></p>

<!-- ![Intel Graphics Command Center – Monitor information confirming EDID data for PA279CRV, including 4K support and HDMI connector identification.](../../../../tec/phy/ASUS/resources/images/graphics-settings__intel__009__pa279crv-Display-Information__en__2800x1575.png) -->

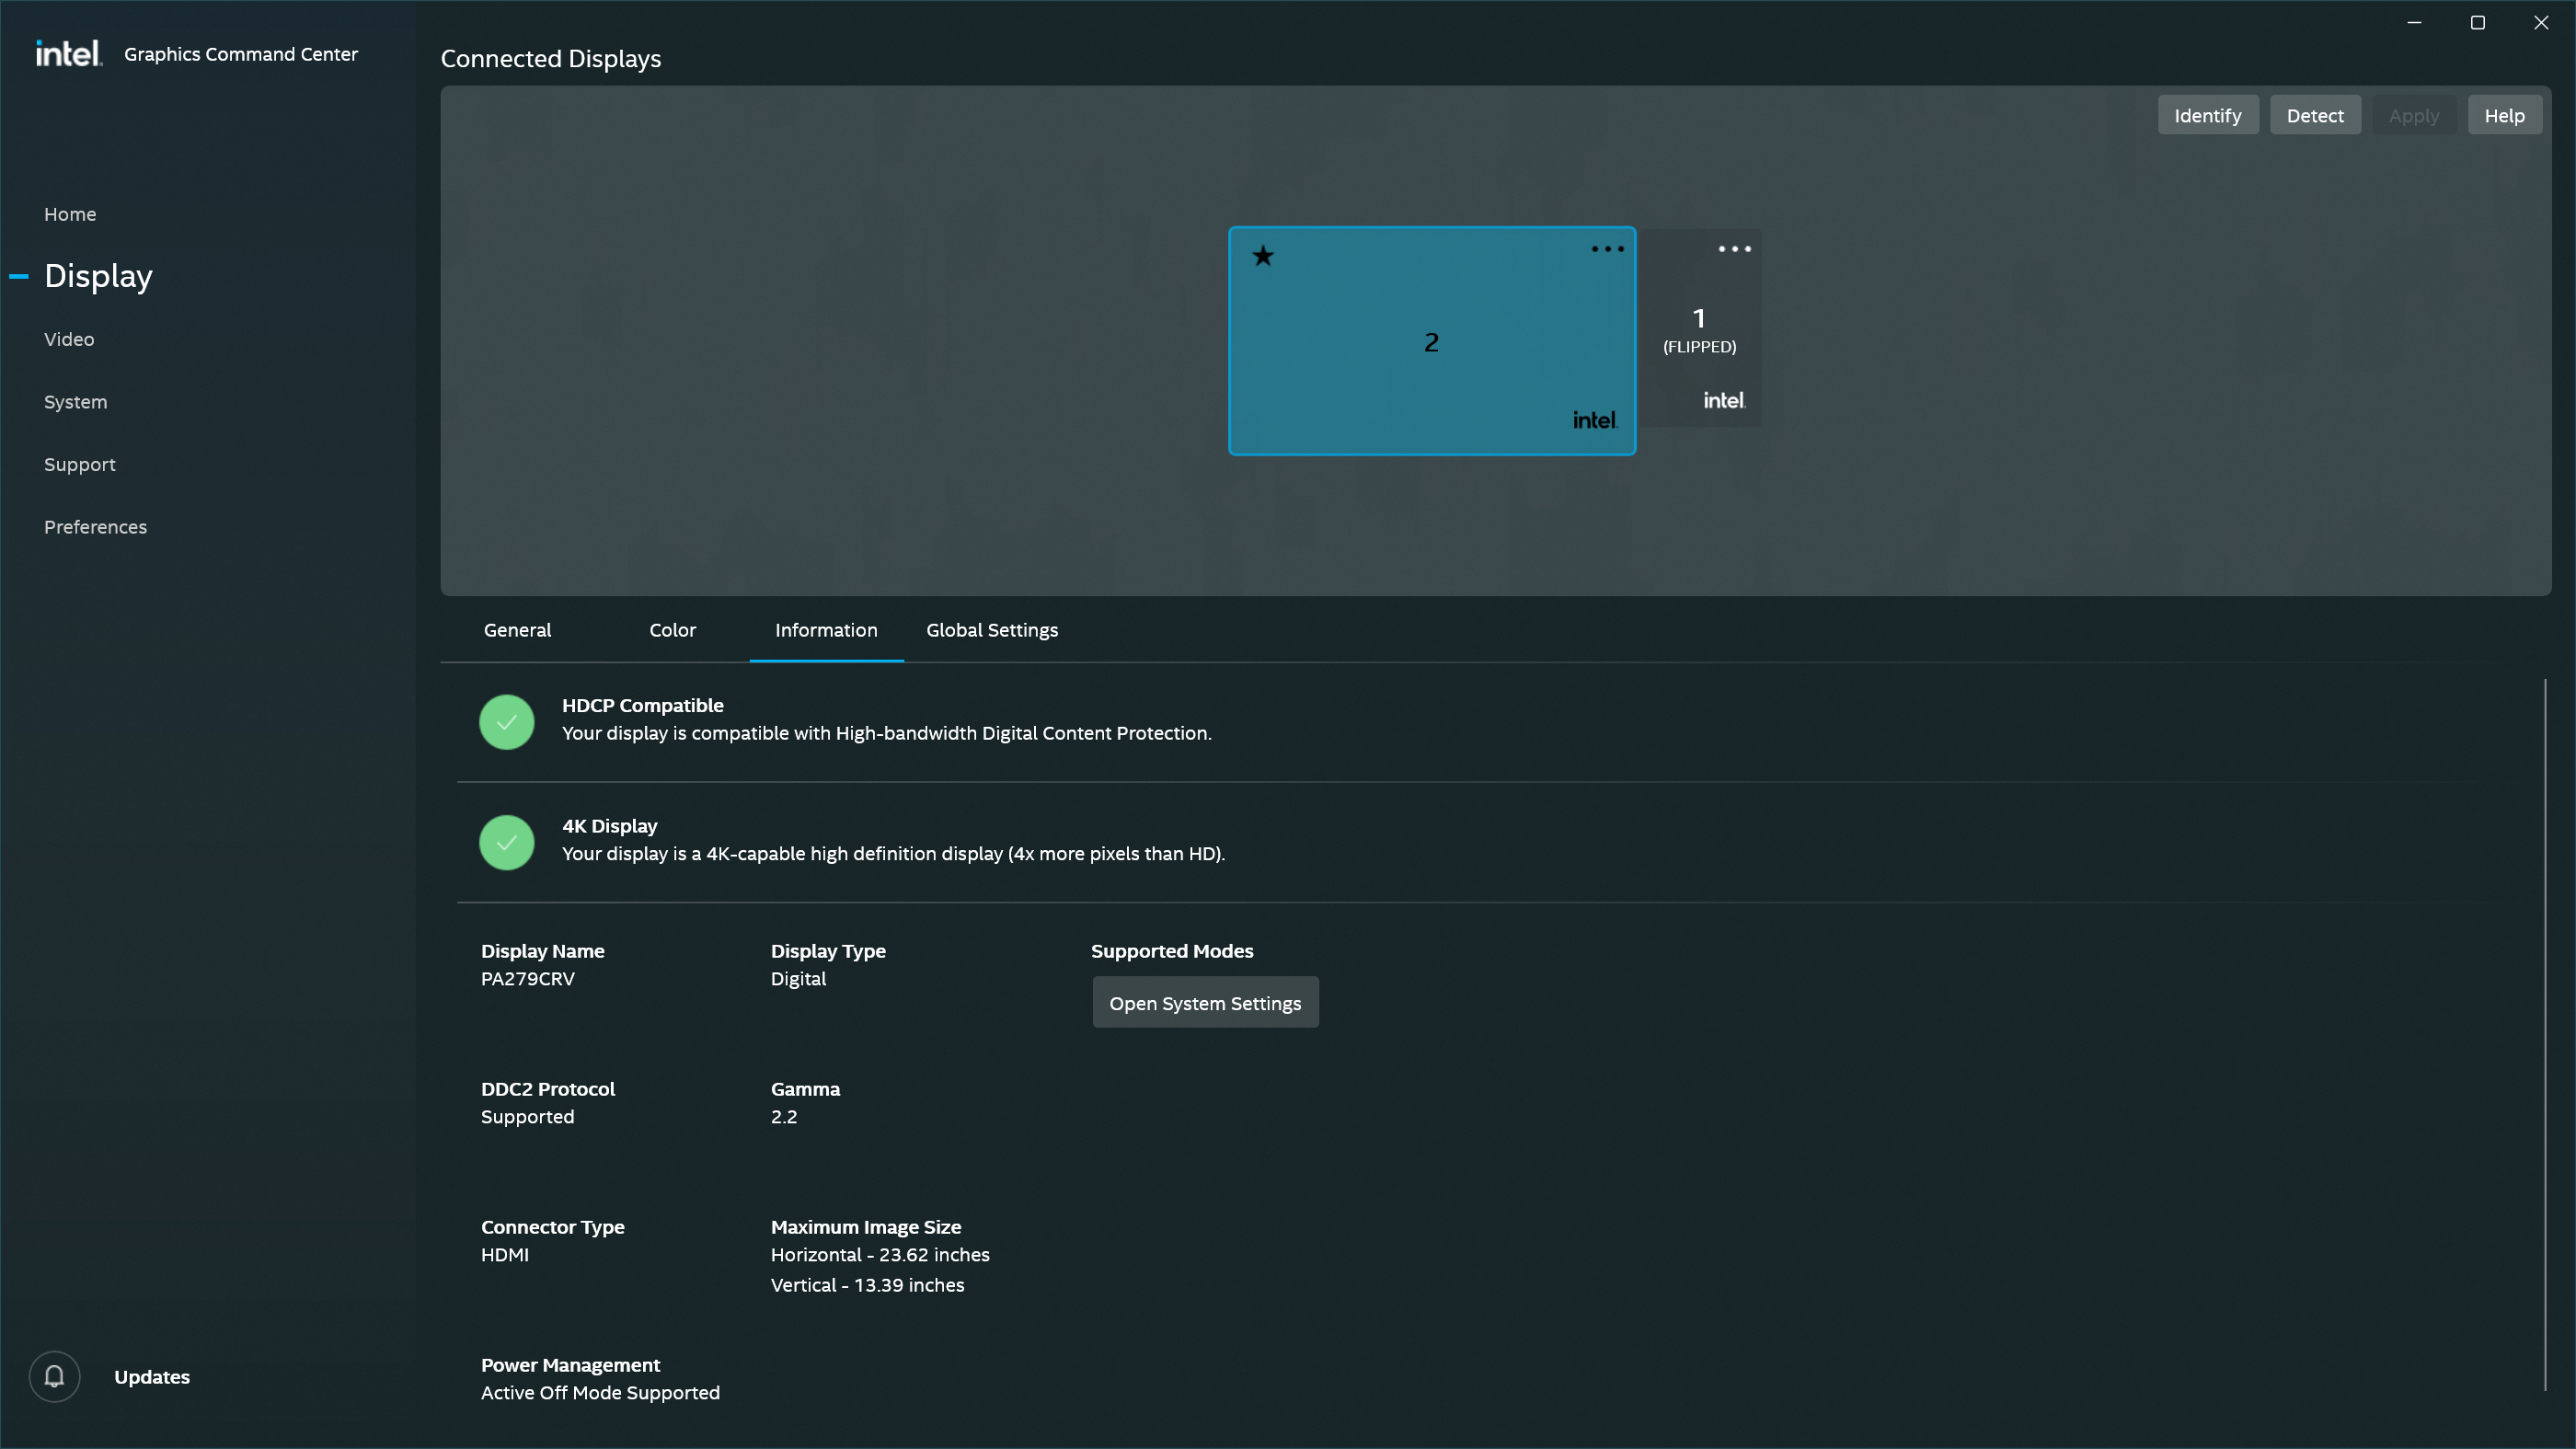
<p><img src="/tec/phy/ASUS/resources/images/graphics-settings__intel__009__pa279crv-Display-Information__en__2800x1575.png" alt="Intel Graphics Command Center – Monitor information confirming EDID data for PA279CRV, including 4K support and HDMI connector identification." class="resize" /></p>

<!-- ![Intel Graphics Command Center – Monitor information confirming EDID data for PA279CRV, including 4K support and HDMI connector identification.](../../../../tec/phy/ASUS/resources/images/graphics-settings__intel__010__pa279crv-System-GPUs__en__2800x1575.png) -->

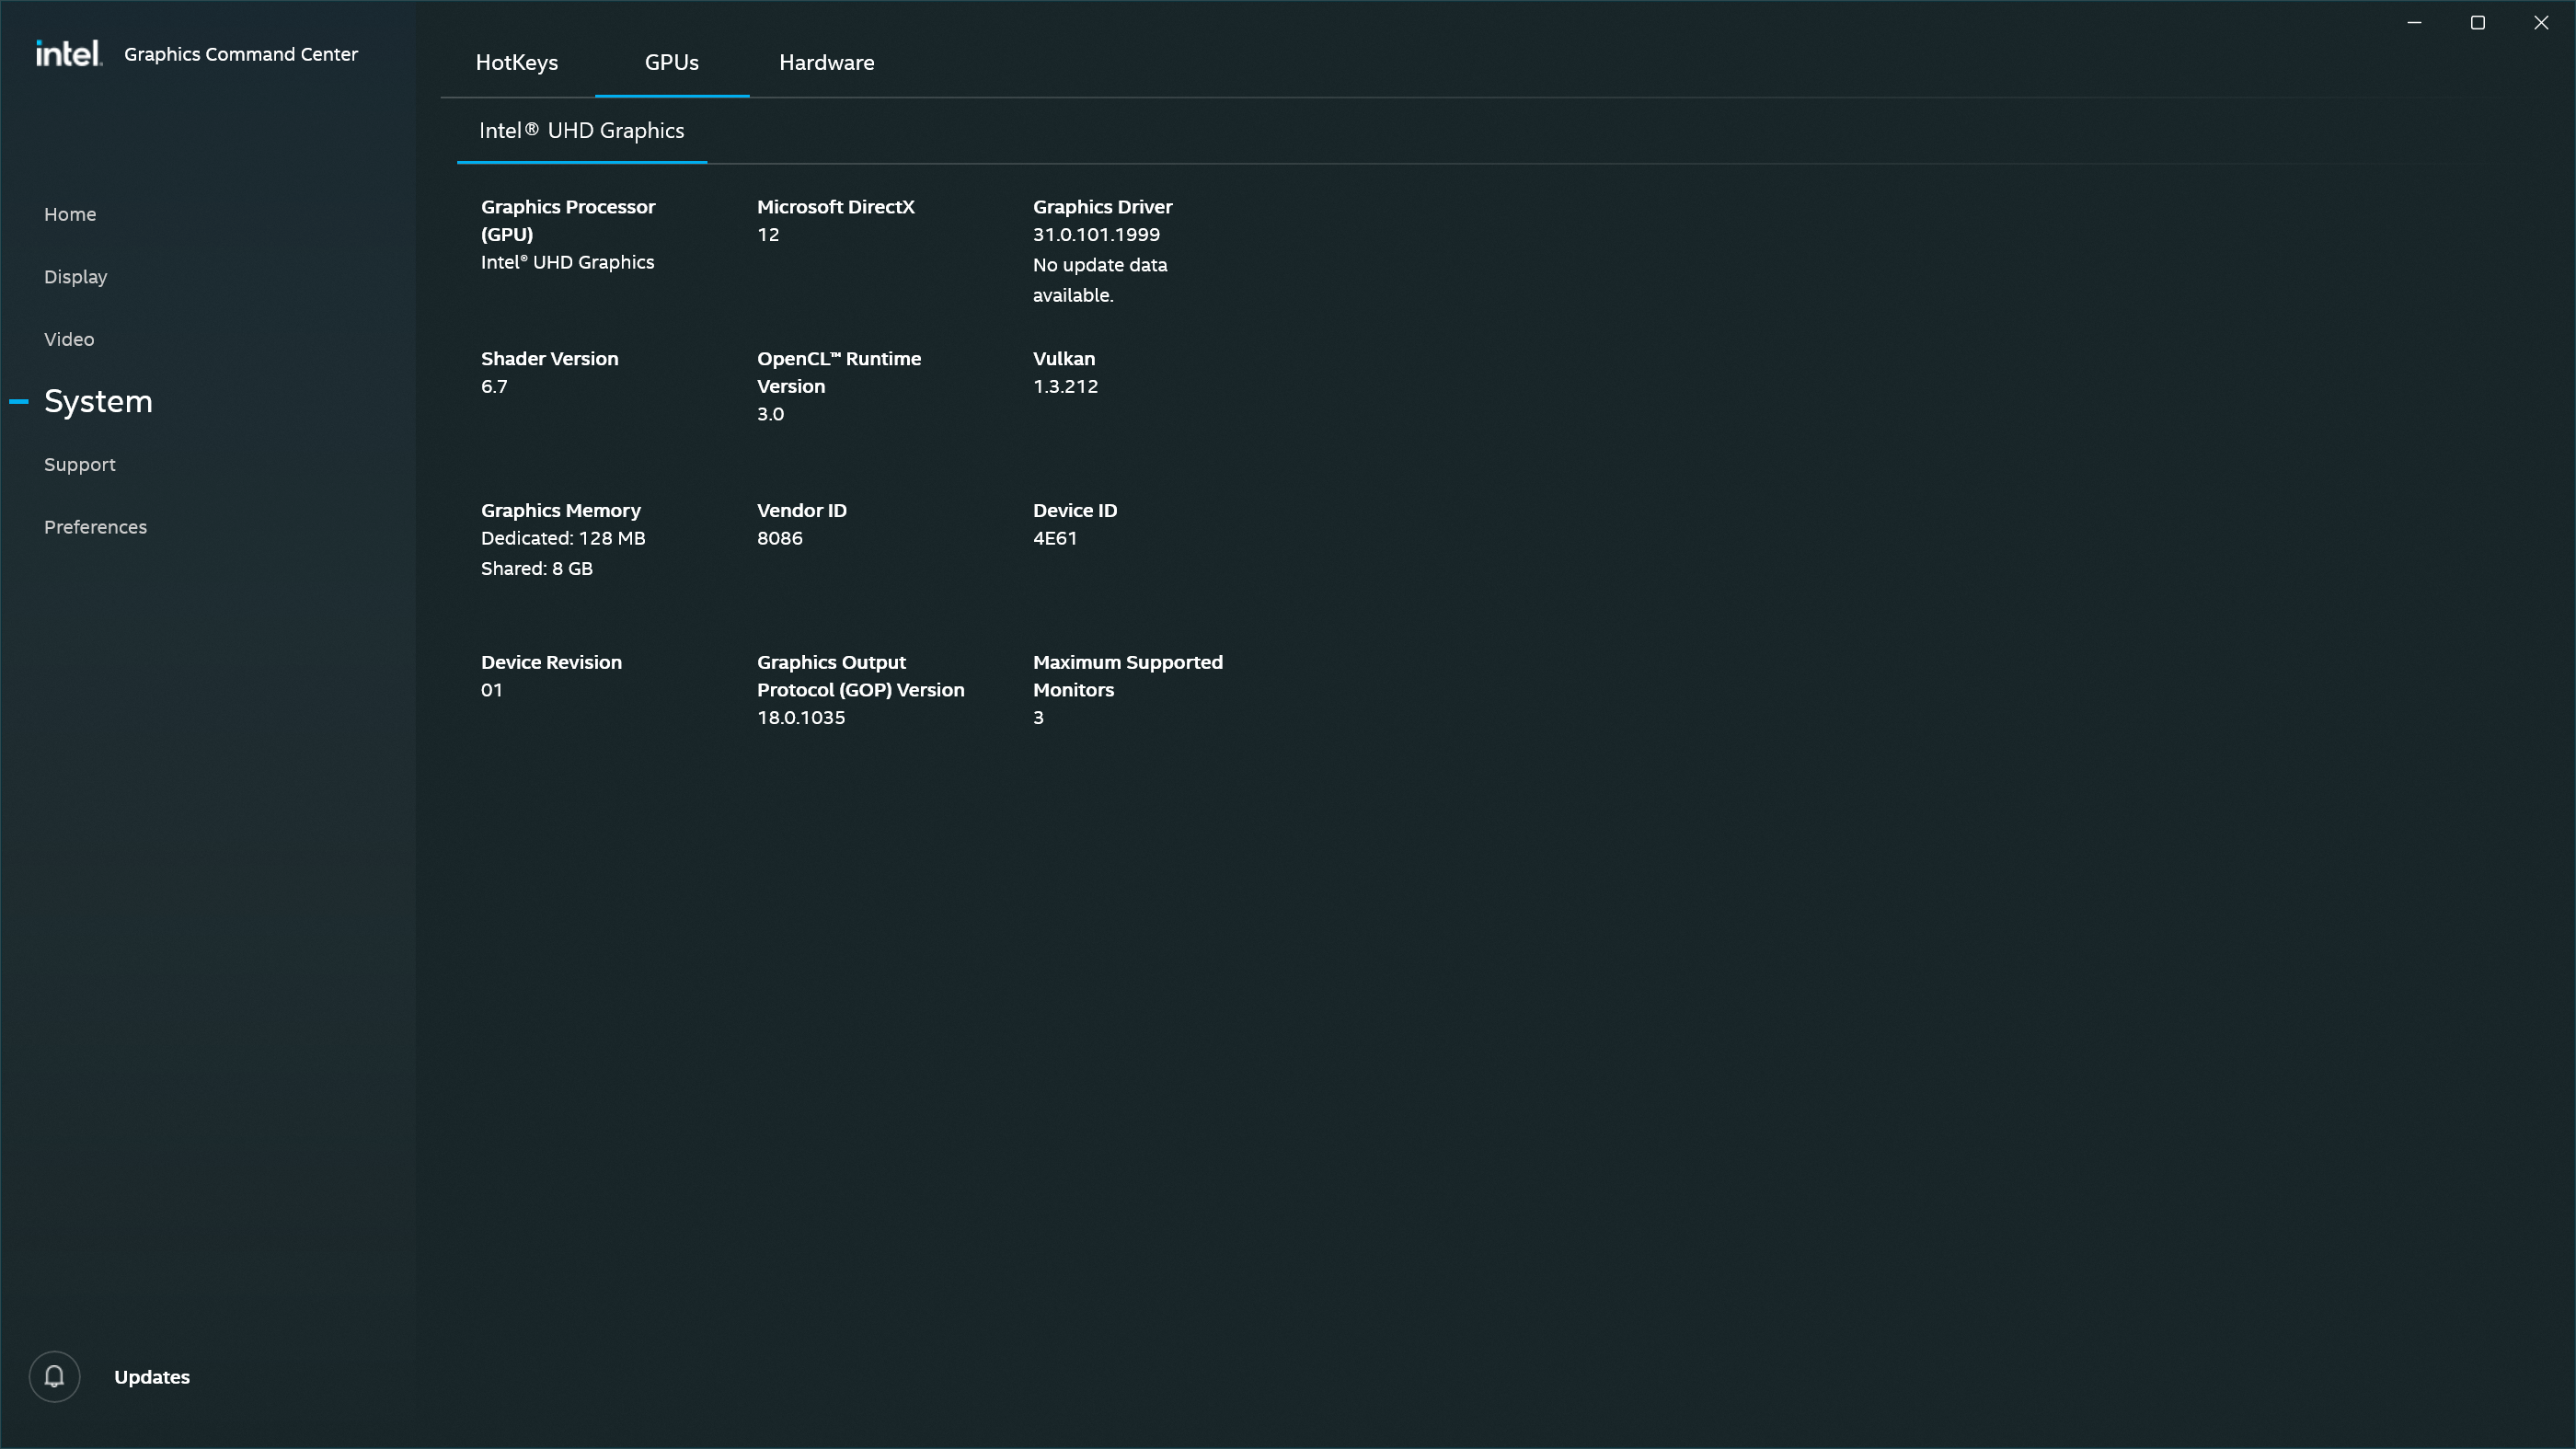
<p><img src="/tec/phy/ASUS/resources/images/graphics-settings__intel__010__pa279crv-System-GPUs__en__2800x1575.png" alt="ntel Graphics Command Center – Monitor information confirming EDID data for PA279CRV, including 4K support and HDMI connector identification." class="resize" /></p>

<!-- ![Hardware overview in Intel Graphics Command Center, confirming dual display detection and physical hardware configuration including CPU, storage, and RAM.](../../../../tec/phy/ASUS/resources/images/graphics-settings__intel__011__pa279crv-System-Hardware__en__2800x1575.png) -->

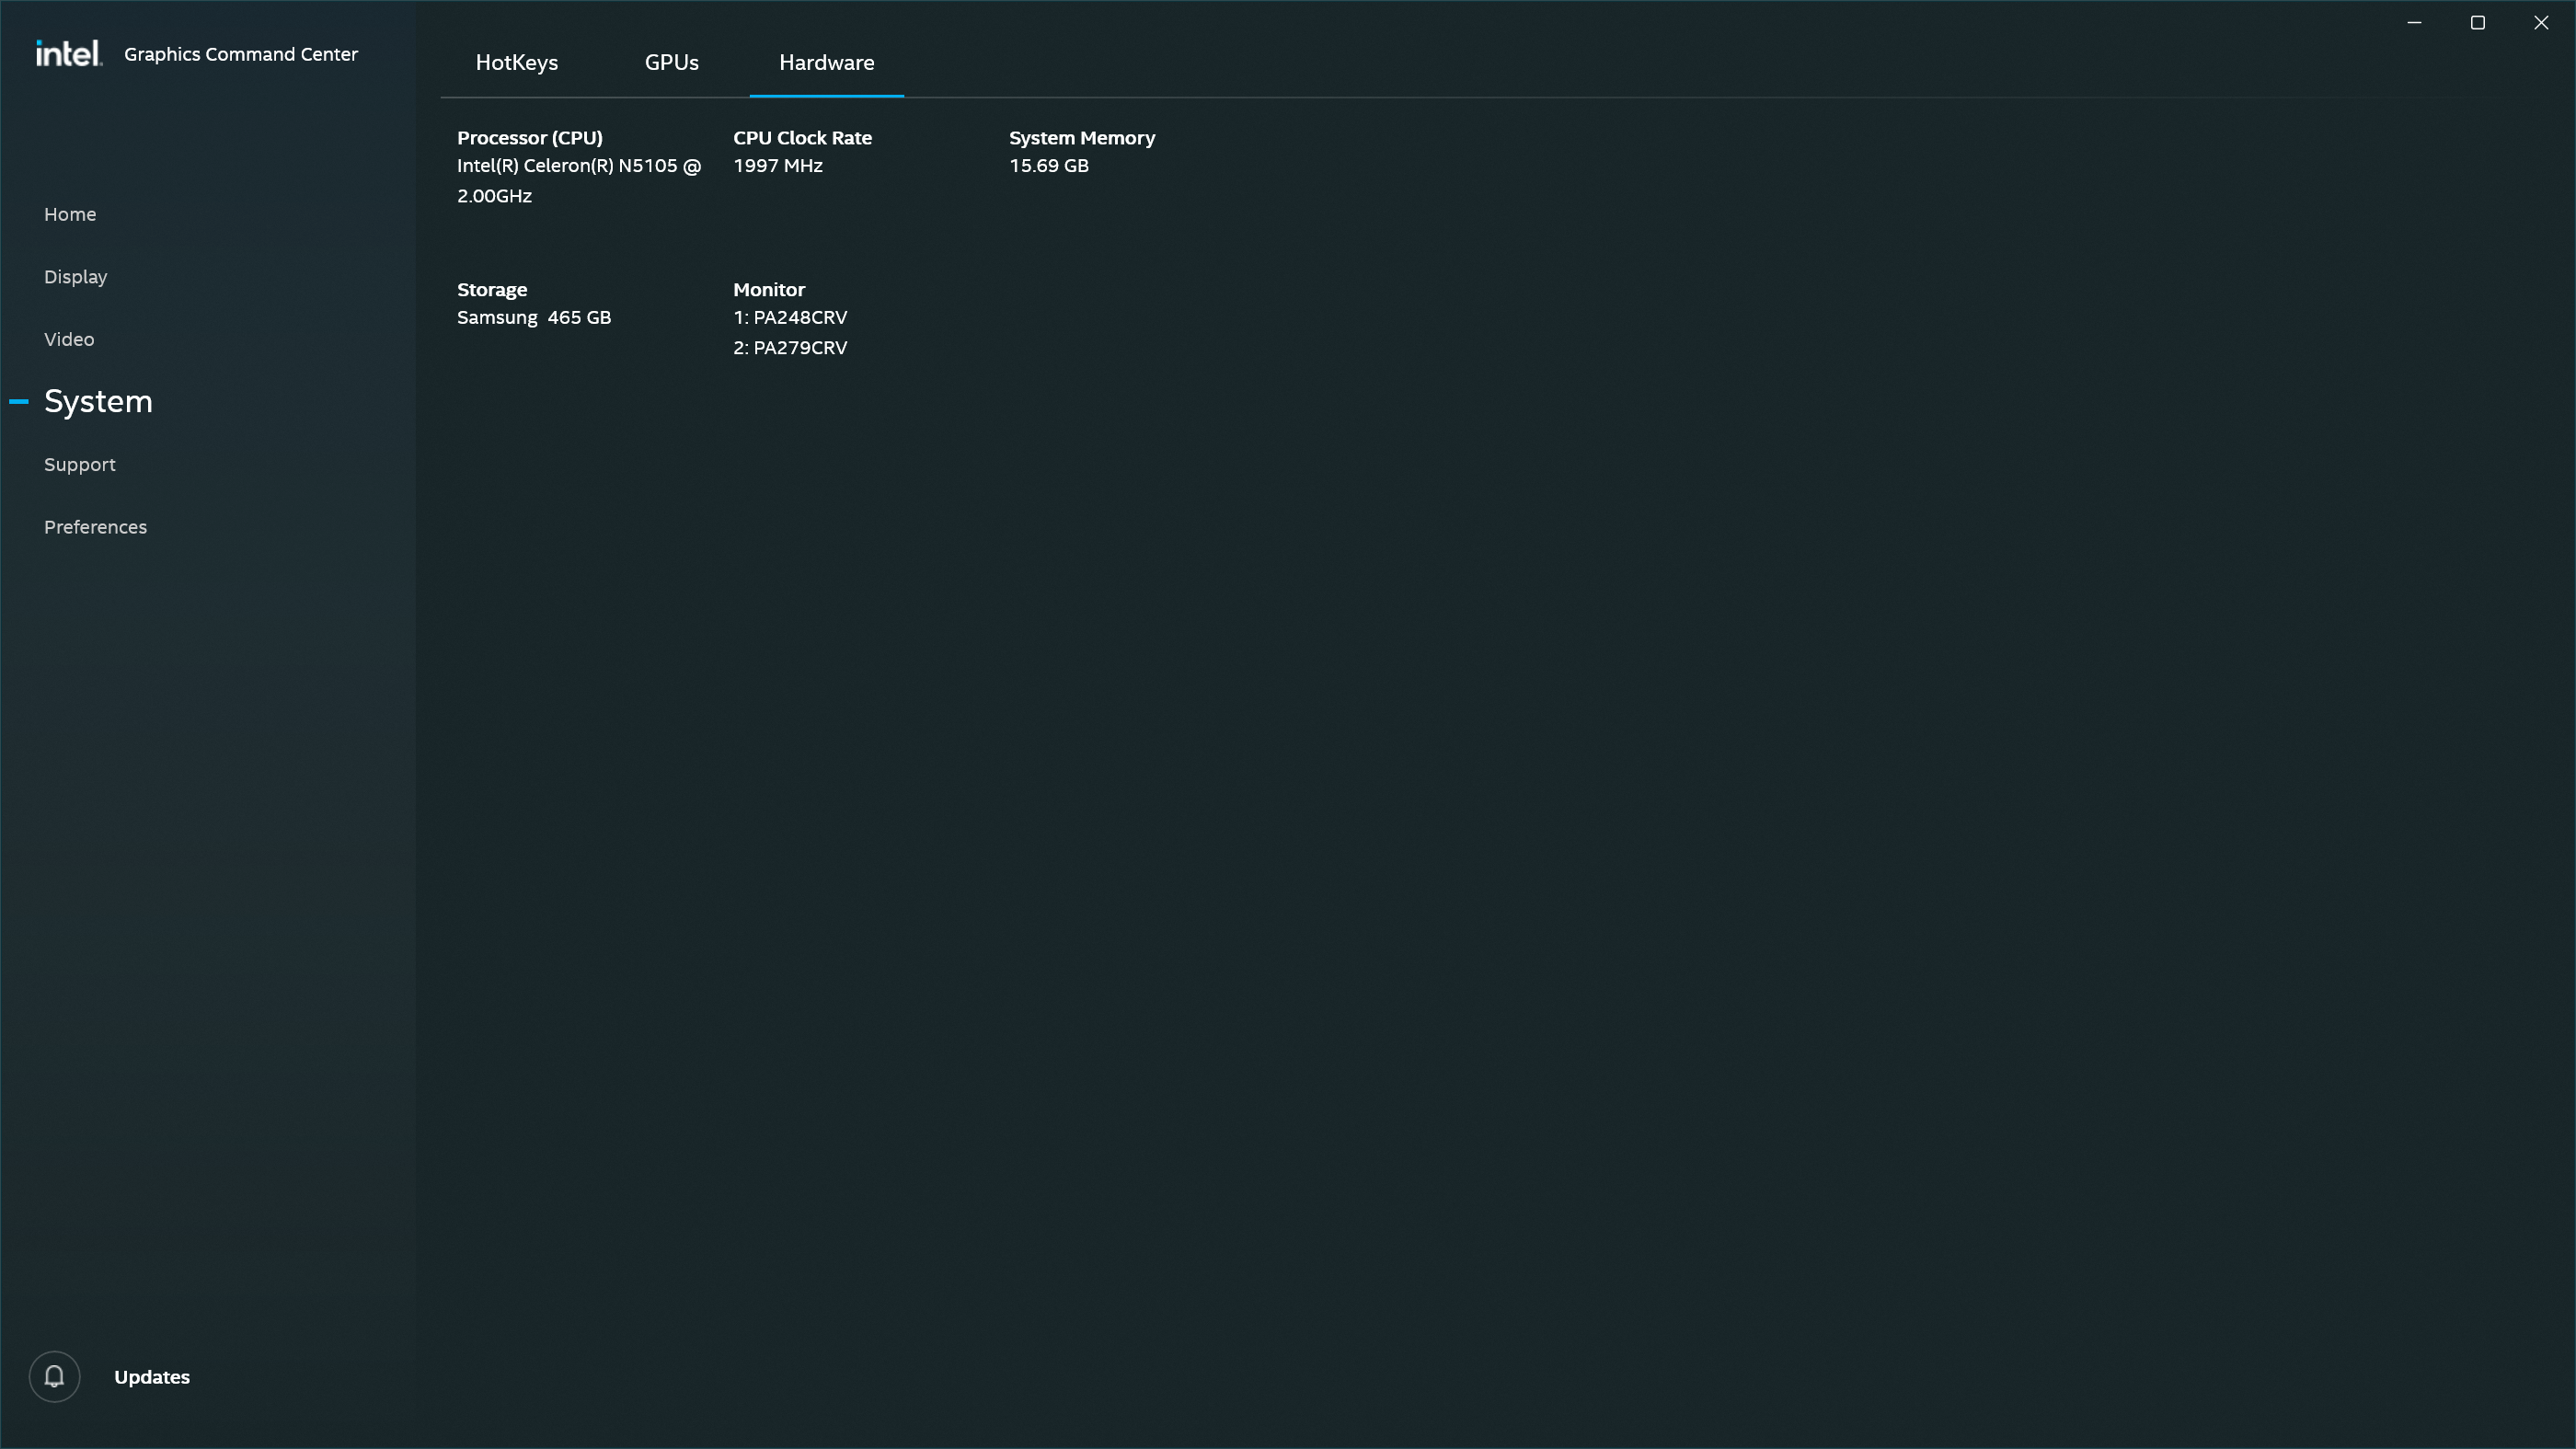
<p><img src="/tec/phy/ASUS/resources/images/graphics-settings__intel__011__pa279crv-System-Hardware__en__2800x1575.png" alt="Hardware overview in Intel Graphics Command Center, confirming dual display detection and physical hardware configuration including CPU, storage, and RAM." class="resize" /></p>

<h2 id="5-mitigations--what-works-reliably">5. Mitigations – What Works Reliably</h2>

<!--- Fix main monitor source input (disable auto-detect)
- Delay secondary monitor wake-up (via OSD or power)
- CRU + Windows GUI to confirm settings before rebooting
- BIOS primary port set to DisplayPort (or override with fixed cable routing)
- Maintain consistent cable config and KVM state (powered on, connected)-->

<p>Several actions were found to stabilize the configuration and ensure consistent initialization of the primary display at the desired resolution and refresh rate.</p>

<ul>
  <li>
    <p><strong>Ensure that the 4k monitor is connected to the “main” NUC output</strong>: This model has 1 HDMI and 1 DisplayPort output. The HDMI output is the primary one, so the 4k monitor should be connected to that one.</p>
  </li>
  <li>
    <p><strong>Set the main monitor (PA279CRV) to a fixed HDMI input</strong>: Disabling automatic input detection on the main monitor reduced EDID delay and ensured faster response during system boot.</p>
  </li>
  <li>
    <p><strong>Leave the secondary monitor (PA248CRV) in source auto-select mode</strong>: This introduced a natural delay in EDID response, helping prioritize the primary display during the handshake process.</p>
  </li>
  <li>
    <p><strong>Apply the desired refresh rate manually in Windows settings</strong>: While CRU made the custom mode available, Windows required manual confirmation to consistently apply it on subsequent reboots.</p>
  </li>
  <li>
    <p><strong>Use CRU to expose only necessary resolutions</strong>: Removing higher refresh rate entries (e.g., 60 Hz) reduced the risk of fallback modes being auto-selected.</p>
  </li>
  <li>
    <p><strong>Power-cycle the KVM and maintain stable cable connections</strong>: Ensuring the KVM remained powered and the display path unaltered helped preserve EDID consistency between reboots.</p>
  </li>
  <li>
    <p><strong>Disable Fast Boot in BIOS</strong>: This allowed the GPU sufficient time to read complete EDID data from all connected displays during POST.</p>
  </li>
  <li>
    <p><strong>Set BIOS primary display to HDMI</strong>: This aligned the firmware preference with the actual cabling and usage scenario, improving display initialization order.</p>
  </li>
</ul>

<p>Together, these mitigations established a reliable dual-monitor configuration where the primary monitor retained its intended resolution and refresh rate, even with the additional complexity introduced by the KVM switch.</p>

<h2 id="6-conclusion--what-surprised-me">6. Conclusion – What Surprised Me</h2>

<!-- - Monitor wake-up speed matters more than expected
- KVM switches don’t just relay HDMI — they affect timing and signal flow
- CRU is powerful, but only honored when the GPU/OS receives correct EDID
- Manual confirmation in Windows GUI can "lock in" refresh rates effectively -->

<p>The most surprising discovery was how critical timing became in what initially appeared to be a straightforward display setup. The interaction between KVM behavior, monitor firmware, GPU detection logic, and operating system configuration created a fragile system that responded inconsistently unless precisely tuned.</p>

<p>While the KVM switch was expected to serve only as a passive HDMI relay, it significantly influenced EDID propagation timing. In combination with differences in monitor wake-up behavior and input scanning modes, this created a race condition that affected which display was initialized first and how resolution and refresh rates were applied.</p>

<p>Custom Resolution Utility (CRU) proved indispensable for exposing custom refresh rates, but ultimately, these settings were only effective if the GPU received complete and timely EDID data. Manual intervention within Windows remained necessary to reliably select and retain the preferred display configuration.</p>

<p>The lesson for similar dual-monitor environments—especially when bandwidth is constrained—is that signal order, wake-up timing, and handshake behavior matter as much as the raw capabilities of the hardware. A configuration that fails under default behavior can become reliable with deliberate timing offsets and clear input priorities.</p>

<p>This investigation highlights how nuanced low-level display negotiation can be, particularly in mixed setups involving KVMs or multiple high-resolution monitors. Ensuring stability often depends on understanding the interplay between physical hardware timing and software-level policy decisions.</p>

<h2 id="appendix-hardware-used">Appendix: Hardware Used</h2>

<ul>
  <li><strong>Intel NUC 11ATKC4</strong> w/ Celeron N5105, 1x HDMI output, 1x DisplayPort output</li>
  <li><strong>ASUS PA279CRV</strong> (4K, HDMI2 input, source fixed)</li>
  <li><strong>ASUS PA248CRV</strong> (FHD, rotated, source auto-detect)</li>
  <li><strong>KVM Switch</strong>: HKS402 HDMI 2.0, USB switching</li>
  <li><strong>Software</strong>: CRU 1.5.2, Intel Graphics Command Center, Windows 11</li>
</ul>]]></content><author><name>Christian Prior-Mamulyan</name></author><category term="tec" /><category term="log" /><category term="homeoffice" /><summary type="html"><![CDATA[What a KVM Taught Me About Monitor Wake-Up Timing, EDID Delays, and HDMI Source Detection]]></summary></entry><entry><title type="html">Transforming UiPath XAML Files into Pseudocode</title><link href="/biz/it/rpa/2025/01/11/transforming-uipath-xaml-to-pseudocode.html" rel="alternate" type="text/html" title="Transforming UiPath XAML Files into Pseudocode" /><published>2025-01-11T00:00:00+01:00</published><updated>2025-01-11T00:00:00+01:00</updated><id>/biz/it/rpa/2025/01/11/transforming-uipath-xaml-to-pseudocode</id><content type="html" xml:base="/biz/it/rpa/2025/01/11/transforming-uipath-xaml-to-pseudocode.html"><![CDATA[<h2 id="transforming-uipath-xaml-files-into-pseudocode"><strong>Transforming UiPath XAML Files into Pseudocode</strong></h2>

<p>UiPath workflows, defined in <code class="language-plaintext highlighter-rouge">.xaml</code> files, can often appear complex and daunting to interpret directly. By transforming these files into pseudocode, you can simplify their logic, making workflows more accessible and easier to document. This post explores a systematic method to parse XAML files and convert them into structured pseudocode, including activity annotations as comments for clarity.</p>

<hr />

<h3 id="why-transform-xaml-files"><strong>Why Transform XAML Files?</strong></h3>

<ol>
  <li><strong>Readability</strong>: Pseudocode provides a simplified, human-readable representation of workflows.</li>
  <li><strong>Documentation</strong>: Useful for process documentation and sharing workflow logic with non-technical stakeholders.</li>
  <li><strong>Debugging</strong>: Helps in understanding workflow execution flow for debugging or optimization.</li>
  <li><strong>Learning</strong>: Enables new developers to quickly grasp the logic without diving into UiPath Studio.</li>
</ol>

<hr />

<h3 id="example-injectinprocessqueuexaml"><strong>Example: InjectInProcessQueue.xaml</strong></h3>

<p>Let’s walk through an example. Below is the pseudocode representation of the <code class="language-plaintext highlighter-rouge">InjectInProcessQueue.xaml</code> file. This file processes email messages, builds a queue, and adds items to it. We include annotations from the XAML file as comments.</p>

<hr />

<h4 id="generated-pseudocode"><strong>Generated Pseudocode</strong></h4>

<pre><code class="language-pseudocode">// Sequence: Inject In Process Queue
Sequence "Inject In Process Queue":
    // Log message at the beginning of the process
    Log Message (Level: INFO): "Going to build and fill an in-process queue"

    // Initialize the InProcessQueue
    Assign:
        To: out_InProcessQueue
        Value: New Queue&lt;QueueItem&gt;()

    // For Each: Process each mail in MailmessagesIncoming
    For Each mail in in_MailmessagesIncoming:
        // Annotation: each mail, if it has a Message-ID, that is used as QueueItem.Reference and added to the in-process queue.
        If (mail.Headers.Get("Message-ID") IsNot Nothing) Then:
            // Sequence: Add InProcessQueueItem
            Sequence "AddInProcessQueueItem":
                // Annotation: Initializes InProcessQueueItem by variable scope
                Variable InProcessQueueItem = New QueueItem With {
                    .SpecificContent = New Dictionary(Of String, Object) From {
                        {"foo", "bar"}
                    }
                }

                // Assign the Message-ID to the QueueItem Reference
                Assign:
                    To: InProcessQueueItem.Reference
                    Value: mail.Headers.Get("Message-ID")

                // Add specific content values for the mail
                // Annotation: MailMessage_MessageId, MailMessage_Subject, MailMessage_Body, MailMessage_From, MailMessage_To, MailMessage_Date, etc.
                Multiple Assign SpecificContent:
                    - MailMessage_Subject = mail.Subject
                    - MailMessage_Body = mail.Body
                    - MailMessage_From = mail.From.Address
                    - MailMessage_To = mail.To
                    - MailMessage_Date = mail.Headers.Get("Date")

                // Add the QueueItem to the InProcessQueue
                Invoke Method "Queue.Enqueue":
                    TargetObject: out_InProcessQueue
                    Argument: InProcessQueueItem

    // Log message at the end of the process
    Log Message (Level: TRACE): "Finished building and filling an in-process queue"
</code></pre>

<hr />

<h3 id="the-transformation-process"><strong>The Transformation Process</strong></h3>

<h4 id="1-parsing-the-xaml-file"><strong>1. Parsing the XAML File</strong></h4>
<p>The XAML file is parsed as an XML document, allowing us to traverse its structure. Each activity is represented as an XML tag, and we extract:</p>
<ul>
  <li>The activity type (e.g., <code class="language-plaintext highlighter-rouge">Sequence</code>, <code class="language-plaintext highlighter-rouge">If</code>, <code class="language-plaintext highlighter-rouge">ForEach</code>).</li>
  <li>Relevant attributes (e.g., <code class="language-plaintext highlighter-rouge">DisplayName</code>, <code class="language-plaintext highlighter-rouge">Condition</code>, <code class="language-plaintext highlighter-rouge">Arguments</code>).</li>
  <li>Annotations (<code class="language-plaintext highlighter-rouge">sap2010:Annotation.AnnotationText</code>) for context.</li>
</ul>

<h4 id="2-building-a-logical-hierarchy"><strong>2. Building a Logical Hierarchy</strong></h4>
<p>UiPath workflows are structured hierarchically:</p>
<ul>
  <li>Activities are nested, reflecting their order and dependencies.</li>
  <li>Pseudocode preserves this hierarchy using indentation.</li>
</ul>

<h4 id="3-translating-activities"><strong>3. Translating Activities</strong></h4>
<p>Each activity is mapped to a corresponding pseudocode construct:</p>
<ul>
  <li><strong>Sequence</strong> → A block of steps.</li>
  <li><strong>If</strong> → Conditional statements (<code class="language-plaintext highlighter-rouge">If ... Then ... Else</code>).</li>
  <li><strong>ForEach</strong> → Loops iterating over collections.</li>
  <li><strong>Assign</strong> → Variable assignments.</li>
  <li><strong>InvokeWorkflowFile</strong> → Function calls with input and output arguments.</li>
  <li><strong>LogMessage</strong> → Log statements.</li>
</ul>

<h4 id="4-integrating-annotations"><strong>4. Integrating Annotations</strong></h4>
<p>Annotations are extracted and inserted as comments above relevant pseudocode lines. These provide valuable context about the workflow’s purpose.</p>

<hr />

<h3 id="why-include-annotations"><strong>Why Include Annotations?</strong></h3>

<p>Annotations are vital for understanding the logic and intent behind each step. For example:</p>
<ul>
  <li><strong>Annotation</strong>: <em>“Initializes InProcessQueueItem by variable scope”</em></li>
  <li><strong>Pseudocode Context</strong>: This comment clarifies why a variable is initialized.</li>
</ul>

<p>Annotations turn technical details into meaningful explanations.</p>

<hr />

<h3 id="challenges-in-the-transformation"><strong>Challenges in the Transformation</strong></h3>

<ol>
  <li>
    <p><strong>Deep Nesting</strong>:
Complex workflows with deeply nested activities require careful recursive traversal.</p>
  </li>
  <li>
    <p><strong>Custom Activities</strong>:
Handling custom or rare activities requires fallback mechanisms to represent them generically.</p>
  </li>
  <li>
    <p><strong>Balancing Detail and Simplicity</strong>:
The goal is to keep pseudocode readable while retaining essential logic.</p>
  </li>
</ol>

<hr />

<h3 id="final-thoughts"><strong>Final Thoughts</strong></h3>

<p>Transforming UiPath XAML files into pseudocode bridges the gap between technical workflows and high-level understanding. By including annotations and presenting a clean, structured representation, you can make workflows easier to read, debug, and document.</p>

<p>Whether you’re sharing your workflow logic with a team or improving your process documentation, this approach ensures clarity and consistency.</p>]]></content><author><name>Christian Prior-Mamulyan</name></author><category term="biz" /><category term="IT" /><category term="RPA" /><summary type="html"><![CDATA[A step-by-step guide to converting UiPath XAML files into pseudocode, making workflows easier to understand and document.]]></summary></entry><entry><title type="html">Ruby Rake Bundler Change Directory</title><link href="/biz/it/software-engineering/2024/12/21/ruby-rake-bundler-change-directory.html" rel="alternate" type="text/html" title="Ruby Rake Bundler Change Directory" /><published>2024-12-21T00:00:00+01:00</published><updated>2024-12-21T00:00:00+01:00</updated><id>/biz/it/software-engineering/2024/12/21/ruby-rake-bundler-change-directory</id><content type="html" xml:base="/biz/it/software-engineering/2024/12/21/ruby-rake-bundler-change-directory.html"><![CDATA[<h3 id="managing-jekyll-subdirectories-with-bundler-in-rake-tasks">Managing Jekyll Subdirectories with Bundler in Rake Tasks</h3>

<p>When working on Jekyll plugins, a common requirement is to include a demo site for testing and showcasing functionality. This demo site often resides in a subdirectory (e.g., <code class="language-plaintext highlighter-rouge">./demo</code>) with its own Gemfile, distinct from the plugin’s root Gemfile. Ensuring commands like <code class="language-plaintext highlighter-rouge">bundle install</code> and <code class="language-plaintext highlighter-rouge">jekyll build</code> execute correctly in this subdirectory while integrating seamlessly into a Rake-based workflow can be challenging, especially on cross-platform setups.</p>

<h3 id="problem-subdirectory-context-in-rake-tasks">Problem: Subdirectory Context in Rake Tasks</h3>

<p>Directly invoking commands like <code class="language-plaintext highlighter-rouge">cd demo &amp;&amp; bundle install</code> in Rake tasks doesn’t reliably handle environment configurations. Specifically:</p>
<ul>
  <li><strong>Bundler Context</strong>: Commands may still use the root Gemfile.</li>
  <li><strong>Environment Isolation</strong>: Switching directories alone doesn’t guarantee the correct environment is loaded, especially on Windows systems.</li>
</ul>

<h3 id="solution-explicit-environment-configuration">Solution: Explicit Environment Configuration</h3>

<p>By explicitly setting the <code class="language-plaintext highlighter-rouge">BUNDLE_GEMFILE</code> environment variable, we can ensure Bundler uses the correct Gemfile for the subdirectory. A helper method centralizes this logic:</p>

<div class="language-ruby highlighter-rouge"><div class="highlight"><pre class="highlight"><code><span class="k">def</span> <span class="nf">safely_in_demo_dir</span>
  <span class="n">demo_dir</span> <span class="o">=</span> <span class="no">File</span><span class="p">.</span><span class="nf">join</span><span class="p">(</span><span class="no">Dir</span><span class="p">.</span><span class="nf">pwd</span><span class="p">,</span> <span class="s2">"demo"</span><span class="p">)</span>
  <span class="k">raise</span> <span class="s2">"Demo directory not found: </span><span class="si">#{</span><span class="n">demo_dir</span><span class="si">}</span><span class="s2">"</span> <span class="k">unless</span> <span class="no">Dir</span><span class="p">.</span><span class="nf">exist?</span><span class="p">(</span><span class="n">demo_dir</span><span class="p">)</span>

  <span class="no">ENV</span><span class="p">[</span><span class="s1">'BUNDLE_GEMFILE'</span><span class="p">]</span> <span class="o">=</span> <span class="no">File</span><span class="p">.</span><span class="nf">join</span><span class="p">(</span><span class="n">demo_dir</span><span class="p">,</span> <span class="s2">"Gemfile"</span><span class="p">)</span>

  <span class="no">Dir</span><span class="p">.</span><span class="nf">chdir</span><span class="p">(</span><span class="n">demo_dir</span><span class="p">)</span> <span class="k">do</span>
    <span class="k">yield</span>
  <span class="k">end</span>
<span class="k">ensure</span>
  <span class="no">ENV</span><span class="p">.</span><span class="nf">delete</span><span class="p">(</span><span class="s1">'BUNDLE_GEMFILE'</span><span class="p">)</span>
<span class="k">end</span>
</code></pre></div></div>

<h3 id="implementation-in-rake-tasks">Implementation in Rake Tasks</h3>

<p>The helper method integrates seamlessly into tasks:</p>

<div class="language-ruby highlighter-rouge"><div class="highlight"><pre class="highlight"><code><span class="n">namespace</span> <span class="ss">:demo</span> <span class="k">do</span>
  <span class="n">desc</span> <span class="s2">"Build the Jekyll demo site"</span>
  <span class="n">task</span> <span class="ss">:build</span> <span class="k">do</span>
    <span class="n">safely_in_demo_dir</span> <span class="k">do</span>
      <span class="n">sh</span> <span class="s2">"bundle install"</span>
      <span class="n">sh</span> <span class="s2">"bundle exec jekyll build"</span>
    <span class="k">end</span>
  <span class="k">end</span>

  <span class="n">desc</span> <span class="s2">"Serve the Jekyll demo site locally"</span>
  <span class="n">task</span> <span class="ss">:serve</span> <span class="k">do</span>
    <span class="n">safely_in_demo_dir</span> <span class="k">do</span>
      <span class="n">sh</span> <span class="s2">"bundle install"</span>
      <span class="n">sh</span> <span class="s2">"bundle exec jekyll serve"</span>
    <span class="k">end</span>
  <span class="k">end</span>
<span class="k">end</span>
</code></pre></div></div>

<h3 id="key-benefits">Key Benefits</h3>

<ol>
  <li><strong>Environment Isolation</strong>: Ensures all commands execute in the context of the <code class="language-plaintext highlighter-rouge">./demo</code> directory.</li>
  <li><strong>Cross-Platform Compatibility</strong>: Works reliably across Unix-like systems and Windows.</li>
  <li><strong>Reuse</strong>: Centralizes directory handling logic to minimize duplication.</li>
</ol>]]></content><author><name>Christian Prior-Mamulyan</name></author><category term="biz" /><category term="IT" /><category term="Software-Engineering" /><summary type="html"><![CDATA[Managing Jekyll Subdirectories with Bundler in Rake Tasks]]></summary></entry><entry><title type="html">Uipath Community Event Technical Setup</title><link href="/tec/log/audio/2024/11/26/uipath-community-event-technical-setup.html" rel="alternate" type="text/html" title="Uipath Community Event Technical Setup" /><published>2024-11-26T00:00:00+01:00</published><updated>2024-11-26T00:00:00+01:00</updated><id>/tec/log/audio/2024/11/26/uipath-community-event-technical-setup</id><content type="html" xml:base="/tec/log/audio/2024/11/26/uipath-community-event-technical-setup.html"><![CDATA[<p>RodeCaster Pro ii
input 1 Shure SM7B
input 2: TRS cable 1m
USB 1: laptop with Zoom
USB 2:
headphone out 1: earpieces</p>

<p>Hyperdeck Shuttle HD
HDMI out: HDMI Audio exctrator
SD card slot: SD card with playout footage</p>

<p>HDMI Audio exctrator
Power: 5V USB
HDMI in: Hyperdeck Shuttle HD
audio out 3.5mm: TRS cable 1m</p>

<p>Blackmagic ATEM Mini Pro ISO
USB out: laptop with Zoom
HDMI in 1: HDMI Splitter B
HDMI in 2: HDMI matrix
HDMI in 3: HDMI Splitter A
HDMI in 4: HDMI Audio exctrator</p>

<p>Laptop:
Main display: Zoom call
HDMI out: HDMI Splitter
USB C:</p>

<p>HDMI Splitter A:
HDMI out 1: Blackmagic ATEM Mini Pro ISO
HDMI out 2: Wacom One pen display</p>

<p>HDMI Splitter B:
HDMI in: camera
HDMI out 1: USB HDMI Adapter
HDMI out 2: Blackmagic ATEM Mini Pro ISO</p>

<p>playout:
Rodcaster in 2: line level, unmuted, fader up
Rodecaster Pro ii Chat Fader: unmuted, fader up
Zoom: Share Advanced Second camera, no sound, optimized for video if possible
Zoom: optionally original sound on
ATEM Mini: playout from green to red
Shuttle: clip on, stop on, mov selected, press playout</p>]]></content><author><name>Christian Prior-Mamulyan</name></author><category term="tec" /><category term="log" /><category term="audio" /><summary type="html"><![CDATA[RodeCaster Pro ii input 1 Shure SM7B input 2: TRS cable 1m USB 1: laptop with Zoom USB 2: headphone out 1: earpieces]]></summary></entry><entry><title type="html">Custom Workflow Analyzer Rules</title><link href="/tec/phy/uipath/products/studio/2024/11/07/custom-workflow-analyzer-rules.html" rel="alternate" type="text/html" title="Custom Workflow Analyzer Rules" /><published>2024-11-07T00:00:00+01:00</published><updated>2024-11-07T00:00:00+01:00</updated><id>/tec/phy/uipath/products/studio/2024/11/07/custom-workflow-analyzer-rules</id><content type="html" xml:base="/tec/phy/uipath/products/studio/2024/11/07/custom-workflow-analyzer-rules.html"><![CDATA[<h2 id="prequisites">Prequisites</h2>

<p>https://docs.uipath.com/sdk/other/latest/developer-guide/creating-activities-with-code</p>

<div class="language-plaintext highlighter-rouge"><div class="highlight"><pre class="highlight"><code>choco install visualstudio2022community --package-parameters "--add Microsoft.VisualStudio.Workload.ManagedDesktop --add Microsoft.VisualStudio.Workload.NetWeb --add Microsoft.VisualStudio.Workload.VisualStudioExtension"
choco install dotnet-6.0-sdk
choco install dotnet-6.0-runtime
choco install nuget.commandline
</code></pre></div></div>

<p>Development Settings: Visual C# or General Development</p>

<p>official feed</p>

<p>https://github.com/UiPath/Community.Activities/tree/develop/Activities/Templates/UiPath.Activities.Template/VisualStudio</p>

<p>https://docs.uipath.com/sdk/other/latest/developer-guide/building-workflow-analyzer-rules</p>

<blockquote>
  <p>When building custom rules, target the .NET version depending on the version of Studio and the project compatibility:</p>

  <p>Studio 2021.4 and earlier: .NET Framework 4.6.1.
Studio 2021.10.6 and later: .NET Framework 4.6.1 for Windows-legacy projects, .NET 6 for Windows and cross-platform projects.</p>
</blockquote>

<h3 id="validate">Validate</h3>

<p><code class="language-plaintext highlighter-rouge">dotnet --list-sdks</code></p>

<h2 id="decisions">Decisions</h2>

<p>targetFramework: Windows only?</p>

<h2 id="solutions">solutions</h2>

<p>Class Library (.NET Framework)
C#
Windows
.NET 6.0</p>]]></content><author><name>Christian Prior-Mamulyan</name></author><category term="tec" /><category term="phy" /><category term="UiPath" /><category term="products" /><category term="Studio" /><summary type="html"><![CDATA[Prequisites]]></summary></entry><entry><title type="html">Excption Try Catch Bubbling Up Reframework</title><link href="/tec/phy/uipath/products/studio/2024/11/07/excption-try-catch-bubbling-up-reframework.html" rel="alternate" type="text/html" title="Excption Try Catch Bubbling Up Reframework" /><published>2024-11-07T00:00:00+01:00</published><updated>2024-11-07T00:00:00+01:00</updated><id>/tec/phy/uipath/products/studio/2024/11/07/excption-try-catch-bubbling-up-reframework</id><content type="html" xml:base="/tec/phy/uipath/products/studio/2024/11/07/excption-try-catch-bubbling-up-reframework.html"><![CDATA[<p>The UiPath ReFramework (Robotic Enterprise Framework) already includes robust error-handling mechanisms at the top level, specifically to catch and handle:</p>

<ul>
  <li><code class="language-plaintext highlighter-rouge">System.Exception</code>: These are unexpected errors (e.g., network issues, null references).</li>
  <li><code class="language-plaintext highlighter-rouge">BusinessRuleException</code>: These represent logical or business-specific validation errors (e.g., data inconsistencies).</li>
</ul>

<p>With the ReFramework’s top-level error handling, exceptions thrown by activities do bubble up and are captured. So, why would you still consider using <code class="language-plaintext highlighter-rouge">Try-Catch</code> blocks within specific workflow segments? Here are key reasons:</p>

<h3 id="1-localized-error-handling-and-recovery">1. <strong>Localized Error Handling and Recovery</strong></h3>

<ul>
  <li>If you have specific steps where certain errors are expected or manageable, a <code class="language-plaintext highlighter-rouge">Try-Catch</code> block allows you to handle those errors locally, without allowing them to bubble up and trigger a full transaction retry or transition to a new state.</li>
  <li>For instance, you might expect occasional network timeouts when connecting to a database or web API. With a <code class="language-plaintext highlighter-rouge">Try-Catch</code>, you could log the error and retry the operation locally rather than failing the entire transaction.</li>
  <li>This localized handling is beneficial when errors are recoverable without needing to go back to the start of the ReFramework process.</li>
</ul>

<h3 id="2-customized-logging-and-information-capture">2. <strong>Customized Logging and Information Capture</strong></h3>

<ul>
  <li>The ReFramework does provide logging, but <code class="language-plaintext highlighter-rouge">Try-Catch</code> blocks within specific activities allow for more granular logs and context-specific information.</li>
  <li>You can capture additional details about the error’s context (like the email ID being processed or the specific data item) and log those details right in the <code class="language-plaintext highlighter-rouge">Catch</code> block. This can make debugging much easier when reviewing logs.</li>
</ul>

<h3 id="3-conditional-continuation-or-skip-logic">3. <strong>Conditional Continuation or Skip Logic</strong></h3>

<ul>
  <li>In some cases, you may want to skip a specific item and continue with the next one in a loop rather than failing the entire transaction. For example, when processing a list of emails, if one email is corrupt or missing data, a <code class="language-plaintext highlighter-rouge">Try-Catch</code> around that email processing step allows you to skip just that email and continue with the rest.</li>
  <li>Without a <code class="language-plaintext highlighter-rouge">Try-Catch</code>, any error would bubble up, potentially causing the whole batch to fail or requiring the entire transaction to restart.</li>
</ul>

<h3 id="4-selective-retries-within-the-activity">4. <strong>Selective Retries within the Activity</strong></h3>

<ul>
  <li>As previously discussed, you can implement manual retry logic with a loop combined with a <code class="language-plaintext highlighter-rouge">Try-Catch</code> block for specific actions prone to transient errors.</li>
  <li>This allows you to retry certain actions (e.g., fetching emails from a server) before deciding to let the error bubble up, which can improve the robustness of activities that rely on external systems. This is especially useful for transient errors where a retry is often successful, such as network timeouts.</li>
</ul>

<h3 id="5-preventing-unnecessary-transaction-retries-or-failures">5. <strong>Preventing Unnecessary Transaction Retries or Failures</strong></h3>

<ul>
  <li>If certain errors are not critical, handling them locally prevents them from bubbling up and causing an unnecessary transaction retry in the ReFramework.</li>
  <li>For example, if you’re reading data from an optional source (like an API that might occasionally fail) but can still continue with partial data, handling this locally avoids triggering a larger error flow.</li>
</ul>

<h3 id="summary">Summary</h3>

<p>Using <code class="language-plaintext highlighter-rouge">Try-Catch</code> blocks in specific parts of a workflow within the ReFramework can provide <strong>more granular control</strong>, <strong>localized recovery</strong>, <strong>custom logging</strong>, and <strong>conditional continuation</strong>. While the ReFramework will handle errors that bubble up, adding <code class="language-plaintext highlighter-rouge">Try-Catch</code> blocks in critical segments offers additional resilience, especially for errors that can be handled without escalating to the ReFramework’s top-level error handling.</p>]]></content><author><name>Christian Prior-Mamulyan</name></author><category term="tec" /><category term="phy" /><category term="UiPath" /><category term="products" /><category term="Studio" /><summary type="html"><![CDATA[The UiPath ReFramework (Robotic Enterprise Framework) already includes robust error-handling mechanisms at the top level, specifically to catch and handle:]]></summary></entry><entry><title type="html">Queue Transaction Item Orchestrator Datatypes</title><link href="/tec/phy/uipath/products/studio/2024/11/07/queue-transaction-item-orchestrator-datatypes.html" rel="alternate" type="text/html" title="Queue Transaction Item Orchestrator Datatypes" /><published>2024-11-07T00:00:00+01:00</published><updated>2024-11-07T00:00:00+01:00</updated><id>/tec/phy/uipath/products/studio/2024/11/07/queue-transaction-item-orchestrator-datatypes</id><content type="html" xml:base="/tec/phy/uipath/products/studio/2024/11/07/queue-transaction-item-orchestrator-datatypes.html"><![CDATA[<p>In the UiPath ReFramework, <strong>Orchestrator Queues</strong> provide a high-level infrastructure for managing and processing items, while <strong>data types and variables within the UiPath workflow</strong> implement lower-level methods and properties to handle these items individually within the automation. Here the differences between the functionality managed by Orchestrator and the data types used within UiPath to interact with Queue items.</p>

<h3 id="1-functionality-implemented-in-orchestrator">1. Functionality Implemented in Orchestrator</h3>

<p>Orchestrator provides several high-level functionalities for managing queues and transactions, including:</p>

<ul>
  <li><strong>Queue Management</strong>:
    <ul>
      <li>Orchestrator allows users to create and configure queues, where each queue holds a list of items (transactions) to be processed by robots.</li>
      <li>Within Orchestrator, queues can have retry policies, SLA deadlines, priorities, and can be monitored for completion, errors, and throughput.</li>
    </ul>
  </li>
  <li><strong>Transaction Handling</strong>:
    <ul>
      <li>Orchestrator automatically tracks the status of each transaction item in a queue. Statuses include <code class="language-plaintext highlighter-rouge">New</code>, <code class="language-plaintext highlighter-rouge">In Progress</code>, <code class="language-plaintext highlighter-rouge">Successful</code>, <code class="language-plaintext highlighter-rouge">Failed</code>, and <code class="language-plaintext highlighter-rouge">Abandoned</code>.</li>
      <li>Orchestrator also handles retry logic if configured, so items that encounter <code class="language-plaintext highlighter-rouge">System.Exception</code> errors can be automatically retried without additional logic in the workflow.</li>
    </ul>
  </li>
  <li><strong>Logging and Analytics</strong>:
    <ul>
      <li>Each transaction’s outcome (success or failure) is logged in Orchestrator, allowing users to view detailed reports and analyze process performance.</li>
      <li>Orchestrator logs each error message and allows filtering and exporting of transaction records for reporting and analysis.</li>
    </ul>
  </li>
  <li>
    <p><strong>Error Handling</strong>:</p>

    <ul>
      <li>Orchestrator differentiates between <code class="language-plaintext highlighter-rouge">Application/System Exceptions</code> (e.g., network errors) and <code class="language-plaintext highlighter-rouge">BusinessRuleExceptions</code> (e.g., data validation issues), allowing developers to configure separate handling and retry strategies for <code class="language-plaintext highlighter-rouge">Application/System Exceptions</code>.</li>
    </ul>
  </li>
  <li><strong>Scalability and Parallel Processing</strong>:
    <ul>
      <li>Queues in Orchestrator support distributed processing, enabling multiple robots to work on the same queue and process items in parallel. This allows for greater scalability and improved processing efficiency.</li>
    </ul>
  </li>
</ul>

<p>In summary, Orchestrator manages the overall lifecycle, logging, and retry policies of queue items at a high level, as well as the status of each transaction item.</p>

<h3 id="2-data-types-and-methodsproperties-in-uipath">2. Data Types and Methods/Properties in UiPath</h3>

<p>Within UiPath workflows, specific data types and methods are used to interact with Orchestrator queues. Key data types include:</p>

<ul>
  <li>
    <p><strong>QueueItem</strong>:</p>

    <ul>
      <li><code class="language-plaintext highlighter-rouge">QueueItem</code> is the main data type used to represent individual items retrieved from an Orchestrator queue.</li>
      <li><strong>Properties</strong>:
        <ul>
          <li><code class="language-plaintext highlighter-rouge">SpecificContent</code>: A <code class="language-plaintext highlighter-rouge">Dictionary(Of String, Object)</code> that holds the main data payload of the transaction item. This property is used to access custom fields within each transaction (e.g., <code class="language-plaintext highlighter-rouge">"InvoiceNumber"</code>, <code class="language-plaintext highlighter-rouge">"Amount"</code>).</li>
          <li><code class="language-plaintext highlighter-rouge">Output</code>: Another dictionary used to store the results or outputs of the transaction that can be pushed back to Orchestrator.</li>
          <li><code class="language-plaintext highlighter-rouge">Progress</code>: A string property that represents the current progress status of the transaction. This can be updated throughout the processing of an item.</li>
          <li><code class="language-plaintext highlighter-rouge">Status</code>: Indicates the current status of the <code class="language-plaintext highlighter-rouge">QueueItem</code> in Orchestrator (e.g., <code class="language-plaintext highlighter-rouge">New</code>, <code class="language-plaintext highlighter-rouge">InProgress</code>, <code class="language-plaintext highlighter-rouge">Successful</code>), but it is read-only in the UiPath workflow. The status is managed by Orchestrator itself.</li>
        </ul>
      </li>
      <li><strong>Methods</strong>:
        <ul>
          <li><code class="language-plaintext highlighter-rouge">SetTransactionStatus</code>: Allows the robot to set the outcome of the transaction (Success, Fail with Application Exception, or Fail with BusinessRuleException) and mark it appropriately in Orchestrator.</li>
        </ul>
      </li>
    </ul>
  </li>
  <li>
    <p><strong>Orchestrator API Methods for Queue Items</strong>:</p>

    <ul>
      <li><code class="language-plaintext highlighter-rouge">Get Transaction Item</code>: Retrieves the next available <code class="language-plaintext highlighter-rouge">QueueItem</code> from the specified queue in Orchestrator. This method is used in the <code class="language-plaintext highlighter-rouge">Get Transaction Data</code> state in ReFramework.</li>
      <li><code class="language-plaintext highlighter-rouge">Add Queue Item</code>: Adds a new item to an Orchestrator queue. This is used in processes where robots need to create new work items dynamically.</li>
      <li><code class="language-plaintext highlighter-rouge">Set Transaction Status</code>: Updates the status of a <code class="language-plaintext highlighter-rouge">QueueItem</code> after processing it. This method can set a transaction to <code class="language-plaintext highlighter-rouge">Successful</code>, <code class="language-plaintext highlighter-rouge">Failed</code> (with either <code class="language-plaintext highlighter-rouge">System.Exception</code> or <code class="language-plaintext highlighter-rouge">BusinessRuleException</code>).</li>
    </ul>
  </li>
  <li>
    <p><strong>DataRow as an Alternative</strong>:</p>
    <ul>
      <li>In cases where processes use Excel files, databases, or data tables as transaction sources instead of Orchestrator queues, a <code class="language-plaintext highlighter-rouge">DataRow</code> can represent each transaction item.</li>
      <li><strong>Properties</strong>:
        <ul>
          <li><code class="language-plaintext highlighter-rouge">Item(columnName)</code>: Accesses a specific column value within the row, which is similar to accessing <code class="language-plaintext highlighter-rouge">SpecificContent</code> in a <code class="language-plaintext highlighter-rouge">QueueItem</code>.</li>
          <li><code class="language-plaintext highlighter-rouge">Table</code>: References the <code class="language-plaintext highlighter-rouge">DataTable</code> that the <code class="language-plaintext highlighter-rouge">DataRow</code> belongs to, useful for relational operations within in-memory data.</li>
        </ul>
      </li>
      <li><code class="language-plaintext highlighter-rouge">DataRow</code> is typically processed similarly to <code class="language-plaintext highlighter-rouge">QueueItem</code> within the ReFramework, although without Orchestrator’s automatic status handling and retry features.</li>
    </ul>
  </li>
</ul>

<h3 id="differences-between-orchestrator-functionality-and-uipath-data-types">Differences between Orchestrator Functionality and UiPath Data Types</h3>

<table>
  <thead>
    <tr>
      <th>Feature</th>
      <th>Managed by Orchestrator</th>
      <th>Managed by UiPath Data Types</th>
    </tr>
  </thead>
  <tbody>
    <tr>
      <td><strong>Queue Management</strong></td>
      <td>Yes, including retries, SLAs, priority, and parallel processing</td>
      <td>No</td>
    </tr>
    <tr>
      <td><strong>Transaction Status</strong></td>
      <td>Yes, updated based on SetTransactionStatus from UiPath</td>
      <td>Accessed via <code class="language-plaintext highlighter-rouge">QueueItem.Status</code> but cannot change locally</td>
    </tr>
    <tr>
      <td><strong>Retry Logic</strong></td>
      <td>Configurable in Orchestrator</td>
      <td>Manual retries would need custom logic if done locally</td>
    </tr>
    <tr>
      <td><strong>Logging and Analytics</strong></td>
      <td>Managed and stored in Orchestrator logs</td>
      <td>Only additional log messages for debugging can be added in the workflow</td>
    </tr>
    <tr>
      <td><strong>Transaction Data</strong></td>
      <td>Stored in the Queue as <code class="language-plaintext highlighter-rouge">SpecificContent</code> and <code class="language-plaintext highlighter-rouge">Output</code> fields</td>
      <td>Accessed through <code class="language-plaintext highlighter-rouge">QueueItem.SpecificContent</code> in UiPath</td>
    </tr>
    <tr>
      <td><strong>Error Handling</strong></td>
      <td>Differentiates <code class="language-plaintext highlighter-rouge">System.Exception</code> and <code class="language-plaintext highlighter-rouge">BusinessRuleException</code></td>
      <td>Must specify error types in UiPath, though exceptions bubble up to Orchestrator</td>
    </tr>
  </tbody>
</table>

<h3 id="error-handling-in-orchestrator-for-queue-items">Error Handling in Orchestrator for Queue Items</h3>

<p>In Orchestrator, error handling and retry logic for <code class="language-plaintext highlighter-rouge">QueueItems</code> works as follows:</p>

<ol>
  <li>
    <p><strong>System.Exception (Application Exception)</strong>:</p>

    <ul>
      <li>When a <code class="language-plaintext highlighter-rouge">System.Exception</code> (or any other exception that’s not a <code class="language-plaintext highlighter-rouge">BusinessRuleException</code>) occurs during the processing of a <code class="language-plaintext highlighter-rouge">QueueItem</code>, Orchestrator <strong>can retry the transaction</strong> if retry logic is enabled for the queue.</li>
      <li>Orchestrator’s Queue settings include an option to configure the number of retries for items that fail due to <code class="language-plaintext highlighter-rouge">System.Exception</code>.</li>
      <li>If a <code class="language-plaintext highlighter-rouge">System.Exception</code> occurs and retries are enabled, Orchestrator will automatically create a new attempt for that transaction item after a specified interval. Each attempt is treated as a new <code class="language-plaintext highlighter-rouge">QueueItem</code>, but Orchestrator tracks the retry count.</li>
      <li>The retry limit is configurable in Orchestrator’s Queue settings, allowing you to control how many times a failed transaction should be retried.</li>
    </ul>
  </li>
  <li>
    <p><strong>BusinessRuleException</strong>:</p>
    <ul>
      <li>When a <code class="language-plaintext highlighter-rouge">BusinessRuleException</code> is thrown in the UiPath workflow, Orchestrator <strong>does not retry the item</strong>, regardless of the Queue’s retry settings.</li>
      <li>A <code class="language-plaintext highlighter-rouge">BusinessRuleException</code> is treated as a <strong>non-retriable</strong> failure because it typically indicates a logical or data-related issue that cannot be resolved by simply retrying (e.g., missing required information, invalid data formats, or violated business rules).</li>
      <li>In the ReFramework, <code class="language-plaintext highlighter-rouge">BusinessRuleException</code> is used to indicate that a transaction failed due to a predictable and irrecoverable condition, and retrying the item would not change the outcome.</li>
      <li>Instead of retrying, Orchestrator will mark the <code class="language-plaintext highlighter-rouge">QueueItem</code> as <strong>Failed</strong> and log the <code class="language-plaintext highlighter-rouge">BusinessRuleException</code> details, allowing the item to be reviewed or handled later as needed.</li>
    </ul>
  </li>
</ol>

<h3 id="why-this-distinction-matters">Why This Distinction Matters</h3>

<p>This distinction is important because it allows developers to classify errors based on their recoverability:</p>

<ul>
  <li><strong>System.Exceptions</strong> often represent transient or environmental issues (like network timeouts or file access errors), where a retry might succeed.</li>
  <li><strong>BusinessRuleExceptions</strong> represent logical conditions or validation errors that are unlikely to change on a retry, making it more efficient to skip retries for these cases.</li>
</ul>

<p>In summary, <strong>only <code class="language-plaintext highlighter-rouge">System.Exception</code> errors are eligible for retry in Orchestrator</strong> if configured. <code class="language-plaintext highlighter-rouge">BusinessRuleException</code> items are logged as failed without retry attempts, in alignment with their nature as non-recoverable errors.</p>

<h3 id="summary">Summary</h3>

<ul>
  <li><strong>System.Exception</strong>: Orchestrator can automatically retry these exceptions if retries are enabled in the Queue settings.</li>
  <li>
    <p><strong>BusinessRuleException</strong>: Orchestrator does <strong>not</strong> retry items that fail due to <code class="language-plaintext highlighter-rouge">BusinessRuleException</code>. These are treated as final failures without retry.</p>
  </li>
  <li><strong>Orchestrator</strong> provides high-level management for the queue lifecycle, transaction status, error handling, retry logic, and logging.</li>
  <li><strong>UiPath Data Types (QueueItem)</strong> provide access to the specific transaction data and allow local handling of item-specific operations but rely on Orchestrator for overarching control over the queue and item status.</li>
</ul>

<p>These aspects work together to allow the ReFramework to handle large, distributed, and potentially error-prone processes in a reliable, manageable, and scalable way.</p>]]></content><author><name>Christian Prior-Mamulyan</name></author><category term="tec" /><category term="phy" /><category term="UiPath" /><category term="products" /><category term="Studio" /><summary type="html"><![CDATA[In the UiPath ReFramework, Orchestrator Queues provide a high-level infrastructure for managing and processing items, while data types and variables within the UiPath workflow implement lower-level methods and properties to handle these items individually within the automation. Here the differences between the functionality managed by Orchestrator and the data types used within UiPath to interact with Queue items.]]></summary></entry><entry><title type="html">Freeze Frame</title><link href="/tec/phy/blackmagic/atem-mini/2024/10/15/freeze-frame.html" rel="alternate" type="text/html" title="Freeze Frame" /><published>2024-10-15T00:00:00+02:00</published><updated>2024-10-15T00:00:00+02:00</updated><id>/tec/phy/blackmagic/atem-mini/2024/10/15/freeze-frame</id><content type="html" xml:base="/tec/phy/blackmagic/atem-mini/2024/10/15/freeze-frame.html"><![CDATA[<p>choco install visualcpp-build-tools -y
choco install visualstudio2019buildtools –package-parameters “–add Microsoft.VisualStudio.Workload.VCTools” -y</p>

<p>https://visualstudio.microsoft.com/visual-cpp-build-tools/</p>

<p>python -m venv O:\venv\audiovideo
 O:\venv\audiovideo\Scripts\Activate.ps1
 O:\venv\audiovideo\Scripts\pip3.exe install pyatem
 O:\venv\audiovideo\Scripts\pip3.exe install streamdeck</p>]]></content><author><name>Christian Prior-Mamulyan</name></author><category term="tec" /><category term="phy" /><category term="Blackmagic" /><category term="ATEM-Mini" /><summary type="html"><![CDATA[choco install visualcpp-build-tools -y choco install visualstudio2019buildtools –package-parameters “–add Microsoft.VisualStudio.Workload.VCTools” -y]]></summary></entry><entry><title type="html">Wol</title><link href="/tec/phy/openwrt/2024/10/15/wol.html" rel="alternate" type="text/html" title="Wol" /><published>2024-10-15T00:00:00+02:00</published><updated>2024-10-15T00:00:00+02:00</updated><id>/tec/phy/openwrt/2024/10/15/wol</id><content type="html" xml:base="/tec/phy/openwrt/2024/10/15/wol.html"><![CDATA[<p>Prerequisites for Wake-on-LAN (WoL):</p>

<ol>
  <li><strong>Motherboard &amp; BIOS Support</strong>: Enable WoL in BIOS/UEFI settings.</li>
  <li><strong>Network Interface Card (NIC) Support</strong>: NIC must support WoL; enable it in device properties.</li>
  <li><strong>Ethernet Connection</strong>: WoL typically requires a wired Ethernet connection.</li>
  <li><strong>Power Supply</strong>: System should provide standby power (S5 state) to the NIC.</li>
  <li><strong>Network Configuration</strong>: Correct MAC address, subnet, and port settings for the Wake-on-LAN packet.</li>
  <li><strong>Software</strong>: Tool to send the “magic packet” (e.g., Depicus, WakeMeOnLan).</li>
</ol>

<p>Ensure proper configuration on the OS (e.g., Windows, Linux).</p>

<ol>
  <li><strong>Enable WoL on Target Device:</strong>
    <ul>
      <li>Access BIOS or OS settings of the target device.</li>
      <li>Enable “Wake on LAN” (WoL).</li>
    </ul>
  </li>
  <li><strong>Install Required Package on OpenWRT:</strong>
    <div class="language-bash highlighter-rouge"><div class="highlight"><pre class="highlight"><code>opkg update
opkg <span class="nb">install </span>etherwake
</code></pre></div>    </div>
  </li>
  <li><strong>Send WoL Packet from OpenWRT:</strong>
    <div class="language-bash highlighter-rouge"><div class="highlight"><pre class="highlight"><code>etherwake <span class="nt">-b</span> &lt;MAC_ADDRESS&gt;
</code></pre></div>    </div>
    <p>Replace <code class="language-plaintext highlighter-rouge">&lt;MAC_ADDRESS&gt;</code> with the target device’s MAC address.</p>
  </li>
  <li><strong>Automate WoL Using OpenWRT Web UI (Optional):</strong>
    <ul>
      <li>Go to <strong>System &gt; Startup</strong>.</li>
      <li>Add a new script to send WoL command on startup. Example:
        <div class="language-bash highlighter-rouge"><div class="highlight"><pre class="highlight"><code>/usr/bin/etherwake <span class="nt">-b</span> &lt;MAC_ADDRESS&gt;
</code></pre></div>        </div>
      </li>
    </ul>
  </li>
  <li><strong>Ensure Network Setup:</strong>
    <ul>
      <li>Target device must be connected to the same subnet.</li>
      <li>Proper forwarding/routing if WoL is sent across subnets.</li>
    </ul>
  </li>
  <li><strong>Alternative: Web Interface WoL Plugin</strong>
    <ul>
      <li>Install <code class="language-plaintext highlighter-rouge">luci-app-wol</code>:
        <div class="language-bash highlighter-rouge"><div class="highlight"><pre class="highlight"><code>opkg <span class="nb">install </span>luci-app-wol
</code></pre></div>        </div>
      </li>
      <li>Access via <strong>Services &gt; Wake on LAN</strong> on the OpenWRT web UI.</li>
    </ul>
  </li>
</ol>

<p>To execute the <code class="language-plaintext highlighter-rouge">etherwake</code> command via SSH, you can set up an alias or use the <code class="language-plaintext highlighter-rouge">ProxyCommand</code> option in the <code class="language-plaintext highlighter-rouge">.ssh/config</code> file. Here’s how:</p>

<ol>
  <li><strong>Edit <code class="language-plaintext highlighter-rouge">.ssh/config</code>:</strong>
    <div class="language-bash highlighter-rouge"><div class="highlight"><pre class="highlight"><code>vim ~/.ssh/config
</code></pre></div>    </div>
  </li>
  <li><strong>Add the Following Configuration:</strong>
    <div class="language-plaintext highlighter-rouge"><div class="highlight"><pre class="highlight"><code>Host wol-alias
    HostName &lt;OpenWRT_IP&gt;
    User &lt;OpenWRT_Username&gt;
    RemoteCommand /usr/bin/etherwake -b &lt;MAC_ADDRESS&gt;
    ExitOnForwardFailure yes
</code></pre></div>    </div>
  </li>
  <li><strong>Usage:</strong>
    <div class="language-bash highlighter-rouge"><div class="highlight"><pre class="highlight"><code>ssh wol-alias
</code></pre></div>    </div>
  </li>
</ol>

<p><strong>Explanation:</strong></p>
<ul>
  <li><code class="language-plaintext highlighter-rouge">Host wol-alias</code>: Create a custom alias (<code class="language-plaintext highlighter-rouge">wol-alias</code>) for the command.</li>
  <li><code class="language-plaintext highlighter-rouge">HostName</code>: IP address of your OpenWRT device.</li>
  <li><code class="language-plaintext highlighter-rouge">User</code>: Username to log in to OpenWRT.</li>
  <li><code class="language-plaintext highlighter-rouge">RemoteCommand</code>: Executes the <code class="language-plaintext highlighter-rouge">etherwake</code> command when you SSH into <code class="language-plaintext highlighter-rouge">wol-alias</code>.</li>
  <li><code class="language-plaintext highlighter-rouge">ExitOnForwardFailure</code>: Ensures the session exits after the command runs.</li>
</ul>

<p><strong>Note:</strong> Replace <code class="language-plaintext highlighter-rouge">&lt;OpenWRT_IP&gt;</code>, <code class="language-plaintext highlighter-rouge">&lt;OpenWRT_Username&gt;</code>, and <code class="language-plaintext highlighter-rouge">&lt;MAC_ADDRESS&gt;</code> with actual values.</p>]]></content><author><name>Christian Prior-Mamulyan</name></author><category term="tec" /><category term="phy" /><category term="OpenWRT" /><summary type="html"><![CDATA[Prerequisites for Wake-on-LAN (WoL):]]></summary></entry><entry><title type="html">Understanding the IPO Model: A Breakdown of Data Flow with Getters and Setters</title><link href="/biz/it/software-engineering/2024/10/01/IPO.html" rel="alternate" type="text/html" title="Understanding the IPO Model: A Breakdown of Data Flow with Getters and Setters" /><published>2024-10-01T00:00:00+02:00</published><updated>2024-10-01T00:00:00+02:00</updated><id>/biz/it/software-engineering/2024/10/01/IPO</id><content type="html" xml:base="/biz/it/software-engineering/2024/10/01/IPO.html"><![CDATA[<h2 id="introduction">Introduction</h2>

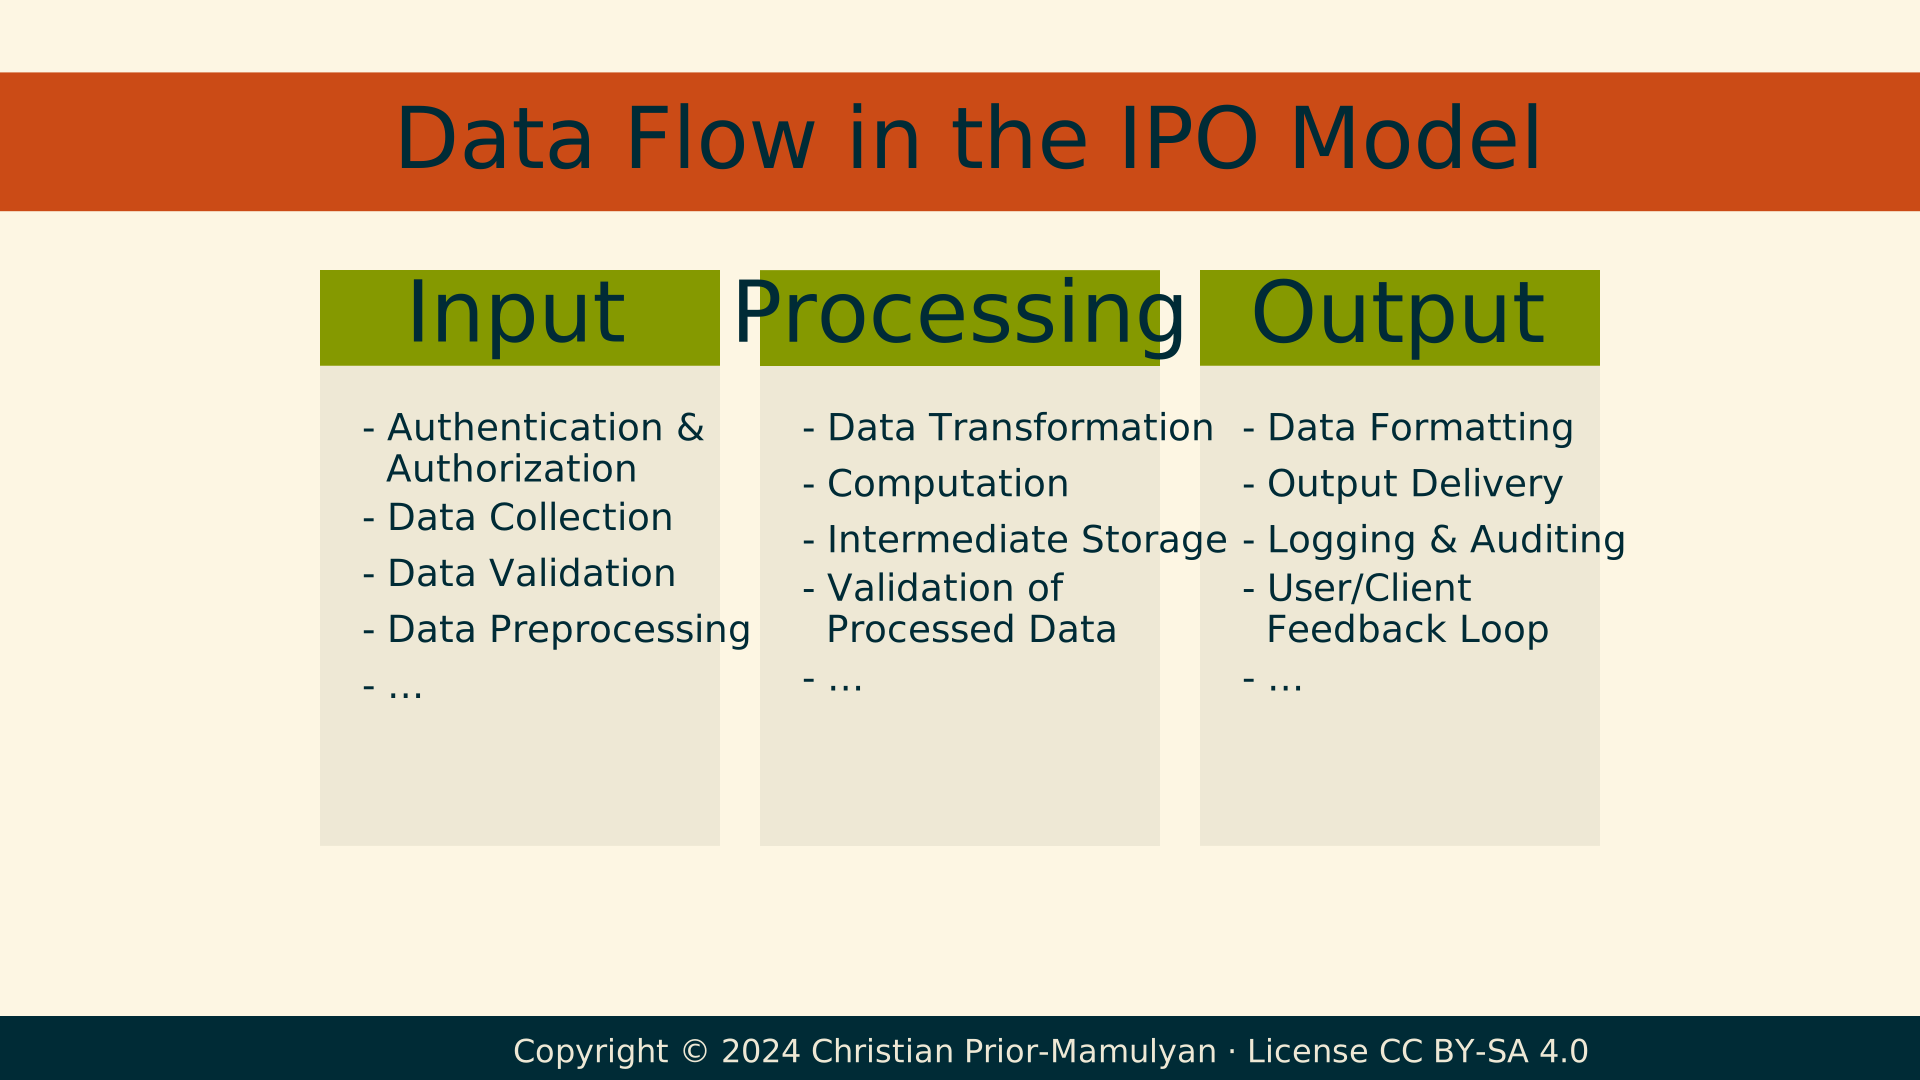
<p>The <strong>Input-Processing-Output (IPO) Model</strong> is a foundational concept in computer science and software development. It describes the flow of data through a system, beginning with data <strong>input</strong>, followed by <strong>processing</strong>, and resulting in <strong>output</strong>. In this article, we’ll break down the IPO model, with a focus on where common programming methods such as <strong>getters</strong> and <strong>setters</strong> fit into the workflow.</p>

<hr />

<h2 id="ipo-model-overview">IPO Model Overview</h2>

<p>The IPO model outlines three key stages that data passes through:</p>

<ol>
  <li><strong>Input</strong>: Data is collected and validated from various sources.</li>
  <li><strong>Processing</strong>: Collected data is transformed, computed, and prepared for output.</li>
  <li><strong>Output</strong>: Processed data is delivered, logged, and outputted to the relevant destination.</li>
</ol>

<p>These stages can be further broken down into substeps, each critical for ensuring efficient and accurate data flow. The table below details the key steps in each stage, along with common naming conventions for functions that carry out these steps.</p>

<table>
  <thead>
    <tr>
      <th>Step</th>
      <th>Common Naming Conventions</th>
    </tr>
  </thead>
  <tbody>
    <tr>
      <td><strong>1.1 Data Collection</strong></td>
      <td><code class="language-plaintext highlighter-rouge">collect_data()</code></td>
    </tr>
    <tr>
      <td><strong>1.2 Data Validation</strong></td>
      <td><code class="language-plaintext highlighter-rouge">validate_data()</code></td>
    </tr>
    <tr>
      <td><strong>1.3 Authentication</strong></td>
      <td><code class="language-plaintext highlighter-rouge">authorize_user()</code></td>
    </tr>
    <tr>
      <td><strong>Getter (access)</strong></td>
      <td><code class="language-plaintext highlighter-rouge">get_user_data()</code></td>
    </tr>
    <tr>
      <td><strong>Setter (modify)</strong></td>
      <td><code class="language-plaintext highlighter-rouge">set_user_data()</code></td>
    </tr>
    <tr>
      <td><strong>2.1 Data Transformation</strong></td>
      <td><code class="language-plaintext highlighter-rouge">transform_data()</code></td>
    </tr>
    <tr>
      <td><strong>2.2 Computation</strong></td>
      <td><code class="language-plaintext highlighter-rouge">compute_results()</code></td>
    </tr>
    <tr>
      <td><strong>2.3 Intermediate Storage</strong></td>
      <td><code class="language-plaintext highlighter-rouge">store_temp_results()</code></td>
    </tr>
    <tr>
      <td><strong>2.4 Validate Processed Data</strong></td>
      <td><code class="language-plaintext highlighter-rouge">validate_processed_data()</code></td>
    </tr>
    <tr>
      <td><strong>3.1 Data Formatting</strong></td>
      <td><code class="language-plaintext highlighter-rouge">format_output()</code></td>
    </tr>
    <tr>
      <td><strong>3.2 Output Delivery</strong></td>
      <td><code class="language-plaintext highlighter-rouge">deliver_output()</code></td>
    </tr>
    <tr>
      <td><strong>3.3 Logging &amp; Auditing</strong></td>
      <td><code class="language-plaintext highlighter-rouge">log_output()</code></td>
    </tr>
    <tr>
      <td><strong>3.4 Feedback Collection</strong></td>
      <td><code class="language-plaintext highlighter-rouge">collect_feedback()</code></td>
    </tr>
  </tbody>
</table>

<hr />

<h2 id="visualizing-the-ipo-process">Visualizing the IPO Process</h2>

<p>To further enhance understanding, we can represent the IPO model as a simple ASCII diagram, showing how data flows between <strong>Input</strong>, <strong>Processing</strong>, and <strong>Output</strong>, and indicating where <strong>getters</strong> and <strong>setters</strong> typically apply.</p>

<div class="language-plaintext highlighter-rouge"><div class="highlight"><pre class="highlight"><code>+----------------------------+      +----------------------------+      +----------------------------+
|          Input              |      |         Processing          |      |           Output            |
+----------------------------+      +----------------------------+      +----------------------------+
| 1.1 Data Collection         |-----&gt;| 2.1 Data Transformation     |-----&gt;| 3.1 Data Formatting         |
|   - Getter: get_user_data() |      |   - Setter: set_user_data() |      |   - format_output()         |
+----------------------------+      +----------------------------+      +----------------------------+
| 1.2 Data Validation         |-----&gt;| 2.2 Computation             |-----&gt;| 3.2 Output Delivery         |
|   - validate_data()         |      |   - compute_results()       |      |   - deliver_output()        |
+----------------------------+      +----------------------------+      +----------------------------+
| 1.3 Auth &amp; Authorization    |-----&gt;| 2.3 Intermediate Storage    |-----&gt;| 3.3 Logging &amp; Auditing      |
|   - authorize_user()        |      |   - store_temp_results()    |      |   - log_output()            |
+----------------------------+      +----------------------------+      +----------------------------+
| 1.4 Data Preprocessing      |-----&gt;| 2.4 Validate Processed Data |-----&gt;| 3.4 Feedback Collection     |
|   - Setter: preprocess_data |      |   - validate_output_data()  |      |   - collect_feedback()      |
+----------------------------+      +----------------------------+      +----------------------------+

                         (Getter: Retrieves data)                  (Setter: Modifies data)
</code></pre></div></div>

<p>In this diagram:</p>
<ul>
  <li>The <strong>Input</strong> stage includes data collection and validation, where <strong>getters</strong> like <code class="language-plaintext highlighter-rouge">get_user_data()</code> retrieve data.</li>
  <li>The <strong>Processing</strong> stage includes data transformation and storage, where <strong>setters</strong> like <code class="language-plaintext highlighter-rouge">set_user_data()</code> modify data as it’s being processed.</li>
  <li>Finally, the <strong>Output</strong> stage formats and delivers the data, often logging and gathering feedback for continuous improvement.</li>
</ul>

<p><img src="/biz/IT/Software-Engineering/resources/InputProcessingOutput.svg" alt="IPO" class="resize" /></p>

<hr />

<h2 id="getters-and-setters-in-the-ipo-model">Getters and Setters in the IPO Model</h2>

<p><strong>Getters</strong> and <strong>setters</strong> are fundamental in object-oriented programming and are used to access and modify object properties:</p>

<ul>
  <li><strong>Getters</strong>: These methods retrieve (or “get”) data from an object. For instance, in the <strong>Input</strong> phase, the method <code class="language-plaintext highlighter-rouge">get_user_data()</code> might be responsible for fetching user input from a form or database.</li>
  <li><strong>Setters</strong>: These methods modify (or “set”) data within an object. During the <strong>Processing</strong> phase, <code class="language-plaintext highlighter-rouge">set_user_data()</code> could update the user information with computed or transformed values before proceeding to the output.</li>
</ul>

<hr />

<h2 id="conclusion">Conclusion</h2>

<p>The <strong>IPO model</strong> provides a clear framework for understanding how data moves through a system, from input to processing to output. By breaking down each phase into substeps and applying modern development techniques such as <strong>getters</strong> and <strong>setters</strong>, developers can ensure efficient, secure, and scalable data handling in their applications.</p>

<p>For more detailed breakdowns and examples, be sure to explore related posts on object-oriented programming patterns and best practices for data handling.</p>]]></content><author><name>Christian Prior-Mamulyan</name></author><category term="biz" /><category term="IT" /><category term="Software-Engineering" /><summary type="html"><![CDATA[Introduction]]></summary></entry></feed>