Automated Analysis of a YouTube Channel
We have been trained in presentation techniques and rhetoric, but for the post-pandemic world the basics of “how to sound good online” is still new territory. So when YouTuber Anders Jensen asked a question about “audio” in LinkedIn I gladly threw some lessons-learned from the past years at him. If these pre-released key takeaways of our upcoming online event are unfamiliar then join us on February the 25th! Registration does not cost anything and after the event no one will try to sell anything to you.
My name is Christian Prior-Mamulyan and I would be glad to see you in the online event!
A flipped classroom … aims to increase student engagement and learning by having pupils complete readings at home and work on live problem-solving during class time. … With a flipped classroom, students watch online lectures, collaborate in online discussions, or carry out research at home, while actively engaging concepts in the classroom, with a mentor’s guidance. Source: Wikipedia entry for “Flipped_classroom”, visited at 2022-02-13
Key takeaways
Good sound for webinars or video conferences starts at the beginning of an audio signal chain with the room sound and the microphone. The room sound is greatly influenced by reflective, absorptive and diffusive qualities of the materials within. The microphone’s polar pattern and frequency response feeds on mic level into the production workflow. A dedicated audio interface solves the analog-digital conversion in hardware; by the way acceptable hardware involved is not wireless. Distributing to YouTube demands for tight control of the normalized loudness and true peak, which can be achieved with compressor, limiter and e.g. the software Youlean Loudness Meter. While doing so an applied EQ (“equalizer”) curve may “fix in post” some deficiencies at the beginning of the audio signal chain. Whether that happens analog at the beginning of the signal chain or digitally in post-production: Audio recording is best understood on the basis of electrical signals and their visual representations like waveforms and frequency spectrums.
- Key takeaways
- Preface
- Preparation
- How it started
- Analysis of the YouTube channel
- Remedies
- knowledge, facts, data
- Skills, Workflows
- Off-The-Shelf Technology
- Applications
Automated Analysis of a YouTube Channel https://www.youtube.com/c/andersjensenorg
Importance of Audio as a success factor Analysis of channel https://www.youtube.com/c/andersjensenorg Remedies Recommended Reading/Watching
Preface
Join Anders Jensen and me on a live session where
- we are going to wrap up first improvements for his video channel and his teaching business
- I share the condensed learning of my past 2 years
- and paint a roadmap for future improvements.
Participants will
- be able to derive actionable ideas from this journey for their own improvements
- distinguish elements of good audio to apply to their own online presence
- rank these by difficulty and affordability
- recognize basic terms and concepts of audio engineering
Goals
- name the YouTube stats for nerds information relating to audio
- predict the YouTube processing ahead of an upload
- differentiate analog from digital components in a recording chain
- rank factors of audio by importance
- Execute a zielführend workflow/timeline of production and post-production
Preparation
Checklists
| 1. Dress Rehearsal Zoom Interview - Participant | |||
|---|---|---|---|
| 1. | Is the Zoom username defined and unikely to change? | ||
| 2. | In the Zoom App, is under Settings > Video near Camera the HD checkbox ticked? | ||
| 3. | In the Zoom App, is under Settings > Audio the appropriate Suppress background noise set? | ||
| 4. | In the Dress Rehearsal, can Original Sound be set to On? | ||
| 5. | Is the microphone level adjustable? | ||
| 6. | Is the loudness meter visible to the participant? | ||
| 2. Dress Rehearsal Zoom Interview - Host | |||
|---|---|---|---|
| 1. | Can the participant be pinned manually? | ||
| 2. | Can the participant be pinned by e.g. ZoomOSC? | ||
| 3. | What is the participant's Zoom name? | ||
| 4. | Can the participant be scraped from a (virtual) monitor with Zoom in fullscreen? | ||
| 5. | Will the participant be fed into OBS with a Window Capture? | ||
| 6. | a | ||
| 7. | b | ||
| 8. | c | ||
| 9. | d | ||
| 10. | e | ||
| 11. | f | ||
| 12. | g | ||
| 13. | h | ||
| 14. | i | ||
| 15. | j | ||
| 16. | k | ||
| 3. Streaming Preshow | |||
|---|---|---|---|
| 1. | connect Wacom One before OBS start | ||
| 2. | Vicreo Hotkey started | ||
| 3. | EpicPen | ||
| 4. | EpicPen in VoiceMeeter | ||
| 5. | Companion instance atem | ||
| 6. | Companion instance Playoutbee | ||
| 7. | Companion instance OBS | ||
| 8. | Companion instance h2r http | ||
| 9. | Companion instance h2r http configured | ||
| 10. | Companion instance VICREO hotkey | ||
| 11. | Moodlebox server | ||
| 12. | Moodlebox authorization | ||
| 13. | ATEM Software Control | ||
| 14. | ATEM Software Control restore | ||
| 15. | ATEM Software Control | ||
| 16. | ATEM Mini | ||
| 17. | ATEM Mini | ||
| 18. | ATEM Mini | ||
| 19. | ATEM Mini | ||
| 20. | ATEM Mini | ||
| 21. | Camera | ||
| 22. | Camera | ||
| 23. | OBS Broadcast | ||
| 24. | OBS Profile | ||
| 25. | OBS Scene Collection | ||
| 26. | OBS Fullscreen Projector (preview) | ||
| 27. | OBS Virtual Camera | ||
| 28. | Zoom Camera | ||
| 29. | Zoom Microphone | ||
| 30. | YouTube Studio | ||
| 31. | Playout Preshow | ||
| 32. | Voicemeeter | ||
| 33. | Voicemeeter Input ATEM Mic | ||
| 34. | Voicemeeter Input Audiointerface | ||
| 35. | Voicemeeter Input with Zoom App | ||
| 36. | Voicemeeter Input with Desktop Apps | ||
| 37. | OBS Audio Mixer | ||
| 38. | Mic preamp DBX286s input gain | ||
| 39. | Mic preamp DBX286s phantom power | ||
| 40. | Mic preamp DBX286s 80Hy bypass | ||
| 41. | Mic preamp DBX286s Process Bypass | ||
| 42. | Mic preamp DBX286s Compressor | ||
| 43. | Mic preamp DBX286s De-Esser | ||
| 44. | Mic preamp DBX286s Enhancer | ||
| 45. | Mic preamp DBX286s Expander/Gate | ||
| 46. | Mic preamp DBX286s Output Gain | ||
| 47. | Zoom started | ||
| 48. | Evo Control with Line Input | ||
| 49. | H2R Graphics Settings Data sources YouTube API key | ||
| 50. | H2R Graphics Data Source Livestream video ID | ||
| 51. | H2R Graphics Data Source Livestream status | ||
| 52. | ZOOM YLM Guest | ||
How it started

Step 1: Reading the incident report
Let us read this comment on LinkedIn as if we were an IT Supporter and this was an incident:
- The reporter mentions that the volume is being turned up
- The room has a certain qualitiy attributed to it (“is quiet”)
- Off-the-shelf technology is mentioned (The RØDE wirelss Go microphone)
- The quality of the recording is described as having white noise
verfifying the incident report
- Listening to the linked video the room is indeed quiet, but has a reverb like a kitchen or
- The term “white noise” is not 100% correctly used, it is safe to assume that “noise floor” is meant
- The description of the audio signal chain is not complete
ticket triage
- more information is needed,
- contact reporter
Analysis of the YouTube channel
YouTube recommendations
https://support.google.com/youtube/answer/1722171
Sources of Noise
Evaluation of all 350+ videos
Hidden Treasures in the YouTube API and youtube-dl output
Remedies
Eliminate *noise
Room
- switch off all noise sources
- minimize sound from the outside coming in
- use headphones (maybe in-ear)
- consider “silent” keyboards
- proper microphone placement as per cardioid pattern and keybord location
- behind your microphone, place something absorbant
Microphone Technique
- balance closeness to the microphone and amplification to minimize amplification of electrical noise
Audio Signal Chain
- do not use an onboard soundcard
- use noise cancellation with care
Room Acoustics, Reverberation Time and Clap Test
The journey to improve the audio quality of a recorded narration for webinars or in videoconferences does not start with buying equipment. Because equipment is used inside a room and the room is where it starts.
The requirements to record for webinars are very similar to those of the voice actors, or voice over artists. And they are quite different from music producers or audio mixers. And quite different from high fidelity music listeners. So this kind of narrows down from whom to take advice from. Another good source of advice are audio engineers in churches, by the way. And with a bit of training our own ears are another authoritative judge!
Within the room there will be direct sound and reflected sound from the walls and surfaces. The physical properties of these surfaces make or break a good room acoustic! Only so-called anechoc chambers have no reflected sound and they are not a good thing to strive for, by the way.
The reflected sound will hit our microphone again and decrease the quality of our recording. This reflected sound is THE most important aspect that needs to be controlled. Worst case is to sit between two hard walls which reflect our spoken word multiple times into the microphone until it dies down in volume.
And let’s not forget that there is a reflective ceiling, too!
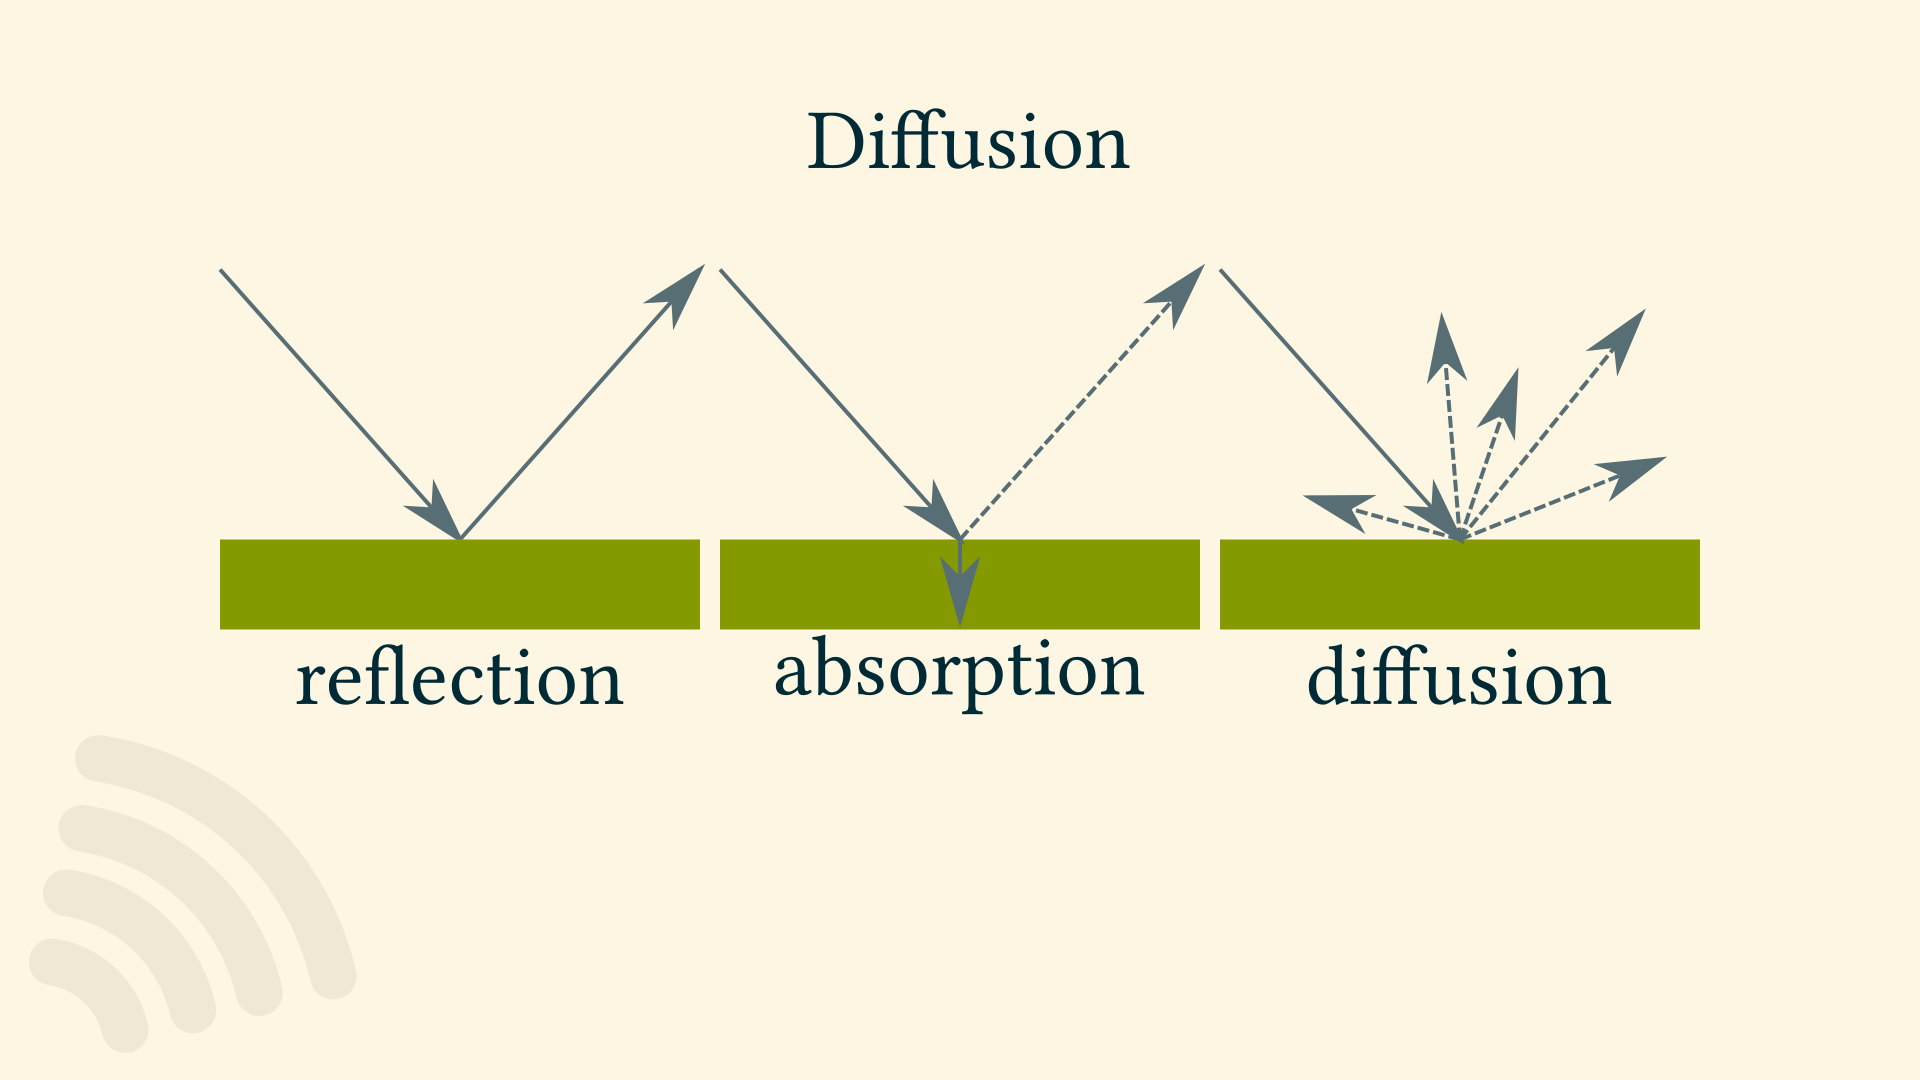
To reduce reflections both absorption and diffusion will improve the room acoustics. Examples for absorptive materials are:
- acoustic foam
- furniture
- curtains
- rugs
- acoustic bass traps and of course
- sound blankets
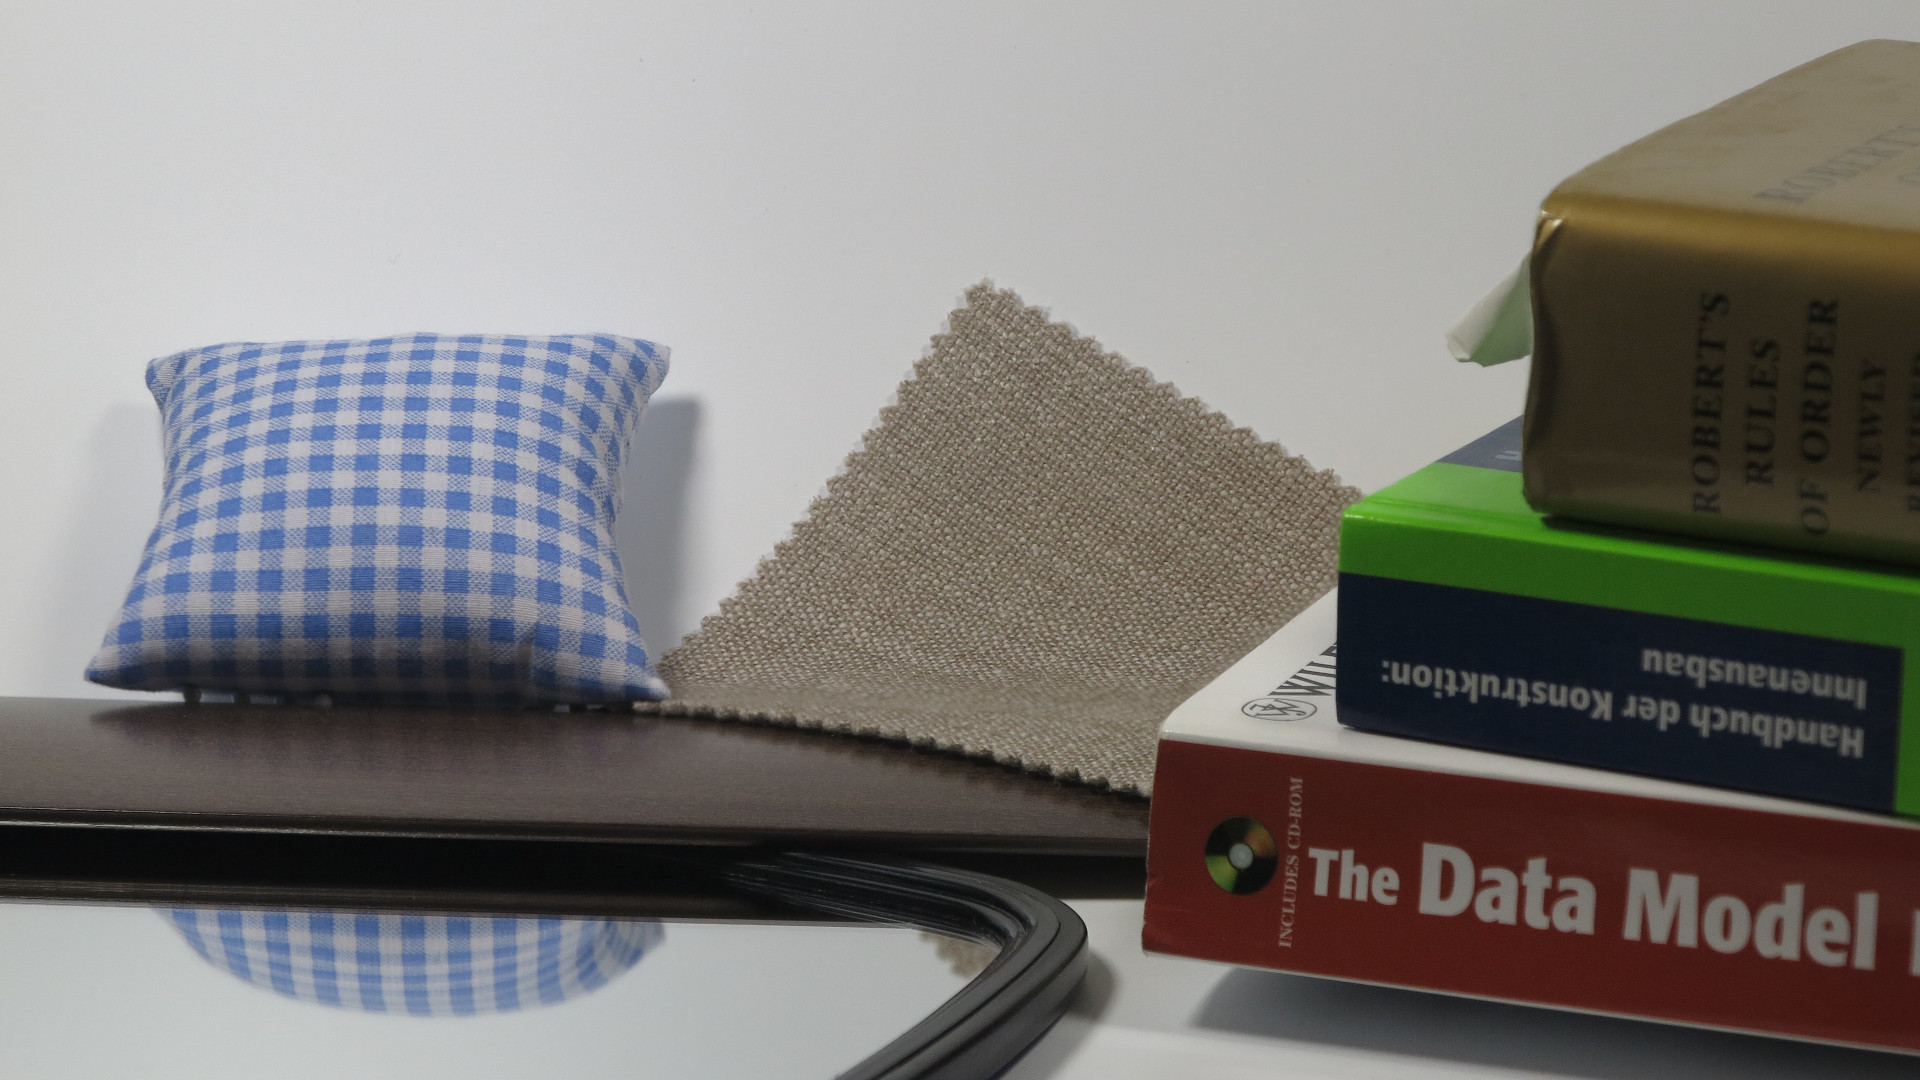
Diffusive materials are
- bookshelves
- sound diffusors
A measurable property of the room is its reverberation time, which can be measured in according to ISO standards – or performed with simple tools which is good enough in our context.
First, what is exactly meant with reverberation time?
Reverberation is the acumulated reflection of sound. It is what we hear in a bathroom. Reveberation time is the time it needs to fade away.
Most common method is to measure the RT60 which is the time in seconds until a loud sound decays by 60 decibels.
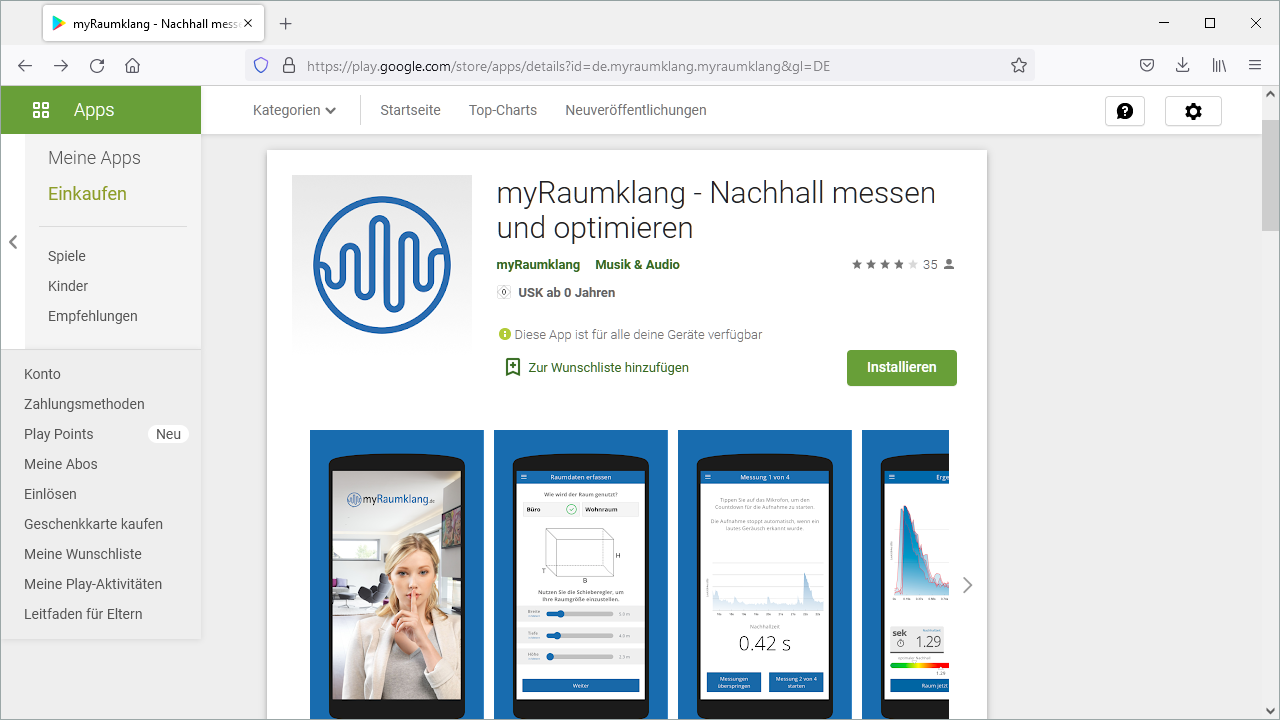
All this is another way of saying: Do a clap test, there is even an app for this!
Either the app or our own recording with our existing microphone into a software that displays a waveform will give us a measurement in seconds.
Then we do a few improvements, and measure again, and listen to our recording again.
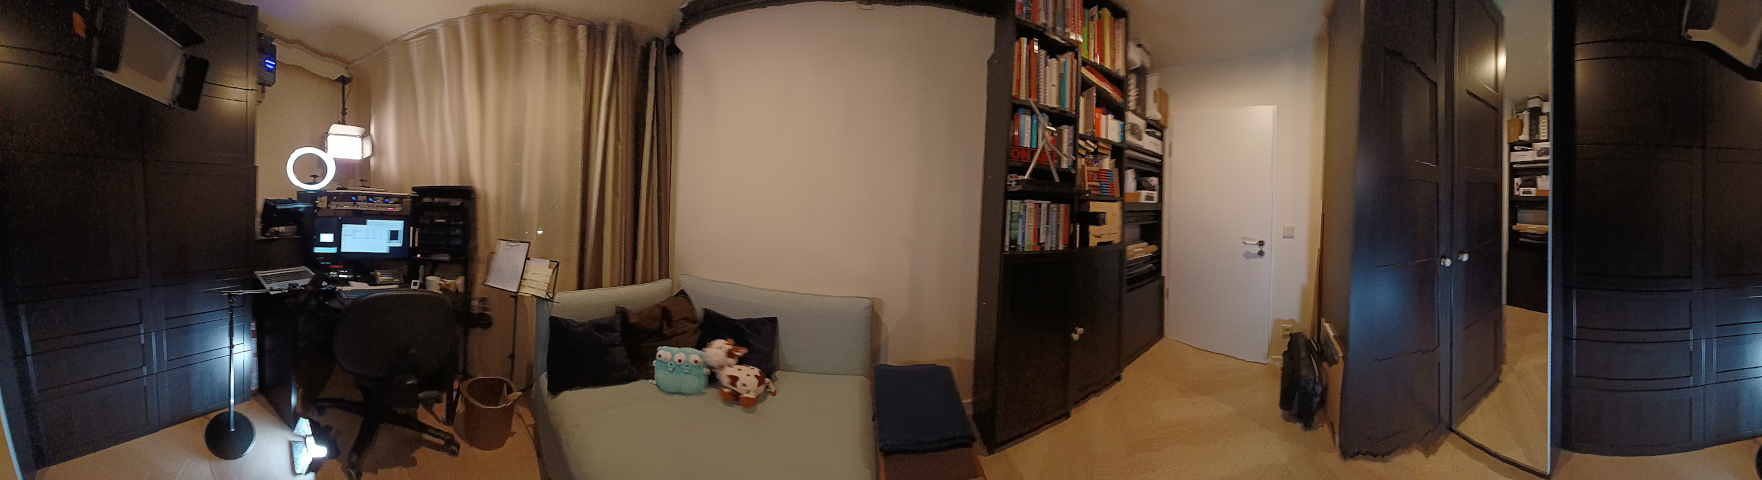
In my room I have both hard and absorbant materials. But as the sound of my voice does not bounce back from the hard surfaces into the microphone I have not negative effect by the hard wooden cupboard doors. So a good room for audio recording does not need to be covered in foam all around!
The biggest problem of my room is that the heating pipes transmit sound from the teenagers room underneath. Reverberation time does not fix THAT. Maybe I will give them a gamer’s headset next christmas! ;)
Going by sich an RT60-like measurement means that it is easy to find out when to stop improving the room acoustic, and focus on other aspects of good audio in webinars!
Resources
https://www.nti-audio.com/en/applications/room-building-acoustics/reverberation-time
http://www.larsondavis.com/learn/building-acoustics/Reverberation-Time-in-Room-Acoustics
my room
https://imgur.com/a/NHX2XGe
Audio Settings on Windows
Checklist
| 1. Windows 10 Audio Recording Inventory | |||
|---|---|---|---|
| 1. | Are ASIO drivers installed? | ||
| 2. | What recording software is used? | ||
| 3. | Does the recording software also function as a communication software? | ||
| 4. | What is the Default Device for Recording? | ||
| 5. | What is the Default Device for Playback? | ||
| 6. | What is the Default Communication Device for Recording? | ||
| 7. | What is the Default Communication Device for Playback? | ||
| 8. | If an audio interface is used, does it have a monitoring output? | ||
| 9. | If an audio interface is used, which driver type is used? | ||
| 10. | If an audio interface is used, does it come with a Bitfocus Companion module? | ||
| 11. | If an external microphone is used, what is its transducer type? | ||
| 12. | If an external microphone is used, what cable does it have? | ||
| 13. | If an external microphone is used, does it need phantom power? | ||
| 14. | If an external microphone is used, what is its polar pattern? | ||
| 15. | If an external microphone is used, what is its frequency response? | ||
| 16. | If an external microphone is used, how is it adressed? | ||
| 17. | The Sound Settings of the Default Device for Recording has which level set? | ||
| 18. | The Sound Settings of the Default Device for Recording show which sample rate? | ||
| 19. | The Sound Settings of the Default Device for Recording show which setting for exclusive mode? | ||
| 20. | The Sound Settings of each Device for Recording has which level set? | ||
| 21. | The Sound Settings of the Default Device for Recording show which sample rate? | ||
| 22. | The Sound Settings of the Default Device for Recording show which setting for exclusive mode? | ||
| 23. | In the Volume Mixer, which output levels are set? | ||
| 24. | In the "App volume and device preferences", which App Volume levels are set for Output? | ||
| 25. | In the "App volume and device preferences", which App Volume levels are set for Input? | ||
| 26. | In the recording software, which input device is set? | ||
| 27. | Is something plugged into headphone/speaker/microphone jack(s)? | ||
| 28. | In the Sound Settings Sounds panel, which sound scheme is set? | ||
| 29. | In the Sound Settings Communications panel, which audio ducking/volume control is set? | ||
| 30. | If a Realtek chipset is built in, are in Realtek HD Audio Manager for the Microphone device Microphone Effects Disabled? | ||
| 31. | In Settings > Privacy > Background Apps, are any apps switched off that might interfere with audio recording? | ||
| 32. | In Control Panel > Hardware > Power Options, is High Performance Setting set? | ||
Loudness GUI
Controlling the loudness during the duration of a recording is a standard workflow in videoproduction.
Here a overview of commonly implemented GUI graphical user interface functionality is shown.
This video shows the software Davinci Resolve.
This video shows the software Audacity.
To make a future edit as easy as possible it is a good idea to work on a copy of the audio track.
There is a handle to change the level of a single clip with the mouse.
The whole track also has a level, here adjustable by a slider and direct entry.
A double click resets the setting.
The beginning of the clip may get a Fade-In. And the end of the clip may get a Fade-Out.
But now the most important part:
Along the timeline at desired positions “keyframes” are inserted.
Each keyframe may get an individual level,
- either by dragging it with the mouse,
- or by a slider,
- or direct entry.
In between the keyframes the software calculates the intermediate value, by default with a linear algorithm.
Every program with more than just a basic feature set will also offer an ease-in and/or ease-out influce for finer control of an otherwise abrupt new state. This software implements this feature with Bezier curve handles. Although for audio projects this particular control it is less important than in – for example animation.
Recommended Reading/Watching
Checklist for All Things Audio
To reduce complexity a lot can be learned from the aviation industry: Their checklist culture is outstanding and based on very
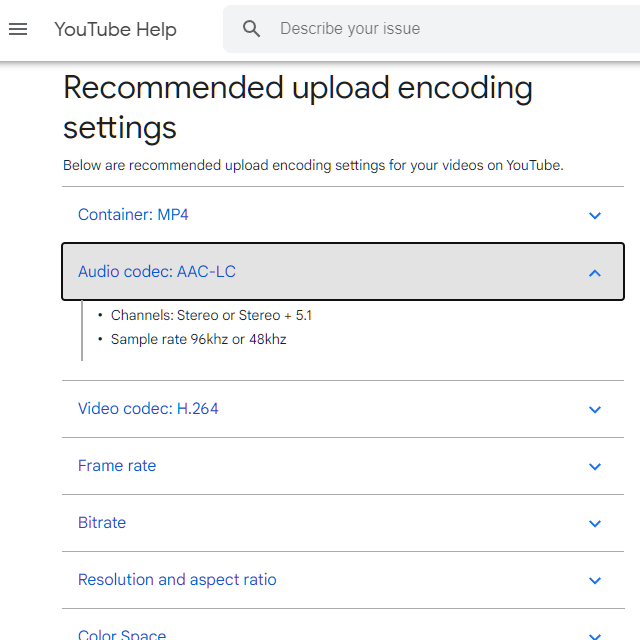
YouTube Recommended upload encoding settings
Checklist
| 1. YouTube Pre-Upload Audiotrack | |||
|---|---|---|---|
| 1. | How many audio tracks does the video contain? | ||
| 2. | Is the audio track in stereo or mono? | ||
| 3. | Which sample rate was the audio encoded with | ||
| 4. | What is the bit depth? | ||
| 5. | What Audio Codec is used? | ||
| 6. | What Bit Rate is used? | ||
| 7. | Does the waveform show spikes? | ||
| 8. | Was the track suitably compressed? | ||
| 9. | Is the Loudness below YouTube standard? | ||
| 10. | Are the True Peaks kept in check, e.g. with a limiter? | ||
| 11. | Is the noise floor quiet? | ||
| 12. | If background music is used, is speech still intelligeable? | ||
| 13. | Are there any parts in the audio that should be replaced by room sound? | ||
| 14. | Are there any lessons learned for the next recording? | ||
knowledge, facts, data
Audio Signal Levels
Using a microphone with a computer is actually an interesting mix: Any digital recording actually starts and ends in the Analog Domain of the physical world, and digital is only the middle part. Both the microphone and the loudspeaker are analog devices.
And a microphone produces at its core a continous electrical signal, done by converting vibrations into electrical energy, and a very low signal that is: The result is an induced voltage of a few millivolt – that is thousandths of a volt. This is very LOW!
In our webinars and YouTube videos signals are passed between audio equipment on
- microphone level and
- line level (in its consumer line level variant)
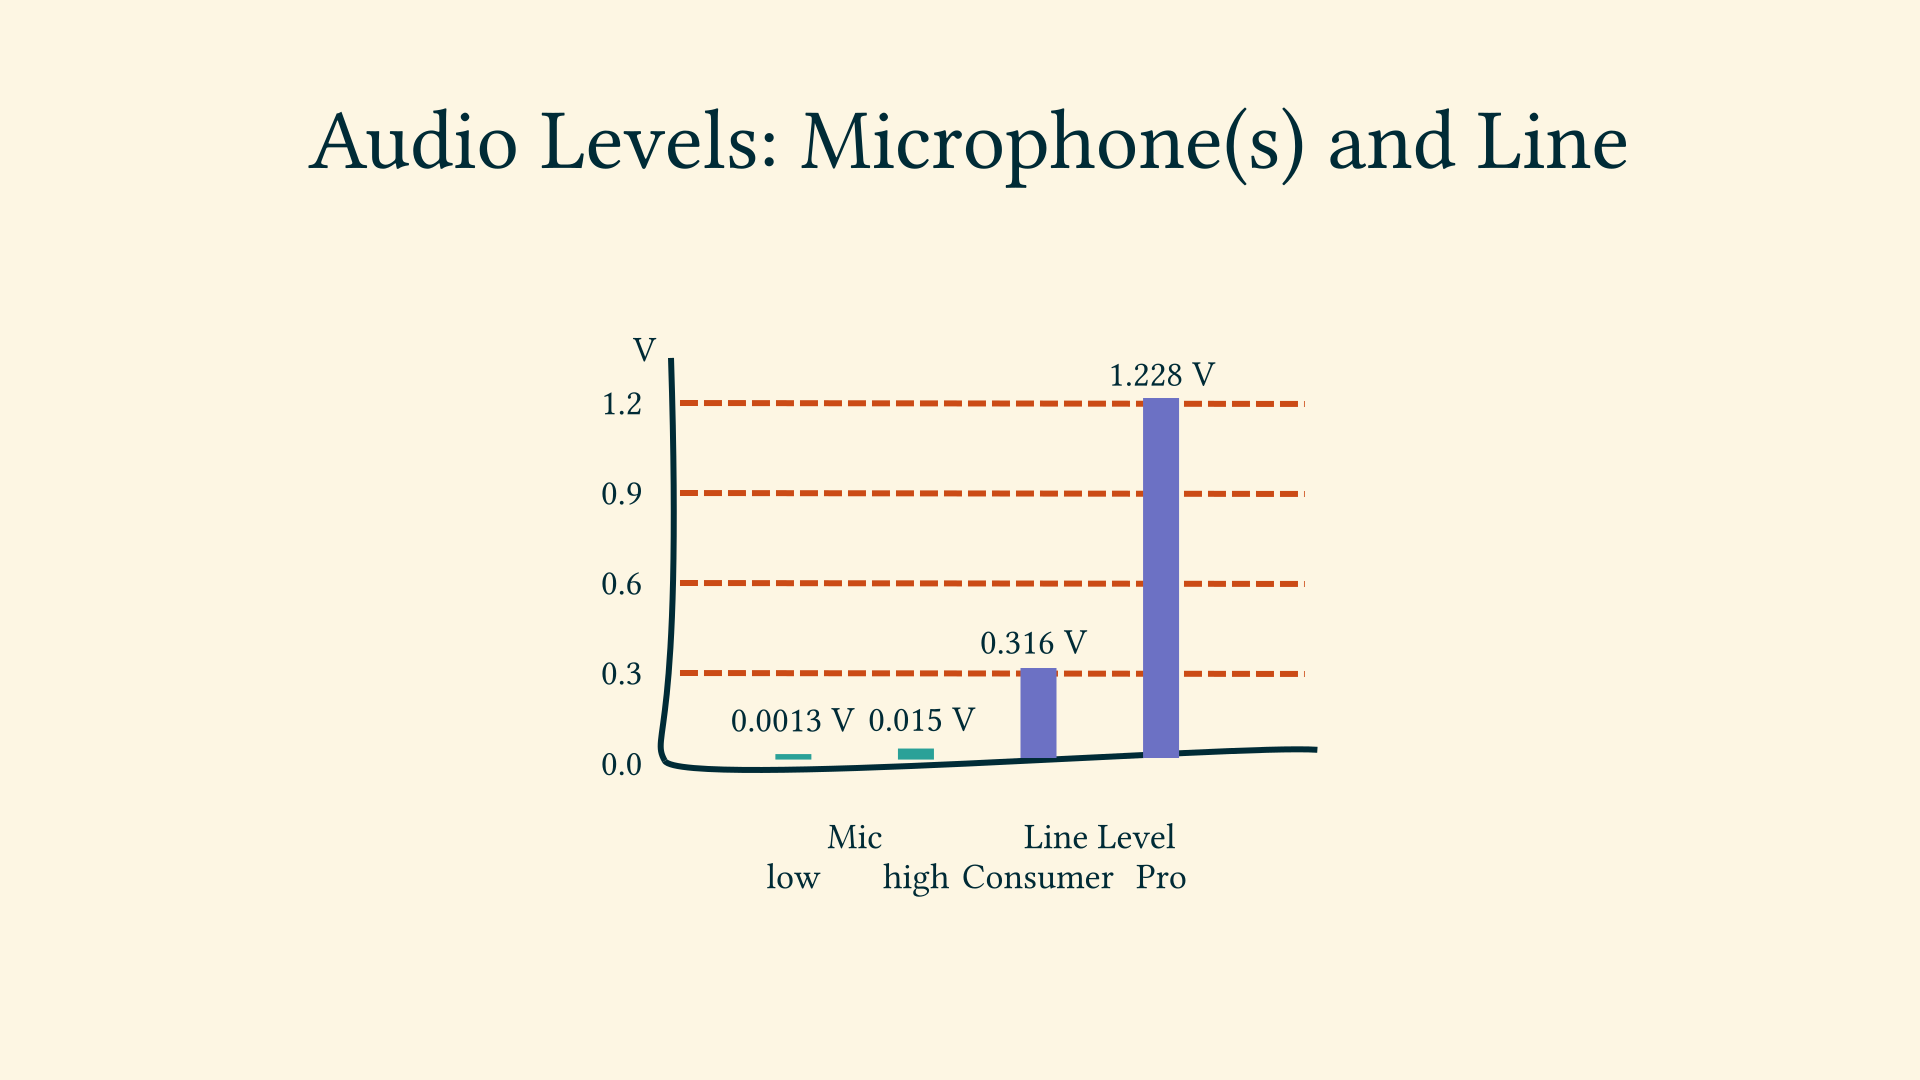
It is the functionality of
- either a pre-amplifier and
- the audio interface
to raise the mic level to line level, which is suitable to pass signals between equipment.
Sometimes we see on equipment the label “instrument level”, this is slightly below consumer line level.
All this gives us a hint that a microphone is best understood with the mindset of an electrical engineer.
The Audio Frequency Spectrum
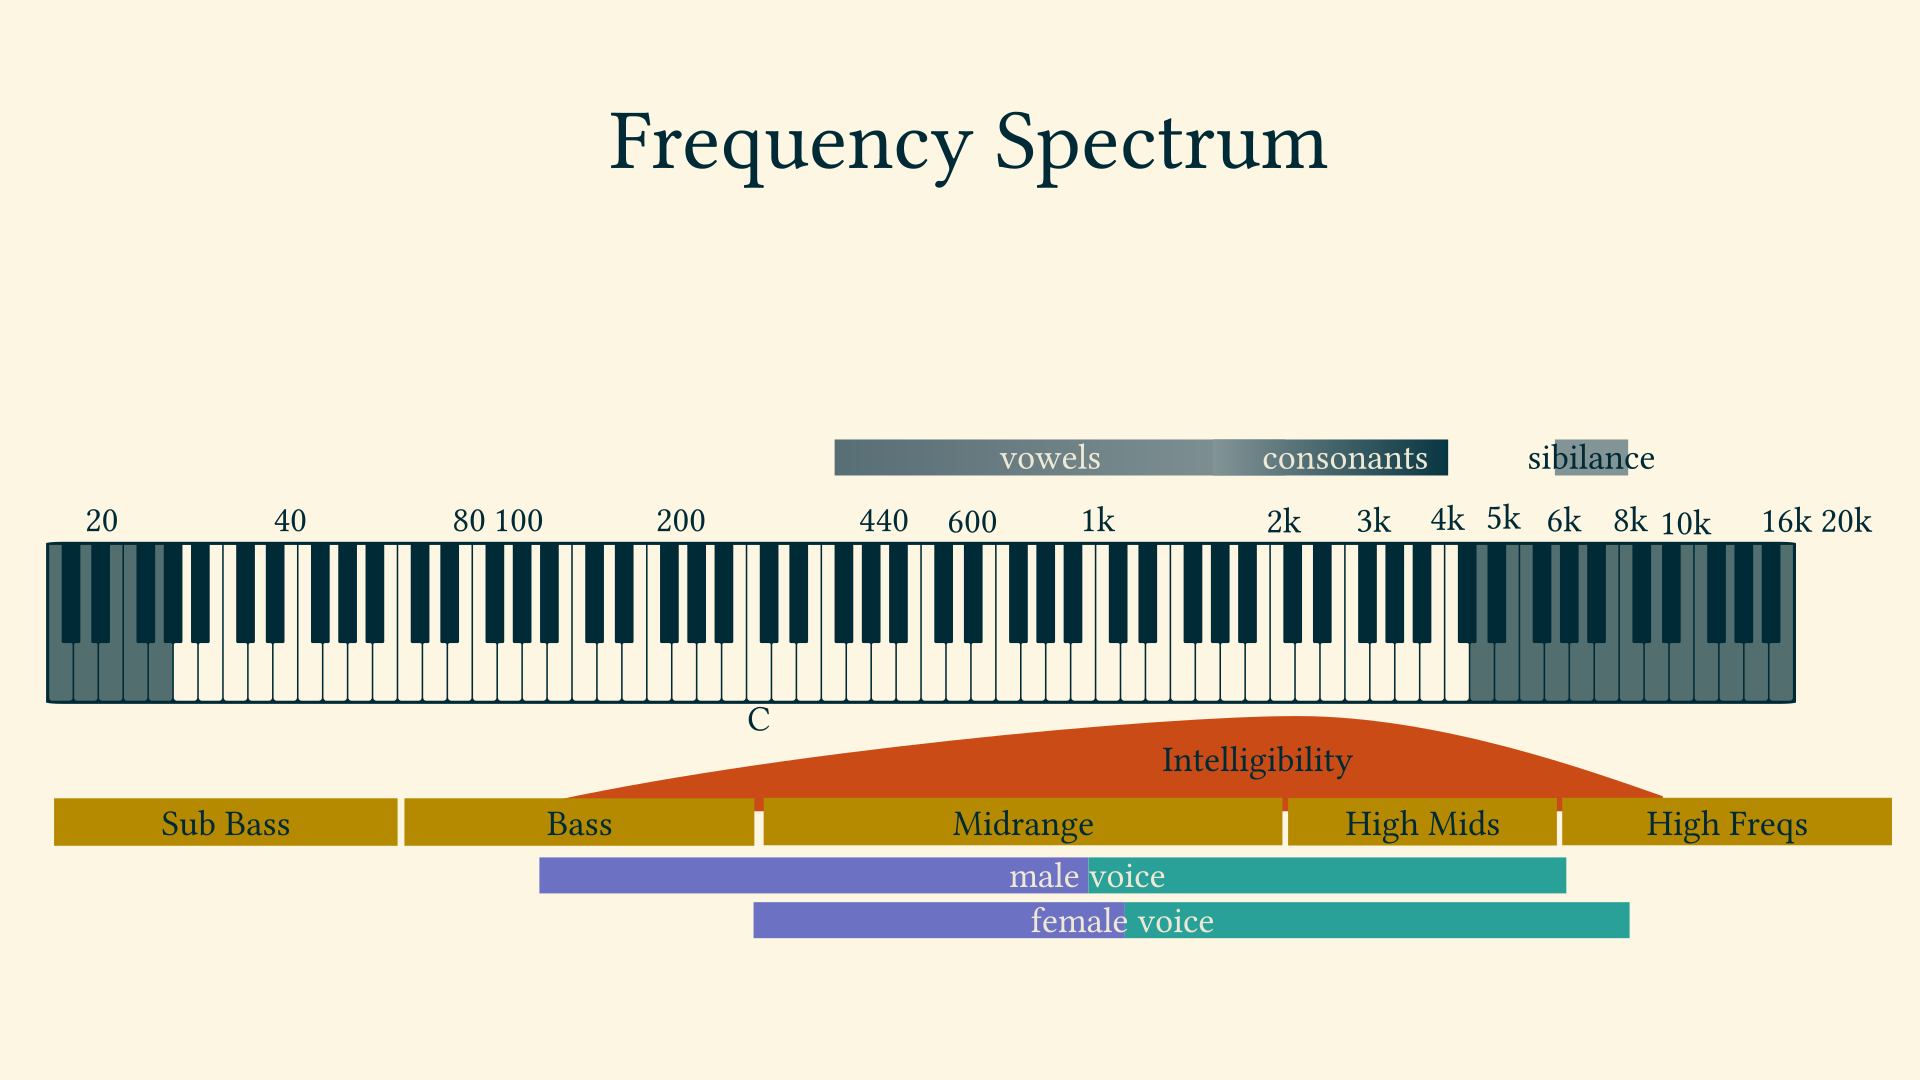
logarithmic scale
20-20k Hz hearing “but…” 200 - 6000 male voice 400 - 8000 Hz female voice
while human hearing spans ten octaves, human speech only covers about five octaves. source: https://larryjordan.com/articles/eq-warm-a-voice-and-improve-diction/
ranges
Our speaking voice has three frequency ranges that need to be understood;
- Fundamentals. The fundamental frequencies of speech occur roughly between 85Hz and 250Hz.
- Vowels. Vowels sounds contain the maximum energy and power of the voice, occurring between 350Hz and 2KHz.
- Consonants. Consonants occur between 1.5KHz and 4KHz. They contain little energy but are essential to intelligibility. https://www.behindthemixer.com/how-eq-speech-maximum-intelligibility/
- Low-End Noise - 20 Hz to 80 Hz
- Boominess - 80 Hz to 300 Hz
- Muddiness - 250 Hz to 500 Hz
- Nasal Honk - 800 Hz to 1.5 kHz
- Presence - 4.5 kHz to 9 kHz
- Breathiness - 10 kHz to 15 kHz https://ledgernote.com/columns/mixing-mastering/how-to-eq-vocals/
By the way, the reason why we record in 44.100 Hz or for videos 48.000 Hz is that this is 2 times 20.000 Hz plus a bit of extra for the sampling filter to work.
-> Nyquist frequency
sibilance:
Vocal sibilance is an unpleasant tonal harshness that can happen during consonant syllables (like S, T, and Z), caused by disproportionate audio dynamics in upper midrange frequencies. Vocal sibilance is a phenomenon of disproportionate dynamics within an isolated frequency range. In other words, it is a problem of too much loudness contrast within a small frequency range of a waveform that has a dynamic profile of its own. The de-esser technique typically uses a narrow peak EQ in the sidechain path to boost the most offensive sibilant frequencies. This EQ exaggerates the dynamic difference between the sibilant band and the rest of the vocal waveform, making it much easier to achieve gain reduction during those consonants (and only then).
https://theproaudiofiles.com/vocal-sibilance/
intelligibility: https://www.dpamicrophones.com/mic-university/facts-about-speech-intelligibility
Loudness
Do you remeber the times when TV commercials were so much louder than the actual TV content? That was the time when the human perception of loudness was not taken into consideration.
The signal level on microphone or line level are measured with a technical reference, and the loudness innovation was to measure according to the human perception. This started at about 2010.
Nowadays streaming service like Spotify and – you guessed it – YouTube use the loudness across a while song or video to adjust loudness. YouTube actually only lowers the loudness, and protects users with headphones that way.
Based on what is called the Fletcher Munson Curve of human loudness perception a loudness measurement is a statistically determined value over time, either
- short-term or
- integrated, that means over for example a whole YouTube video.
Software like Youlean Loudness Meter analyze the audio and returns a graphical representation.
Why is this important?
Because when the production loudness did differ from the target platform’s rules then it makes sense to adjust the distribution loudness, to not leave it up to the streaming service to mess about with the audio.
YouTube for example will
- turn down videos that are integrated –which mean over the full duratio – louder than -14dB LUFS (which is the ludness unit).
- but YouTube will not turn the loudness up if it was too low to begin with!
The loudness measurement makes our – hopefully many – recordings comparable comparable between each other.
Methods to influnce the loudness of a recording are
- the complressor or
- the amplifier
The loudness measurement also helps us to adjust an interview partner to the same loudness as the host.
Online tool: https://www.loudnesspenalty.com/ Stats for nerds: https://productionadvice.co.uk/stats-for-nerds/
| YouTube loudness normalization | What you need to know https://www.youtube.com/watch?v=wIicS8hKbeQ |
intro: loud commercials
goal: relevance for YouTuber and what are the key concepts behind it
//caveat: peak audio AND loudness
toc
- what is loudness, what is loud
- perception
- (Fletcher Munson Curve)
- we hear the mids more prominently than bass and highs
- excursion: music production, TV
- European Broadcast Union (EBU) OR EU, consumer protection, 2010
- now https://www.itu.int/dms_pubrec/itu-r/rec/bs/R-REC-BS.1770-4-201510-I!!PDF-E.pdf
- also: playlist shuffle
- example overcompressed track https://magroove-files.s3.amazonaws.com/magroove-blog/wp-content/uploads/2019/08/Nivel-em-LUFS-de-diferentes-faixas-de-%C3%A1udio-768x480.jpg
- peak, RMS, LUFS, …
- negative numbers because referenced to full scale of the maximum that a system can handle
- RMS is not adjusted to human hearing
- LUFS k-weight https://youlean-129cf.kxcdn.com/wp-content/uploads/2020/05/Screen-Shot-2020-05-03-at-7.06.08-PM-3.png https://youlean.co/how-to-hack-lufs-normalization/
- high LUFS “means compression” == loss of dynamic range
- statistics over time
- short-term
- integrated
-
true peak
- production loudness
- distribution loudness
To remain on the practical side of things:
- example LUFS graph over time
-
YouTube rules, and other platforms
-
YouTube rules -> YLM features
- resulting action / Applying This Knowledge
- separate master mixes for each platform
- or rely on “them” to turn it down
- measure after the adjustments!
Youlean Loudness Meter 2 (Free and Pro) Mastering The Mix LEVELS (Paid) iZotope Insight 2 (Paid) Waves WLM Plus Loudness Meter (Paid)
Technical Document AESTD1008.1.21-9 (supersedes TD1004) Recommendations for Loudness of Internet Audio Streaming and On-Demand Distribution September 24, 202 https://www.aes.org/technical/documentDownloads.cfm?docID=731
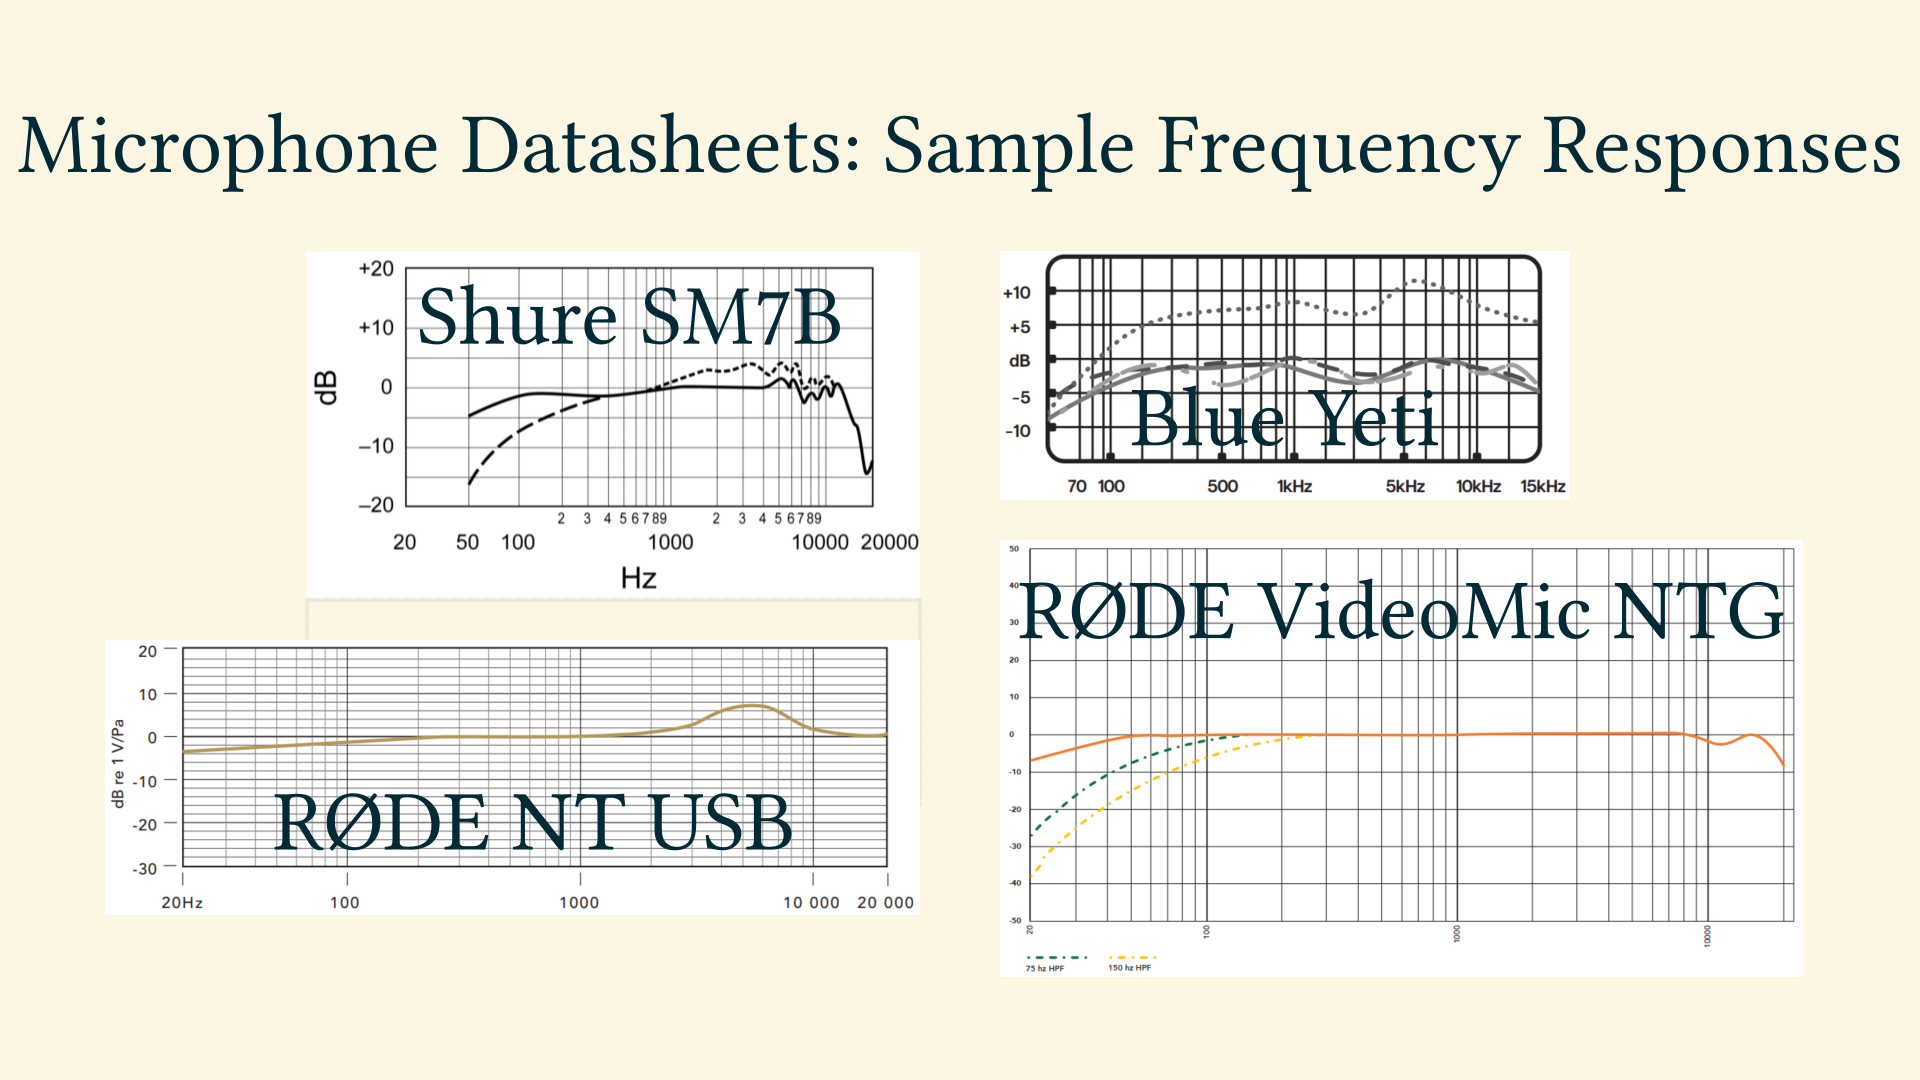
Reading Microphone Datasheets
For the novice a less readable part of datasheets of microphones might be the graphs about polar patterns and frequency responses. But that part is sooo important!
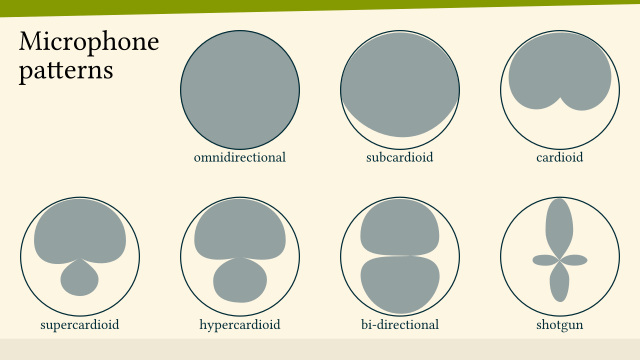
Polar Patterns
The polar pattern depicts the sencsitivity to sounds arriving from different angles. A polar graph uses angles as reference system, different from the more ubiquitous cartesian graphs with their x, z and mazbe z axis. The practitioner can read from a microphone’s polar pattern graph how to best position the micriphone so that it does not pick up for example typing noise from the keyboard.
Frequency Responses
With the microphone at the very beginning of a recording signal chain it is highly advisable before doing any later EQ “equalisation” changes to the frequency spectrum to study what the microphone did apply to the frequencies at the very beginning. If the practitioner knows that the microphone has what is commonly referred to as presence boost in the (roughly) 3 kHz to 6 kHz range: Then there will hardly be any need to further boost that range in post production.
The polar patterns also show in raw data what otherwise might get marketing terms applied to, like “Exciter” oder “ContourFX”.
Skills, Workflows
GUI Elements for ampli…
Types of Audio Editing
7 types https://audioaural.com/what-are-the-7-types-of-audio-editing-techniques/
- amplification: increase the volume
- compression: change the dynamics
- limiting: limit sound above a certain level
- panning: move the sound in and between left and right stereo channel
- equalization: changes to the frequency spectrum; low-cut, high-cut, bell boost
- normalization: //fixme
- stereo imaging: “from mono to stereo” //fixme
Preface:
In the context of audio, Dynamic Range is the difference in Decibel between the quietest and loudest part. It can refer to both the dynamic range of the audio track(s) in a video, or the capabilities of a signal chain consisting of hardware and software.
The quietest part of a signal chain is called noise floor and each piece of equipment has one – even a cable.
The dynamic range can be altered by compression and expansion: Compressors (and in its extreme form Limiters) reduce Dynamic Range, while Expander (and in its extreme form Gates) increase it.
Wait, what? A Noise Gate does INcrease what exactly? Heh – the dynamic range!
By the way, in an audio )post-)processing workflow they have their place, and quite often chained after each other.
https://ask.audio/articles/mixing-concepts-what-is-dynamics-why-you-should-care
- noise gate
- expander
Compressor
A compressor (is an electrical amplifier that) reduces the dynamic range of a signal. Basically, it brings the loud and quiet parts closer together in terms of volume. Most compressors have a few standard controls: Threshold determines how loud the incoming signal needs to be before it gets any treatment. Ratio adjusts how much the incoming signal, that is above the threshold, is compressed. The higher the ratio, the more squished the sound. Attack/Release controls how long it takes the compressor to react to the incoming signal. Lastly, input gain simply makes the pretreatment sound louder, allowing more of the signal to be above threshold, resulting in more compression. https://www.dancemusicnw.com/compressors-expanders-gates-explained/
Threshold: high for limiting, at quietest for overall compression. set at level of tyical distance to typical level Ratio 4:1 for voice recording (3:1 - 5:1) Attack: 3ms time attack quickly, release slower Release time 100ms <————- longer than release, for drawn-out endings of words; if too long it nerver releases and we hear a so-called “pumping effect” Knee <– for voice not so important, it’s like a bezier curve at the threshold
Make-up gain or output gain: Not necessarily an aspect of the compressor. But as the compressor, making the loudest parts quieter, tends to turn the overall level down, there is a need to raise the overall level by adding make-up gain.
Recommended “reading”: https://www.youtube.com/watch?v=DYOuClAWokg Compression for Voiceover Booth Junkie
Expander and Gate
A Gate, or noise gate, is like an inverted compressor: Instead of limiting signals above a given threshold, the gate lowers a signal below a given threshold.
Equalisation: Changes to the Frequency Spectrum
Sibilance
start with microphjone frequency response chart
Types of EQ
- Graphic EQ
- Parametric EQ
Parametric EQ
Use studio headphones
- Low-pass: Removes all frequencies above a set frequency
- High-pass: Removes all frequencies below a set frequency
- Low-shelf: Attenuates all frequencies below a set frequency
- High-shelf: Attenuates all frequencies above a set frequency
- Peak: Increase frequencies at a set frequency
- Notch: Decrease frequencies at a set frequency
Remember to use a narrow Q factor when you’re cutting frequencies and use > a wide Q factor when boosting. But rules can be broken, just as long as > it sounds good. https://talkinmusic.com/how-to-eq-vocals/
no recipes, rather stretegies
The most obvious approach to EQ is push up more of what you want to hear. Getting the right microphone for the voice and recording it well should mean little or no EQ is needed. … If the performer was sticky and click-y, you’ll be hard pressed to boost in the 2-5 kHz range and not bring out mouth noise in the process. In my experience EQ isn’t going to help you get rid of mouth noise, but it can definitely make it worse. https://theproaudiofiles.com/voice-processing-eq-cuts-boosts/
- what happened before? (mic frequency response)
- Roll off the low-end starting around 90 Hz.
- Reduce the mud around 250 Hz.
- Add a high shelf around 9 kHz & a high roll off around 18 kHz.
- Add a presence boost around 5 kHz.
- Boost the core around 1 kHz to 2 kHz.
- Reduce sibilance around 5 kHz to 8 kHz.
https://ledgernote.com/columns/mixing-mastering/how-to-eq-vocals/
EQ in the postprocesing workflow
- gate (before compressor with its make-up gain)
- EQ cuts
- compression
- EQ boosts
- limiter
Roll off the low frequencies if the proximity effect is causing unusual > bassiness. Don’t roll off so much low end as the voice loses some of its umph. Yes, > I’m using “umph” as a technical word. Boost in the 1KHz to 5KHz range for improving intelligibility and clarity. Boost in the 3Khz to 6Khz range to add brightness. This can help with > speakers with poor intonation. Boost in the 4.5Khz to 6Khz range to add presence. Note that too much > boosting in this area can produce a thin lifeless sound. Boost in the 100Hz to 250Hz for a boomy effect In case your head is about to explode from an information overload, remember these key points; The above points can contradict each other. There is no hard and fast rule. Mixing is as much an art as a science. Trust your ears over everything else. It’s possible that once you EQ the vocal channel that it’s a little lacking in the low end. Boost it a bit give it that full sound. Again, trust your ears. Close your eyes and ask yourself if it a) sounds natural and b) sounds clear. https://www.behindthemixer.com/how-eq-speech-maximum-intelligibility/
Electric Signals, Noise, Discretization
Why is the microphone such a strange thing for us IT guys?
As programmers, IT technicians or system administrators we are used to highly complex systems, comprised of hardware, operating system, programming languages with their respective runtimes or interpreters, peripheral devices and software.
These machines are based on basic physical laws, electrons and their digitization.

To illustrate the various disciplines in physics, electrical engineering and computer sciende let’s have a look at the blackboard in the lecture “Circuits and Electronics” by Professor Anant Agarwal at the Massachusets Institure of Technology: About half a dozen disciplines fill his blackboard, and on the left we are dealing with simple electronic circuits and their behaviour that can be expressed in Volt, Ampere and Ohm.

Here is a visualization of the effect of noise when transmitting a combination of two signals.
Coming from the high-level digital world on the right side of the blackboard we IT people can dive into the analog world for example when experimenting with an Arduino or the GPIO pins of a Raspberry Pi.

Looking at the example again we see that just to determine if such a signal expresses a binary “on” or “off” poses a challenge – as everybody knows who tried to implement a bare-bones shutdown-button for the Raspberry Pi.
This is pretty for from the usual “Hello World!” example in our favorite programming languages!
Now I am coming back full circle:
The microphone is such a basic electrical device, producing electrical signals measured in 1/1000 of a Volt.
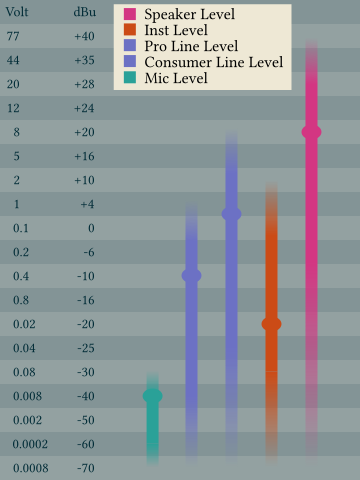
Here is a chart of the signals strengths with the equivalents of Volt and Decibels referenced in Voltage. (Yes, there is a straightforward conversion!) The microphone “transduces” a pretty low signal! One millivolt plus minus a half!
And on the way to our software on the operating system of our choice we need to traverse the whole blackboard of Professor Agarwal!

And on the way we inevitably are dealing with the same problems as before, noise and / or the need to digitize the signal (not only into binary 1 or zero but commonly into 16 bit, er even 24 or 32 bit).
All this is just my long-winded approach to re-state best practices in dealing with audio recordings from a microphone:

Produce the cleanest possible signal, raise it as quickly to line level, and use hardware dedicated to high quality conversion from the analog world to the digital world.
Next time you are using a microphone, remember the picture of noise sitting on top of a signal, and remeber the blackboard of Professor Agarwal!
//todo: incorporate analog playout //analog reconstruction of two consecutive digital samples peaking at 0 dBFS may result in an analog wave that peaks higher than either of the samples //https://www.mixinglessons.com/dbtp-decibel-true-peak/
Off-The-Shelf Technology
Audio Signal Chain
To sound good in webinars and on YouTube many small adjustments need to be made, and it is best to identify the components involved – so they can be adressed individually.
For the sake of completeness the room where we record should be put on the list first. As it will have sounds coming in from the outside, and sound reflecting within its walls.
The we obviously will talk into a microphone, one of the many types and models. A microphone converts soundwaves to analog audio signals.
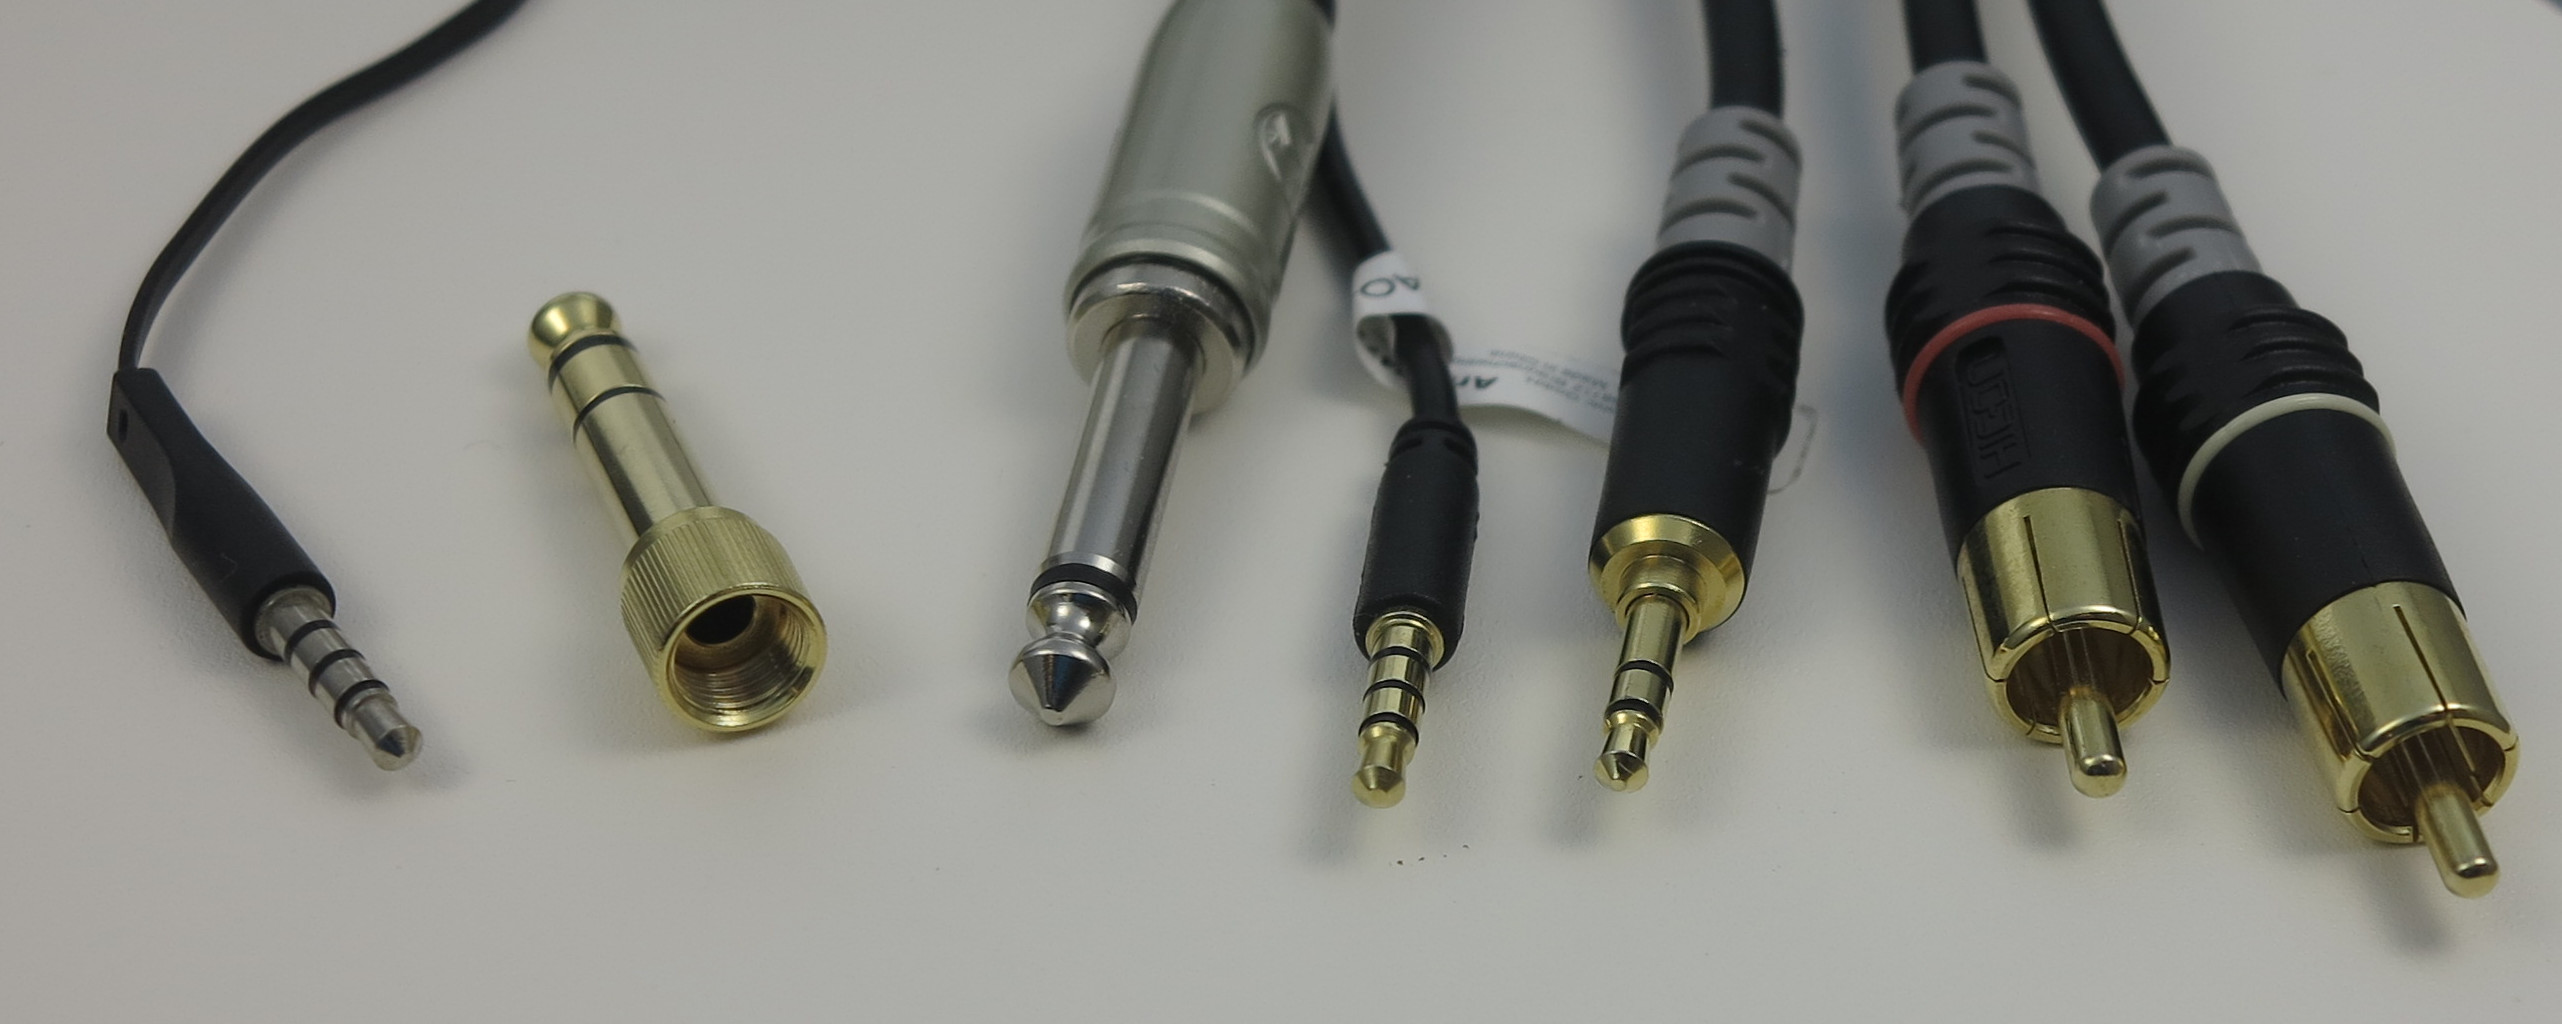
The cable connecting it will have 2 or three connections, and the connector will determine where we can plug it in. AND the cable will give us a hint about the level.
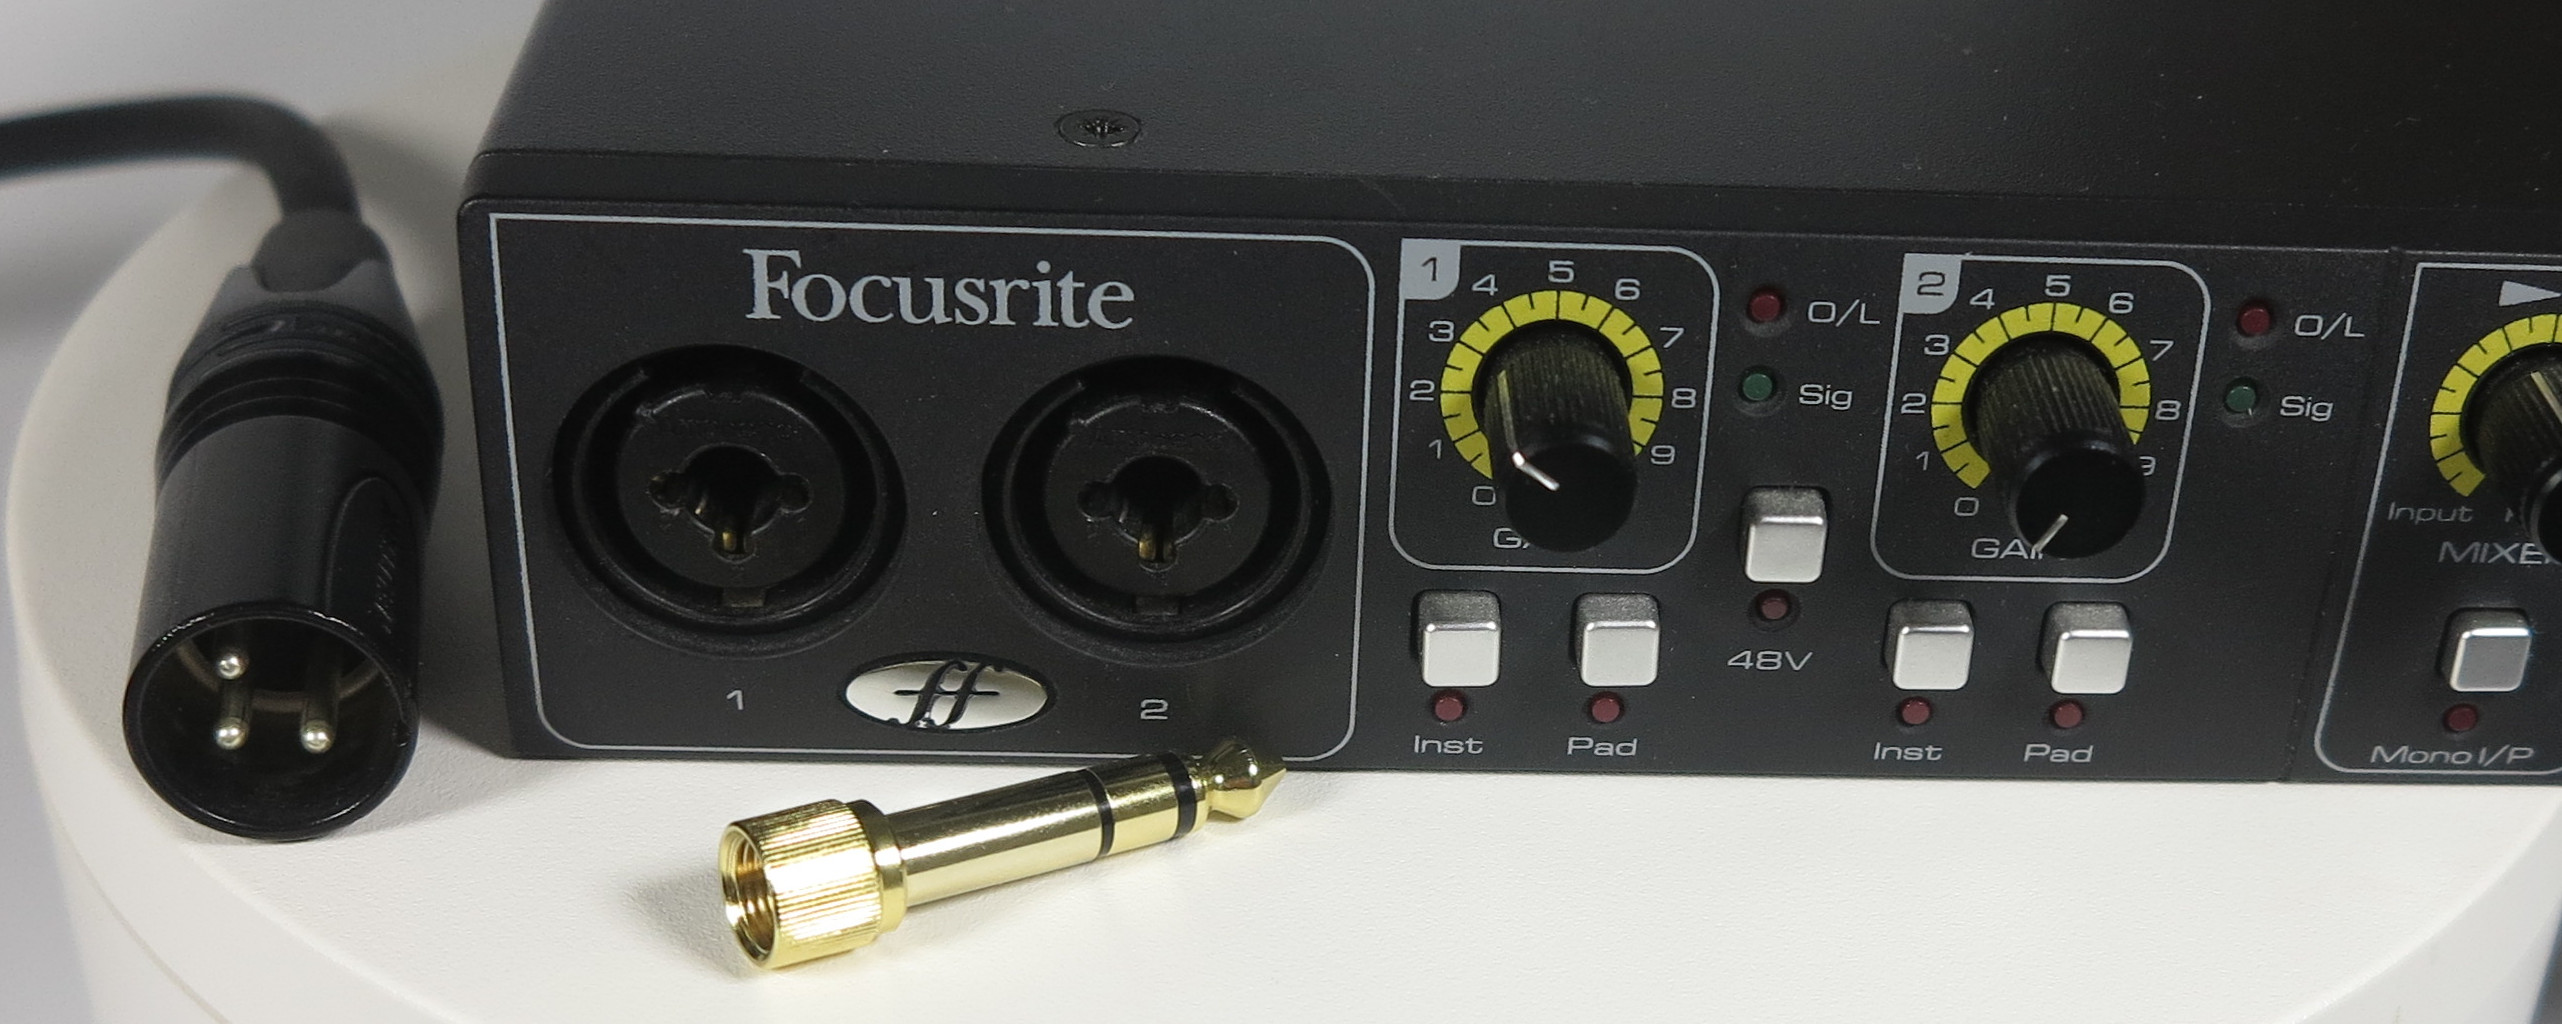
Within the cable run there is the possibility to insert an additional microphone pre-amplifier.
Preferrably a standalone audio interface will give us the microphone pre-amplification, knobs to turn the gain level, and will transform the analog signal into a digital.
By the way, a USB microphone “just” has a built-in audio interface.
On the computer that an audio interface is connected to many things can happen to the signal, like
- processing it with a digital workflow
- embedding it with video
- streaming it to YouTube
- storing it to in lossless or lossy formats
The signal chain does not end there though, let’s keep in mind that the viewer or listener will
Audio Cables and Plugs
Youlean Loudness Meter
OBS Multi-Track Recording
Applications
Makefile for youtube-dl
Any repetitive manual task should be automated, for example the analysis of a whole YouTube channel.
For speedy access to the videos the files need to be downloaded to the local harddrive, which is the core functionality of the Python-based commandline program youtube downloader and its improved fork yt-dl.
And a conveninet way to make this whole process repeateble is to write a shell script in the form of a Makefile. To run such files from the Unix world on Windows the WSL Windows Subsystem for Linux can be used.
The Makefile is published as a GitHub Gist https://gist.github.com/cprima/0d331d5a2c366688998071f6b61774fd
Result is that a few commands may be run daily and produce the raw material for an analysis.
Youtube downloader keeps track of the videos already downloaded in the past.
The metadata from YouTube is returned in JSON Format and again Python is a good technological fit to aggregate each individual file into a tabular format. A quick Jupyter Notebook does the job well.
#/**
# * Helper commands to analyse YouTube videos
# *
# * @author: Christian Prior-Mamulyan <cprior@gmail.com>
# * @license: MIT
# *
# * @usage: export YTCHANNELVIDEOURL=https://www.youtube.com/watch?v=iavXywwUh1c
# * @usage: make -e download_audio
# *
# * depends on https://github.com/yt-dlp/yt-dlp
# */

YTCHANNELBASEURL=https://www.youtube.com/channel/
YTCHANNELID=UCPdtz4gd_iYebJFYq9N8pWA
YTCHANNELVIDEOURL?=https://www.youtube.com/watch?v=7UN1xRN24xY
BATCH_FILE=urls.txt
ARCHIVE_FILE=archive.txt
SLEEP_REQUESTS=8
MIN_SLEEP_INTERVAL=8
MAX_SLEEP_INTERVAL=128
SUBTILES_LANG=en
LIMIT_RATE=5M
TROTTLED_RATE=50K
_BESTEALTHY=--limit-rate $(LIMIT_RATE) --throttled-rate $(TROTTLED_RATE) --min-sleep-interval $(MIN_SLEEP_INTERVAL) --max-sleep-interval $(MAX_SLEEP_INTERVAL) --sleep-requests $(SLEEP_REQUESTS)
_WRITEMETADATA=--write-url-link --write-info-json --write-description --write-info-json --write-thumbnail --write-auto-subs --sub-lang $(SUBTILES_LANG)


.PHONY: list_channel_videourls
list_channel_videourls:
	@echo "# pipe the output to e.g. >> $(BATCH_FILE)"
	@yt-dlp --get-filename --no-warnings --quiet -o "https://www.youtube.com/watch?v=%(id)s" $(addprefix $(YTCHANNELBASEURL),$(YTCHANNELID))

.PHONY: download_videos
download_videos:
	yt-dlp --limit-rate $(LIMIT_RATE) $(_BESTEALTHY) --continue --ignore-errors --no-overwrites --output "%(upload_date)s_%(acodec)s_%(asr)s_%(title)s.%(ext)s" --batch-file $(BATCH_FILE) $(_WRITEMETADATA)
Audacity and Room Reverb
UiPath Robot Process for YLM Automation
My favorite software for loudness analysis, Youlean Loudness Meter, cannot be automated out-of-the-box. But fortunately any type of GUI automation can be done not just with software from test automation but it is a core feature of RPA software, Robotic Process Automation. And with the aim to analyze the YouTube channel of Anders Jensen, RPA developer and Most Valuable Professional in forum of the software vendor “UiPath” – what would be a better fit than UiPath’s CV activities Computer Vision activities.
UiPath is the world’s leading RPA software company, started in 2015 in Bukarest, Romania and has since seen a rockeetship growth. Part of the capabilities of the development tool “UiPath Studio” are the Computer Visicion activities. Even such hard to automate GUIs like the one of Youlean Loudness Meter can be automated by Computer Vision’s AI-enhanced Click, Type into or dropdown select capabilities. All without having to resort to image scraping.
An efficient anylssis of Anders Jensen’s 350+ video was impossible without this UiPath Robot Process!